
Why You’ll Love This Chocolate Banana Protein Smoothie
- It tastes like dessert for breakfast. Seriously, the combination of ripe banana and rich cocoa powder creates a flavor that’s reminiscent of a chocolate milkshake, but without the guilt. It’s the perfect way to satisfy a sweet tooth first thing in the morning.
- It’s incredibly quick and forgiving. You can have this blended and ready to drink in under five minutes. No cooking, no fuss. And if you’re a little off with measurements? It’s a smoothie—it’s very hard to mess up. A little more banana, a little less milk? It’ll still be delicious.
- It’s a fantastic nutritional powerhouse. Between the protein, potassium from the banana, and antioxidants from the cocoa, this smoothie delivers a balanced mix of macronutrients that will keep you full and energized for hours. It’s a meal that truly works for you.
- The texture is unbeatably creamy. Using a frozen banana is the ultimate trick here. It gives the smoothie a thick, luscious, almost soft-serve-like consistency that you just can’t get from ice alone. It’s genuinely satisfying to sip on.
Ingredients & Tools
- 1 large ripe banana, preferably frozen
- 1 scoop (about 30 g) chocolate or vanilla protein powder
- 1 tablespoon unsweetened cocoa powder
- 1 cup (240 ml) milk of choice (dairy, almond, oat)
- 1/2 cup plain Greek yogurt or a dairy-free alternative
- 1 tablespoon nut butter (almond, peanut) or a seed butter
- Optional: A handful of spinach, a pinch of cinnamon, a dash of vanilla extract, or a pitted date for extra sweetness.
Tools: A good-quality blender is your best friend here.
The ingredients list is short and sweet for a reason. Each one plays a specific role—the banana for sweetness and creaminess, the protein powder for… well, protein, and the cocoa for that deep chocolate flavor. Using a high-quality protein powder you actually enjoy the taste of is key, as it can make or break the final flavor. And honestly, don’t skip the nut butter. It adds a subtle richness and healthy fats that make the smoothie much more satiating.
Serves: 1 | Prep Time: 5 minutes | Cook Time: 0 minutes | Total Time: 5 minutes
Before You Start: Tips & Ingredient Notes
- Freeze your bananas ahead of time. This is the single most important step for a creamy texture. Peel ripe bananas, break them into chunks, and freeze them on a parchment-lined tray before transferring to a bag. This prevents one giant banana iceberg in your blender.
- Choose your protein powder wisely. The flavor of your protein powder will shine through. If you’re using a vanilla one, you’ll get a more nuanced flavor. A chocolate one will double down on the chocolate intensity. Either works beautifully.
- Ripe bananas are non-negotiable. You want those bananas with plenty of brown spots. They are naturally sweeter and blend much more smoothly than a firm, yellow banana. This is your primary sweetener, so make it count.
- Think about your milk temperature. Using a cold liquid will help your smoothie stay thick and frosty. If you use room-temperature milk, it might thin out more quickly. For the ultimate thick shake consistency, every ingredient should be cold.
How to Make Chocolate Banana Protein Smoothie
Step 1: The Liquid Base First. This is a classic blender rule of thumb that really makes a difference. Pour your chosen milk into the blender pitcher first. This helps the blades move freely from the start, creating a vortex that pulls the other ingredients down smoothly. You’ll notice it just blends everything more evenly, preventing those frustrating chunks at the bottom.
Step 2: Add the Soft Ingredients. Next, spoon in the Greek yogurt and your nut butter. Adding these now, before the frozen elements, helps them incorporate more easily. If you’re using any optional liquid additives like vanilla extract, add them here too. The goal is to get the liquid and softer items swirling together to create a smooth base.
Step 3: The Powders and Greens. Now, add the protein powder and cocoa powder directly on top of the liquid. If you’re being sneaky with a handful of spinach, tuck it in now. A little trick—adding the powders before the frozen fruit can help prevent them from flying up and sticking to the sides of the blender jar, ensuring you get every last bit.
Step 4: The Star of the Show: Frozen Banana. Finally, add your frozen banana chunks. Placing them on top allows the blender blades to gradually break them down without getting stuck. If you add the frozen stuff first, the blades can sometimes just spin uselessly on top of a solid block—we’ve all been there.
Step 5: Blend to Perfection. Start your blender on a low speed and gradually increase to high. Let it run for 45-60 seconds, or until the mixture is completely smooth, with no visible chunks of banana or streaks of powder. You’ll hear the sound change from a labored churning to a smooth, high-pitched whir. If it’s struggling to blend, pause, use a tamper if your blender has one, or add a tiny splash more milk to get things moving.
Step 6: Taste and Adjust. This is the most important chef’s step! Pour a little into your glass and taste it. Is it sweet enough? The ripeness of bananas can vary. If you’d like it sweeter, add half a pitted date or a tiny drizzle of maple syrup and blend for another 10 seconds. Want it thicker? Add a couple of ice cubes. Thinner? A bit more milk. Make it yours.
Step 7: Serve Immediately. Pour your beautifully creamy, chocolatey creation into a tall glass. Smoothies are best enjoyed right away, as they can separate and become watery if left to sit. But if you must… see the FAQs for a make-ahead tip!
Serving Suggestions
Complementary Dishes
- A slice of whole-wheat toast with avocado — The creamy, savory fat from the avocado provides a lovely contrast to the sweet, cold smoothie, making for a very balanced and satisfying meal.
- A small handful of almonds or walnuts on the side — The extra crunch and healthy fats complement the drinkable meal and add another layer of texture to your breakfast or snack.
Drinks
- A tall glass of cold water with lemon — It might sound simple, but staying hydrated is key, especially after a workout. The lemon adds a refreshing zing that cleanses the palate after the rich chocolate flavor.
- A hot cup of black coffee or herbal tea — The warmth of the coffee or tea is a fantastic contrast to the cold smoothie, creating a well-rounded breakfast experience.
Something Sweet
- A few fresh raspberries or strawberries — The bright, slightly tart burst of fresh berries after a sip of the chocolatey smoothie is an absolute delight and adds a dose of freshness.
- A single square of dark chocolate — For the true chocolate lover, enjoying a piece of high-quality dark chocolate alongside the smoothie doubles down on the decadence in the best way possible.
Top Mistakes to Avoid
- Mistake: Using fresh, unfrozen bananas. This is the number one reason for a watery, thin smoothie. The frozen banana is crucial for that thick, milkshake-like texture. I’ve made this mistake when I was out of frozen ones, and the difference is night and day.
- Mistake: Adding ingredients in the wrong order. Putting the frozen fruit and powders in first can cause blender cavitation—where the blades just spin in a pocket of air. Always start with liquids to protect your blender motor and ensure a smooth blend.
- Mistake: Not tasting before serving. Ingredients vary! Your banana might be less sweet, your protein powder might be more potent. Always do a quick taste test and adjust the sweetness or thickness to your personal preference. It takes five seconds and ensures you love the final product.
- Mistake: Over-blending. Once it’s smooth, it’s done. Letting the blender run for several minutes can actually start to warm up the smoothie from the friction of the blades, melting your perfectly achieved frosty texture.
Expert Tips
- Tip: Make smoothie packs for busy mornings. Portion all the dry and frozen ingredients (banana, protein powder, cocoa powder) into a zip-top bag and store it in the freezer. In the morning, just dump the bag into the blender, add your liquid and yogurt, and blend. It cuts down morning prep to literally seconds.
- Tip: Boost the nutrition silently. A handful of fresh spinach is virtually undetectable in terms of flavor but adds a great nutrient boost. For an extra fiber kick, try adding a tablespoon of ground flaxseed or chia seeds—they blend in seamlessly.
- Tip: Create a flavor swirl. For a fancy touch, blend the smoothie as directed, then drizzle a little extra nut butter or some sugar-free chocolate syrup inside the glass before pouring. As you pour, it will create a beautiful marbled effect.
- Tip: Turn it into a smoothie bowl. If you want to eat it with a spoon, reduce the milk by about a quarter cup. Blend until it’s super thick and spoonable, then pour it into a bowl and top with granola, coconut flakes, and sliced fruit for a truly Instagram-worthy meal.
FAQs
Can I make this smoothie ahead of time?
You can, but the texture is best right after blending. If you need to prep it, your best bet is to make it and store it in a sealed jar in the fridge for up to 24 hours. Give it a really good shake or a quick re-blend before drinking, as it will separate. For longer storage, freeze it in a jar (leave an inch of space at the top for expansion) and thaw it in the fridge overnight. The texture might be a little less perfect, but it’ll still taste great.
I don’t have protein powder. Can I skip it?
Absolutely! The smoothie will still be delicious, just less protein-packed. To add some natural protein and maintain creaminess, you could increase the Greek yogurt to a full cup or add a quarter cup of cottage cheese (it sounds weird, but it blends in completely and you won’t taste it!). Another option is to use a tablespoon of hemp seeds, which add protein, healthy fats, and a slight nutty flavor.
My smoothie turned out too thick/thin. How can I fix it?
No problem, this is an easy fix! If it’s too thick and your blender is struggling, stop blending and add a tablespoon more of milk at a time until it reaches your desired consistency. If it’s too thin, you have a couple of options: add a few ice cubes and blend again, or add half a frozen banana or even a tablespoon of rolled oats to thicken it up without watering it down.
Can I use a different fruit instead of banana?
The banana is key for the creamy texture and natural sweetness, but you can experiment. Frozen mango or frozen cauliflower rice (seriously!) can provide a neutral base and creamy texture. Just note that the flavor will change significantly, and you may need to adjust the sweetness with a date or a drop of maple syrup, especially if using cauliflower.
Is this smoothie good for a post-workout recovery drink?
It’s an excellent choice! The combination of carbohydrates from the banana to replenish glycogen stores and protein from the powder/yogurt to aid muscle repair makes it ideal for consuming within that 30-60 minute post-exercise window. It’s easily digestible and delivers the nutrients your body needs to recover effectively.
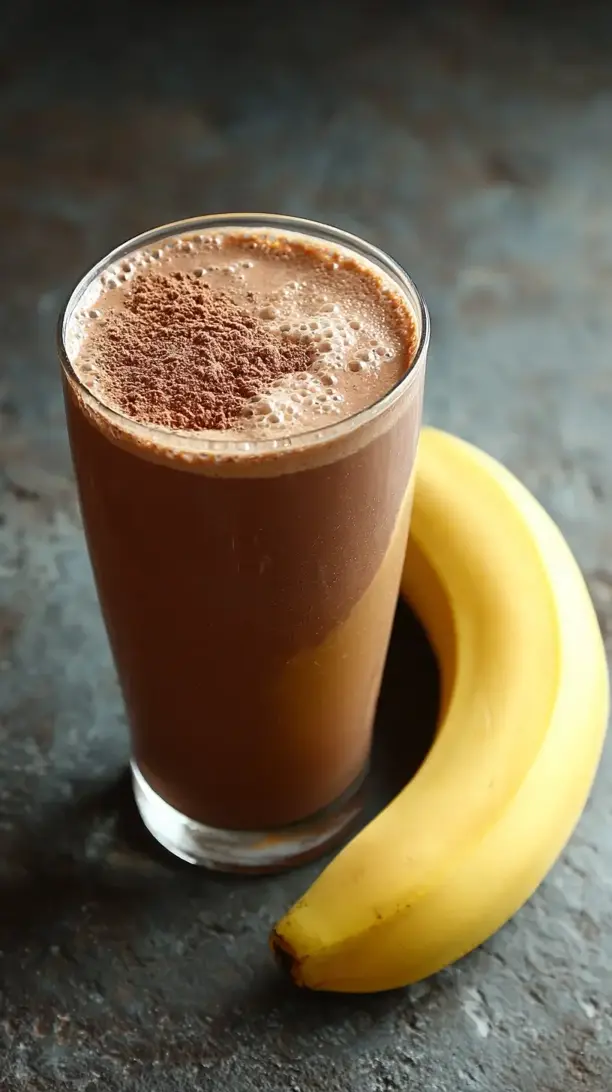
Chocolate Banana Protein Smoothie
Whip up a creamy Chocolate Banana Protein Smoothie in 5 minutes! This healthy, post-workout shake tastes like dessert but fuels your day. Get my easy, no-fuss recipe.
Ingredients
Ingredients
-
1 large ripe banana (preferably frozen)
-
1 scoop chocolate or vanilla protein powder (about 30 g)
-
1 tablespoon unsweetened cocoa powder
-
1 cup milk of choice (dairy, almond, oat (240 ml))
-
1/2 cup plain Greek yogurt or dairy-free alternative
-
1 tablespoon nut butter (almond, peanut or seed butter)
-
Optional ingredients (handful of spinach, pinch of cinnamon, dash of vanilla extract, pitted date for extra sweetness)
Instructions
-
The Liquid Base First. This is a classic blender rule of thumb that really makes a difference. Pour your chosen milk into the blender pitcher first. This helps the blades move freely from the start, creating a vortex that pulls the other ingredients down smoothly. You'll notice it just blends everything more evenly, preventing those frustrating chunks at the bottom.01
-
Add the Soft Ingredients. Next, spoon in the Greek yogurt and your nut butter. Adding these now, before the frozen elements, helps them incorporate more easily. If you're using any optional liquid additives like vanilla extract, add them here too. The goal is to get the liquid and softer items swirling together to create a smooth base.02
-
The Powders and Greens. Now, add the protein powder and cocoa powder directly on top of the liquid. If you're being sneaky with a handful of spinach, tuck it in now. A little trick—adding the powders before the frozen fruit can help prevent them from flying up and sticking to the sides of the blender jar, ensuring you get every last bit.03
-
The Star of the Show: Frozen Banana. Finally, add your frozen banana chunks. Placing them on top allows the blender blades to gradually break them down without getting stuck. If you add the frozen stuff first, the blades can sometimes just spin uselessly on top of a solid block—we've all been there.04
-
Blend to Perfection. Start your blender on a low speed and gradually increase to high. Let it run for 45-60 seconds, or until the mixture is completely smooth, with no visible chunks of banana or streaks of powder. You'll hear the sound change from a labored churning to a smooth, high-pitched whir. If it's struggling to blend, pause, use a tamper if your blender has one, or add a tiny splash more milk to get things moving.05
-
Taste and Adjust. This is the most important chef's step! Pour a little into your glass and taste it. Is it sweet enough? The ripeness of bananas can vary. If you'd like it sweeter, add half a pitted date or a tiny drizzle of maple syrup and blend for another 10 seconds. Want it thicker? Add a couple of ice cubes. Thinner? A bit more milk. Make it yours.06
-
Serve Immediately. Pour your beautifully creamy, chocolatey creation into a tall glass. Smoothies are best enjoyed right away, as they can separate and become watery if left to sit. But if you must... see the FAQs for a make-ahead tip!07