
Why You’ll Love This Chocolate Banana Protein Muffins
- They’re secretly packed with protein. Thanks to a clever combo of protein powder and Greek yogurt, these muffins will keep you full and energized for hours, making them a far cry from the empty-calorie muffins you might find at a coffee shop.
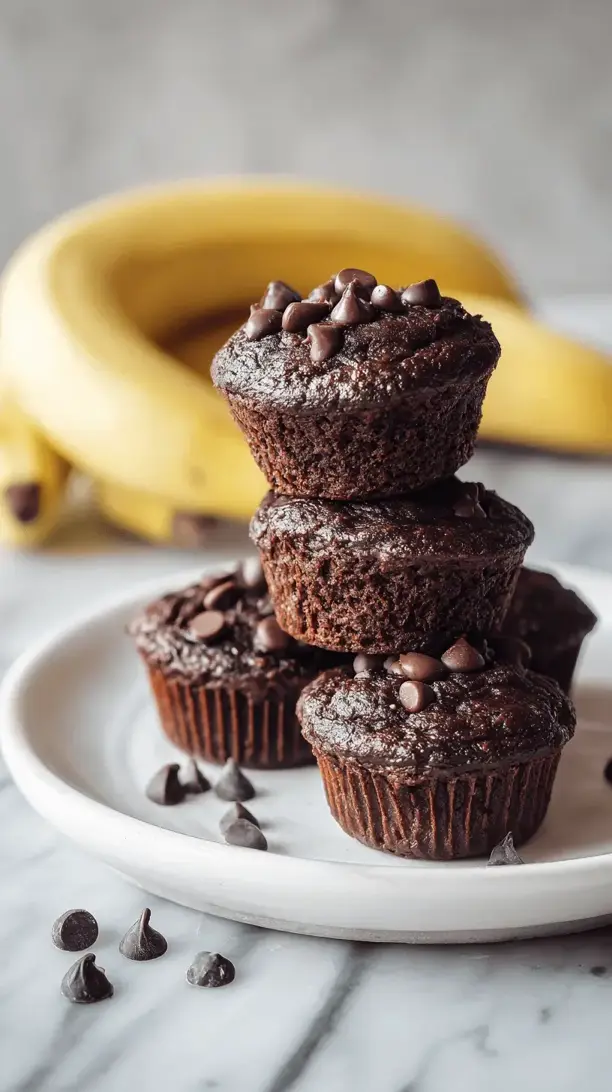
- The texture is absolutely dreamy. We’re talking about a moist, tender crumb that’s studded with melty chocolate chips. They’re not dense or chalky like some healthy baked goods can be—honestly, they feel like a real indulgence.
- They’re a fantastic way to use up ripe bananas. You know those bananas turning brown on your counter? This is their glorious destiny. The riper they are, the sweeter and more flavorful your muffins will be, which means less need for extra sugar.
- Meal prep heaven. These muffins freeze like a dream. Just pop them in a freezer bag, and you’ve got a healthy, grab-and-go breakfast or snack ready whenever you need it. A little reheating is all it takes.
Ingredients & Tools
- 3 large very ripe bananas (about 1 ½ cups mashed)
- 2 large eggs, at room temperature
- 1/2 cup (120 g) plain Greek yogurt
- 1/4 cup (60 ml) maple syrup or honey
- 1/4 cup (60 ml) melted coconut oil (or avocado oil)
- 1 tsp pure vanilla extract
- 1 ½ cups (180 g) oat flour (see notes!)
- 1/2 cup (60 g) chocolate protein powder (vanilla works too)
- 1 tsp baking soda
- 1/2 tsp baking powder
- 1/4 tsp salt
- 1/2 cup (90 g) dark chocolate chips, plus more for topping
Tools: 12-cup muffin tin, muffin liners, two mixing bowls, whisk, fork or potato masher for bananas, ice cream scoop (optional but helpful).
The quality of your ingredients really shines through here. Using a good-quality protein powder you enjoy the taste of is key, and those overripe bananas are non-negotiable for natural sweetness and moisture.
Serves: 12 | Prep Time: 15 minutes | Cook Time: 20-22 minutes | Total Time: 40 minutes
Before You Start: Tips & Ingredient Notes
- How ripe is “very ripe”? We’re talking bananas that are covered in brown spots, maybe even mostly brown. They should mash easily with a fork and smell intensely sweet. This is the single biggest factor for a naturally sweet muffin.
- Oat flour from scratch? Absolutely! If you don’t have store-bought oat flour, just blend rolled oats in a high-speed blender or food processor until they form a fine powder. It’s incredibly easy and often more economical.
- Choosing your protein powder. I highly recommend a whey-casein blend or a plant-based blend for the best texture. Steer clear of 100% whey isolate if you can, as it can sometimes make baked goods a bit rubbery. The flavor of your powder will come through, so pick one you like!
- Why room temperature eggs? This is a small but mighty detail. Room-temperature eggs incorporate into the batter more evenly, leading to a better rise and a more uniform texture. If you forgot, just place your eggs in a bowl of warm water for 5-10 minutes.
How to Make Chocolate Banana Protein Muffins
Step 1: First, preheat your oven to 350°F (175°C) and line a muffin tin with 12 liners. This gives the oven plenty of time to come to the right temperature—a hot oven is crucial for that initial muffin rise. Now, grab those bananas and mash them thoroughly in a large mixing bowl. You want them to be relatively smooth, with just a few small lumps for texture. The aroma is already starting to smell like promise!
Step 2: To the mashed bananas, add the eggs, Greek yogurt, maple syrup, melted coconut oil, and vanilla extract. Whisk everything together until it’s well combined and smooth. You’ll notice the mixture might look a little curdled at first because of the oil, but just keep whisking—it will come together into a lovely, homogenous liquid base. This is your wet ingredient team, ready to go.
Step 3: In a separate, medium-sized bowl, whisk together the dry ingredients: the oat flour, protein powder, baking soda, baking powder, and salt. Whisking these together beforehand is a non-negotiable step—it ensures the leavening agents are evenly distributed, so every muffin rises perfectly and you don’t get a bitter bite of baking soda. It only takes a minute but makes a world of difference.
Step 4: Now, pour the dry ingredients into the wet ingredients. Switch to a spatula and gently fold the mixture together. The trick is to stop mixing as soon as you no longer see streaks of dry flour. A few lumps are totally fine! Overmixing is the enemy of tender muffins, as it develops the gluten in the oat flour and can make them tough.
Step 5: Once the batter is just combined, fold in the dark chocolate chips. Reserve a small handful to sprinkle on top for a bakery-style finish. Using an ice cream scoop or a 1/4-cup measure, divide the batter evenly among the 12 muffin liners. They should be about 3/4 full. Top each one with the reserved chocolate chips.
Step 6: Bake for 20-22 minutes, or until the tops are springy to the touch and a toothpick inserted into the center of a muffin comes out clean (minus any melted chocolate, of course!). The smell in your kitchen will be absolutely divine. Let the muffins cool in the pan for 5 minutes before transferring them to a wire rack to cool completely. This waiting period is tough, but it helps them set properly.
Serving Suggestions
Complementary Dishes
- A bowl of fresh berries — The bright, tart acidity of strawberries or raspberries cuts through the richness of the chocolate beautifully, creating a perfectly balanced bite.
- A side of Greek yogurt with a drizzle of nut butter — For a more substantial breakfast, this adds even more protein and healthy fats, turning your muffin into a complete and satisfying meal.
Drinks
- A cold glass of milk or unsweetened almond milk — It’s a classic for a reason. The creaminess is the perfect partner for chocolate, making it feel like a real treat.
- A hot cup of black coffee — The bitterness of a good brew highlights the deep chocolate notes in the muffin without adding any extra sweetness to your morning.
Something Sweet
- A small scoop of vanilla bean ice cream — Honestly, serve one of these muffins slightly warmed with a scoop of ice cream and you have an instant, guilt-free dessert that feels incredibly decadent.
- A drizzle of salted caramel sauce — For a special occasion, a little drizzle over the top takes these from a healthy snack to a dinner-party-worthy finale.
Top Mistakes to Avoid
- Mistake: Using underripe bananas. This is the number one error. Green or yellow bananas lack the necessary sweetness and moisture, which will result in a bland, dry muffin. Patience is key—wait for those spots!
- Mistake: Overmixing the batter. I’ve messed this up before too… you want a smooth batter, right? But vigorous stirring develops gluten, leading to dense, tough muffins. Fold gently until just combined.
- Mistake: Skipping the muffin liners or greasing the pan. Even with oil in the batter, these can stick. Liners make for easy cleanup and perfect presentation every single time.
- Mistake: Overbaking. Set a timer! Check at the 20-minute mark. An overbaked muffin will be dry. Remember, they continue to cook a little from residual heat as they cool in the pan.
Expert Tips
- Tip: Weigh your oat flour. If you have a kitchen scale, use it! Cup measurements can vary wildly depending on how you scoop. 180 grams is the most accurate way to ensure the perfect texture.
- Tip: Customize your mix-ins. Not a dark chocolate fan? Swap the chips for an equal amount of chopped walnuts, pecans, or even dried cherries for a different flavor profile each time you bake.
- Tip: Freeze individual muffins for instant snacks. Once completely cool, wrap each muffin tightly in plastic wrap and place them all in a large freezer bag. They’ll keep for up to 3 months. To thaw, just leave one on the counter for an hour or microwave for 30-45 seconds.
- Tip: Create a bakery-style dome. For those picture-perfect muffin tops, start the baking temperature at 425°F (220°C) for 5 minutes, then reduce to 350°F (175°C) for the remaining time. The initial blast of high heat gives them a great rise.
FAQs
Can I make these gluten-free?
Yes, they are naturally gluten-free as long as you use certified gluten-free oat flour. Oats are naturally gluten-free, but they are often processed in facilities that also handle wheat, so if you have a sensitivity, checking the label is important. Everything else in the recipe is inherently gluten-free, so you’re good to go!
My batter seems really thick. Is that normal?
Yes, it’s meant to be a fairly thick batter, which is what helps create those nice, domed muffin tops. If it seems *excessively* thick, almost like cookie dough, it could be that your bananas were on the smaller side or your oat flour was packed too tightly into the measuring cup. A tiny splash of milk (a tablespoon or so) can loosen it up if needed.
Can I use a different type of protein powder?
You can, but the results may vary. Vanilla or unflavored protein powder works perfectly well. I’d avoid strongly flavored powders like strawberry or cookies and cream, as they might clash with the chocolate and banana. Plant-based powders like pea or brown rice protein work, but they can yield a denser, slightly grittier texture compared to whey or blends.
How should I store these muffins?
Once completely cool, store them in an airtight container at room temperature for up to 2 days. For longer storage, I highly recommend the refrigerator (up to 5 days) or the freezer (up to 3 months). The protein content means they can spoil faster than a standard muffin, so chilling or freezing is your best bet.
Can I make this into a loaf instead?
Absolutely! This batter works wonderfully for a banana bread. Just pour it into a greased 9×5 inch loaf pan and bake at 350°F (175°C) for 50-60 minutes, or until a toothpick inserted into the center comes out clean. The baking time will be significantly longer, so keep an eye on it after the 45-minute mark.
Chocolate Banana Protein Muffins
Whip up my Chocolate Banana Protein Muffins! A healthy, grab-and-go breakfast packed with protein & natural sweetness. Easy recipe with simple ingredients for a guilt-free treat.
Ingredients
Ingredients
-
3 large very ripe bananas (about 1 ½ cups mashed)
-
2 large eggs (at room temperature)
-
1/2 cup plain Greek yogurt (120 g)
-
1/4 cup maple syrup or honey (60 ml)
-
1/4 cup melted coconut oil (60 ml (or avocado oil))
-
1 tsp pure vanilla extract
-
1 ½ cups oat flour (180 g)
-
1/2 cup chocolate protein powder (60 g (vanilla works too))
-
1 tsp baking soda
-
1/2 tsp baking powder
-
1/4 tsp salt
-
1/2 cup dark chocolate chips (90 g, plus more for topping)
Instructions
-
First, preheat your oven to 350°F (175°C) and line a muffin tin with 12 liners. This gives the oven plenty of time to come to the right temperature—a hot oven is crucial for that initial muffin rise. Now, grab those bananas and mash them thoroughly in a large mixing bowl. You want them to be relatively smooth, with just a few small lumps for texture. The aroma is already starting to smell like promise!01
-
To the mashed bananas, add the eggs, Greek yogurt, maple syrup, melted coconut oil, and vanilla extract. Whisk everything together until it’s well combined and smooth. You’ll notice the mixture might look a little curdled at first because of the oil, but just keep whisking—it will come together into a lovely, homogenous liquid base. This is your wet ingredient team, ready to go.02
-
In a separate, medium-sized bowl, whisk together the dry ingredients: the oat flour, protein powder, baking soda, baking powder, and salt. Whisking these together beforehand is a non-negotiable step—it ensures the leavening agents are evenly distributed, so every muffin rises perfectly and you don’t get a bitter bite of baking soda. It only takes a minute but makes a world of difference.03
-
Now, pour the dry ingredients into the wet ingredients. Switch to a spatula and gently fold the mixture together. The trick is to stop mixing as soon as you no longer see streaks of dry flour. A few lumps are totally fine! Overmixing is the enemy of tender muffins, as it develops the gluten in the oat flour and can make them tough.04
-
Once the batter is just combined, fold in the dark chocolate chips. Reserve a small handful to sprinkle on top for a bakery-style finish. Using an ice cream scoop or a 1/4-cup measure, divide the batter evenly among the 12 muffin liners. They should be about 3/4 full. Top each one with the reserved chocolate chips.05
-
Bake for 20-22 minutes, or until the tops are springy to the touch and a toothpick inserted into the center of a muffin comes out clean (minus any melted chocolate, of course!). The smell in your kitchen will be absolutely divine. Let the muffins cool in the pan for 5 minutes before transferring them to a wire rack to cool completely. This waiting period is tough, but it helps them set properly.06


