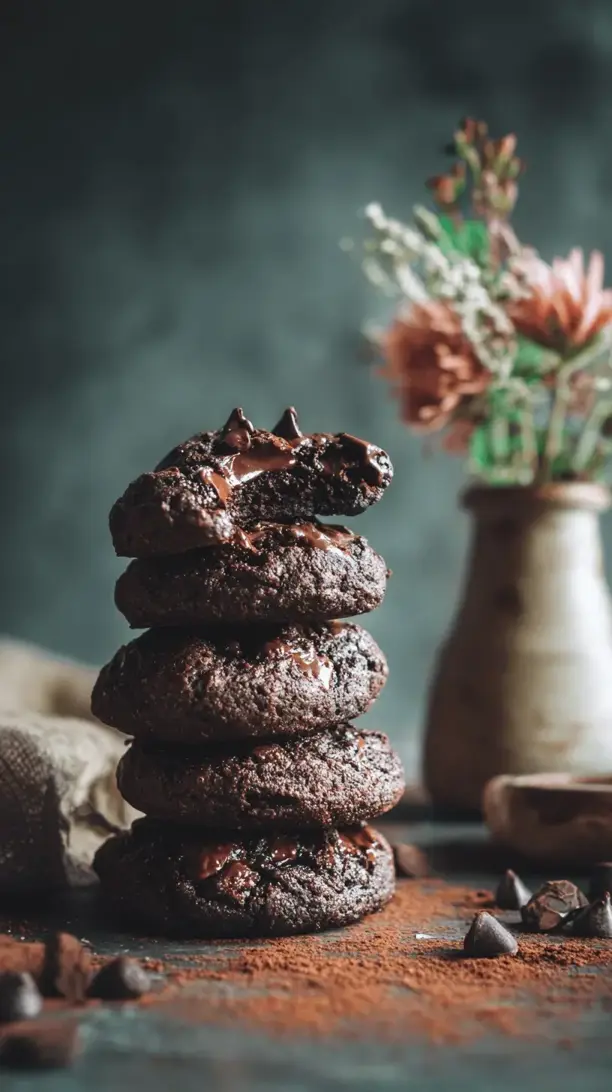
Why You’ll Love This Chocolate Avocado Cookies
- Unbelievably Fudgy Texture. The mashed avocado creates an incredibly moist and dense cookie that’s almost brownie-like in the center, without any hint of greasiness.
- Secretly Wholesome. You’re swapping out butter for a fruit packed with good fats, making these feel like a slightly virtuous treat that doesn’t skimp on indulgence.
- One-Bowl Wonder. Honestly, the cleanup is minimal. You mash, you mix, you scoop—it’s that simple and quick, perfect for a spontaneous baking session.
- Deep, Rich Chocolate Flavor. Using both cocoa powder and chocolate chips gives you a double hit of chocolate that’s intense and deeply satisfying, with little melty pockets throughout.
Ingredients & Tools
- 1 large ripe avocado (about 150g flesh)
- 100 g light brown sugar
- 50 g granulated sugar
- 1 large egg
- 1 tsp vanilla extract
- 30 g cocoa powder (Dutch-processed is ideal)
- 120 g all-purpose flour
- 1/2 tsp baking soda
- 1/4 tsp salt
- 100 g dark chocolate chips or chunks
Tools: A medium mixing bowl, a fork or potato masher, a whisk or spatula, a baking sheet, and parchment paper.
The key here is a perfectly ripe avocado—it should yield gently to pressure. That ensures it mashes smoothly and blends seamlessly into the batter, leaving no green streaks behind.
Nutrition (per serving)
- Calories: 145 kcal
- Protein: 2.5 g
- Fat: 6 g
- Carbohydrates: 22 g
- Fiber: 2 g
Serves: 12 | Prep Time: 15 minutes | Cook Time: 10-12 minutes | Total Time: 27 minutes
Before You Start: Tips & Ingredient Notes
- Avocado Ripeness is Everything. You need an avocado that’s soft but not bruised. If it’s underripe, it won’t mash properly; if it’s overripe, it might have a slightly off flavor.
- Don’t Skip the Two Sugars. The brown sugar adds moisture and a hint of caramel, while the granulated sugar helps the cookies spread and get those lovely crisp edges. The combination is magic.
- Scoop for Consistency. Using a cookie scoop or a tablespoon measure ensures all your cookies are the same size, which means they’ll bake evenly and you won’t have some raw and some burnt.
- Quality Cocoa Makes a Difference. Since chocolate is the star here, a good-quality cocoa powder (I prefer Dutch-processed for its deeper color and flavor) really elevates the entire cookie.
How to Make Chocolate Avocado Cookies
Step 1: First, preheat your oven to 175°C (350°F) and line a baking sheet with parchment paper. Now, let’s tackle the avocado. Slice it in half, remove the pit, and scoop the beautiful green flesh into your mixing bowl. Take a fork or a potato masher and go to town on it until it’s completely smooth, with no lumps whatsoever. You’re aiming for a creamy, almost pudding-like consistency. This is the foundation of your cookie’s texture, so be thorough!
Step 2: To the beautifully mashed avocado, add both the brown and granulated sugars. Use a whisk or a sturdy spatula to beat them together for a good minute or two. You’ll notice the mixture lighten in color slightly and become a bit fluffy—this is what you want! It helps incorporate air, giving the cookies a little lift. Now, crack in the egg and add the vanilla extract. Mix again until everything is completely combined and the batter looks uniform.
Step 3: It’s time for the dry ingredients. Sift the cocoa powder, flour, baking soda, and salt directly into the wet mixture. Sifting is important here—it prevents lumps of cocoa or flour in your final cookies and ensures a tender crumb. Use a spatula to gently fold everything together. Be careful not to overmix! Stop as soon as you no longer see streaks of flour. The dough will be quite thick and fudgy.
Step 4: Now for the best part—the chocolate chips! Fold in the dark chocolate chips or chunks until they’re evenly distributed throughout the thick, chocolatey dough. I like to reserve a small handful to press onto the tops of the scooped cookies before baking; it makes them look extra inviting.
Step 5: Using a cookie scoop or a tablespoon, drop rounded mounds of dough onto your prepared baking sheet, leaving about 5 cm (2 inches) between them as they will spread a little. If you saved some chocolate chips, now’s the time to gently press a few onto the top of each dough ball.
Step 6: Bake for 10-12 minutes. The trick is to pull them out when the edges look set and maybe even a little crackly, but the centers still appear soft and slightly underdone. They will continue to cook on the hot baking sheet as they cool. Let them rest on the tray for at least 5 minutes—this is crucial for them to set up properly. Then, transfer them to a wire rack to cool completely… or, you know, enjoy one warm and gooey.
Serving Suggestions
Complementary Dishes
- A scoop of vanilla bean ice cream — The classic cold creaminess melting into the warm, fudgy cookie is a timeless combination that feels like a hug.
- A small bowl of fresh berries — The bright, tart pop of a raspberry or strawberry cuts through the rich chocolate beautifully, balancing each bite.
Drinks
- A tall glass of cold milk — It’s a classic for a reason. The creaminess of the milk is the perfect partner to a rich, chocolatey dessert.
- A shot of espresso — The bitterness of a strong coffee enhances the deep cocoa notes in the cookie and makes the whole experience feel a bit more sophisticated.
Something Sweet
- Orange segments dipped in dark chocolate — This continues the chocolate theme but introduces a bright, citrusy note that cleanses the palate wonderfully.
- A small piece of peppermint bark — The cool mint provides a refreshing contrast and makes the entire dessert feel festive and fun.
Top Mistakes to Avoid
- Overmixing the Dough. Once you add the flour, mix just until combined. Overworking the gluten will make your cookies tough instead of tender and fudgy.
- Using an Underripe Avocado. If your avocado is hard and doesn’t mash into a smooth paste, you’ll end up with little green chunks in your cookies, which isn’t the end of the world but isn’t ideal for texture.
- Overbaking. These cookies are meant to be soft in the center. If you wait for the center to look fully cooked in the oven, they’ll be dry and cakey by the time they cool. Trust the soft center!
- Not Letting Them Cool on the Pan. I know it’s tempting to move them right away, but those 5 minutes on the hot baking sheet are essential for them to set up without falling apart.
Expert Tips
- Tip: Chill the Dough if Your Kitchen is Warm. If your avocado was particularly ripe or your kitchen is hot, the dough might be a bit sticky. Pop it in the fridge for 20-30 minutes. This firms up the fats, preventing the cookies from spreading too much and becoming thin.
- Tip: Add a Pinch of Espresso Powder. You won’t taste coffee, I promise. Adding just a quarter teaspoon of espresso powder to the dry ingredients intensifies and deepens the chocolate flavor, making it taste even more chocolatey.
- Tip: Experiment with Mix-ins. While chocolate chips are classic, feel free to swap in an equal amount of toasted walnuts, pecans, or even a handful of dried cherries for a different texture and flavor profile.
- Tip: Make Them Salted. Right when the cookies come out of the oven, while they’re still hot and soft, sprinkle a tiny pinch of flaky sea salt over the top. The salt makes the chocolate flavor pop in the most incredible way.
FAQs
Can I taste the avocado?
Honestly, no, not if your avocado is ripe and you mash it thoroughly. The cocoa powder and sugars completely overpower any subtle avocado flavor. What you’re left with is an incredibly rich, moist chocolate cookie that people will be puzzled by when you reveal the secret ingredient. The avocado’s role is purely textural, providing that fantastic fudgy quality and healthy fats.
Can I make these cookies vegan?
You can certainly try! For the egg, a flax egg (1 tbsp ground flaxseed mixed with 3 tbsp water, left to thicken for 5 minutes) usually works well as a binder in dense, fudgy recipes like this one. Also, be sure to use dairy-free chocolate chips. The texture might be a tiny bit more delicate, but they should still be delicious.
How should I store these cookies?
Because of the moisture from the avocado, it’s best to store them in an airtight container at room temperature for up to 2 days. For longer storage, I’d recommend freezing them. Place the cooled cookies in a single layer on a baking sheet to freeze solid, then transfer to a freezer bag. They’ll keep for up to 2 months.
My cookies didn’t spread much. What happened?
This usually points to two things: either your avocado wasn’t ripe enough (leading to a stiffer dough) or your dough was too cold when it went into the oven. Remember, the fats in the avocado need to be at a soft, room-temperature consistency to allow for proper spreading. If your kitchen is cool, just let the scooped dough sit on the counter for 10-15 minutes before baking.
Can I use a different type of flour?
I’ve had success with a 1:1 gluten-free flour blend, and the cookies turn out great. Whole wheat pastry flour can also work, though it will make the cookies a bit denser and give them a slightly nuttier flavor. I wouldn’t recommend using almond or coconut flour, as they behave very differently and would throw off the texture completely.
Chocolate Avocado Cookies
Discover the magic of Chocolate Avocado Cookies! This easy, one-bowl recipe yields fudgy, rich cookies with a healthy twist. Get the secret to perfect cookies now.
Ingredients
For the Ingredients
-
1 large ripe avocado (about 150g flesh)
-
100 g light brown sugar
-
50 g granulated sugar
-
1 large egg
-
1 tsp vanilla extract
-
30 g cocoa powder (Dutch-processed is ideal)
-
120 g all-purpose flour
-
1/2 tsp baking soda
-
1/4 tsp salt
-
100 g dark chocolate chips or chunks
Instructions
-
First, preheat your oven to 175°C (350°F) and line a baking sheet with parchment paper. Now, let’s tackle the avocado. Slice it in half, remove the pit, and scoop the beautiful green flesh into your mixing bowl. Take a fork or a potato masher and go to town on it until it’s completely smooth, with no lumps whatsoever. You’re aiming for a creamy, almost pudding-like consistency. This is the foundation of your cookie’s texture, so be thorough!01
-
To the beautifully mashed avocado, add both the brown and granulated sugars. Use a whisk or a sturdy spatula to beat them together for a good minute or two. You’ll notice the mixture lighten in color slightly and become a bit fluffy—this is what you want! It helps incorporate air, giving the cookies a little lift. Now, crack in the egg and add the vanilla extract. Mix again until everything is completely combined and the batter looks uniform.02
-
It’s time for the dry ingredients. Sift the cocoa powder, flour, baking soda, and salt directly into the wet mixture. Sifting is important here—it prevents lumps of cocoa or flour in your final cookies and ensures a tender crumb. Use a spatula to gently fold everything together. Be careful not to overmix! Stop as soon as you no longer see streaks of flour. The dough will be quite thick and fudgy.03
-
Now for the best part—the chocolate chips! Fold in the dark chocolate chips or chunks until they’re evenly distributed throughout the thick, chocolatey dough. I like to reserve a small handful to press onto the tops of the scooped cookies before baking; it makes them look extra inviting.04
-
Using a cookie scoop or a tablespoon, drop rounded mounds of dough onto your prepared baking sheet, leaving about 5 cm (2 inches) between them as they will spread a little. If you saved some chocolate chips, now’s the time to gently press a few onto the top of each dough ball.05
-
Bake for 10-12 minutes. The trick is to pull them out when the edges look set and maybe even a little crackly, but the centers still appear soft and slightly underdone. They will continue to cook on the hot baking sheet as they cool. Let them rest on the tray for at least 5 minutes—this is crucial for them to set up properly. Then, transfer them to a wire rack to cool completely… or, you know, enjoy one warm and gooey.06