Why You’ll Love This Chicken Teriyaki Bowl
- It’s faster than delivery. Seriously, from start to finish, you can have this on the table in about 30 minutes. The sauce comes together in the same pan you cook the chicken in, which means less cleanup and more flavor.
- You control the sweetness. Homemade teriyaki sauce lets you adjust the balance of salty and sweet to your exact liking. Prefer it less sweet? Use a little less brown sugar. Love a stronger ginger kick? Grate in a bit more. It’s all up to you.
- It’s a complete meal in one bowl. You’ve got your protein, your carbs, and your veggies all hanging out together. It’s the definition of a satisfying, balanced dinner that leaves you feeling great.
- The leftovers are fantastic. This dish reheats like a dream for lunch the next day. The flavors have even more time to mingle, making it possibly even more delicious on day two.
Ingredients & Tools
- 500 g boneless, skinless chicken thighs, cut into bite-sized pieces
- 2 tbsp neutral oil (like avocado or vegetable oil)
- 1/2 cup soy sauce (or tamari for gluten-free)
- 1/4 cup brown sugar, packed
- 2 tbsp mirin
- 2 cloves garlic, minced
- 1 tbsp fresh ginger, grated
- 1 tbsp cornstarch
- 2 tbsp water
- 1 head broccoli, cut into small florets
- 1 large carrot, julienned or grated
- 2 spring onions, thinly sliced
- 1 tbsp sesame seeds, for garnish
- 2 cups cooked white rice (jasmine or sushi rice work beautifully)
Tools: A large skillet or wok, a small whisk or fork, a microplane or fine grater for the ginger.
A quick note on the ingredients—using chicken thighs instead of breasts makes a huge difference here. They stay incredibly juicy and are much more forgiving if you overcook them slightly. And please, if you can, use fresh ginger and garlic. The flavor is so much brighter and more aromatic than the powdered versions.
Serves: 4 | Prep Time: 15 minutes | Cook Time: 15 minutes | Total Time: 30 minutes
Before You Start: Tips & Ingredient Notes
- Chicken Thighs vs. Breast. I really recommend thighs for this recipe. They have more fat, which means they stay tender and soak up the sauce beautifully. If you must use breast, be extra careful not to overcook it, as it can become dry quickly.
- What is Mirin, anyway? Mirin is a sweet Japanese rice wine that adds a subtle complexity to the sauce. If you can’t find it, a tiny splash of dry sherry or even a teaspoon of rice vinegar mixed with a pinch of extra sugar can work in a pinch, but the flavor won’t be quite the same.
- Prepping your veggies ahead of time. This recipe comes together fast, so having your broccoli florets ready, your carrots julienned, and your sauce ingredients measured out will make the process smooth and stress-free. We call this *mise en place*—and it’s a game-changer.
- The cornstarch slurry is key. Don’t skip mixing the cornstarch with cold water before adding it to the sauce. This prevents lumps and gives you that signature glossy, thick teriyaki glaze we’re all after.
How to Make Chicken Teriyaki Bowl
Step 1: Start by prepping all your ingredients. Cut the chicken into even, bite-sized pieces so they cook uniformly. Mince the garlic, grate the ginger, and chop your vegetables. Having everything within arm’s reach will make the cooking process feel like a breeze. Go ahead and get your rice cooking if you haven’t already—it should be ready around the same time as the chicken.
Step 2: Heat the oil in your large skillet or wok over medium-high heat. Once the oil is shimmering hot, add the chicken pieces in a single layer. You’ll hear a satisfying sizzle. Let the chicken cook undisturbed for 3-4 minutes to get a nice sear on one side before stirring. We’re not looking to cook it through completely just yet, just to get some good color.
Step 3: While the chicken is searing, whisk together the soy sauce, brown sugar, and mirin in a small bowl or measuring cup. In a separate tiny bowl, make your slurry by stirring the cornstarch and cold water together until it’s completely smooth with no lumps.
Step 4: Push the partially cooked chicken to one side of the skillet. Add the minced garlic and grated ginger to the empty space. They’ll sizzle and become fragrant in about 30 seconds—be careful not to let them burn! This quick bloom in the hot oil unlocks all their amazing flavor.
Step 5: Now, pour the soy sauce mixture over the chicken and garlic-ginger. Give everything a good stir to combine. Let it come to a gentle simmer. You’ll notice the sauce will be quite thin at first. That’s perfectly normal.
Step 6: Give your cornstarch slurry another quick stir (it can settle) and then drizzle it into the simmering sauce while stirring constantly. Almost magically, the sauce will begin to thicken and turn glossy within a minute or two. This is when the magic happens!
Step 7: Add your broccoli florets to the skillet and stir them into the sauce. Reduce the heat to medium-low, cover the skillet with a lid, and let it steam for about 3-4 minutes. This will cook the broccoli until it’s tender-crisp and bright green.
Step 8: Uncover the skillet. The sauce should be beautifully thick and coating the back of a spoon. Taste a piece of chicken and adjust the seasoning if needed—maybe a tiny pinch of sugar if it’s too salty, or a splash more soy sauce if you want it saltier. Turn off the heat.
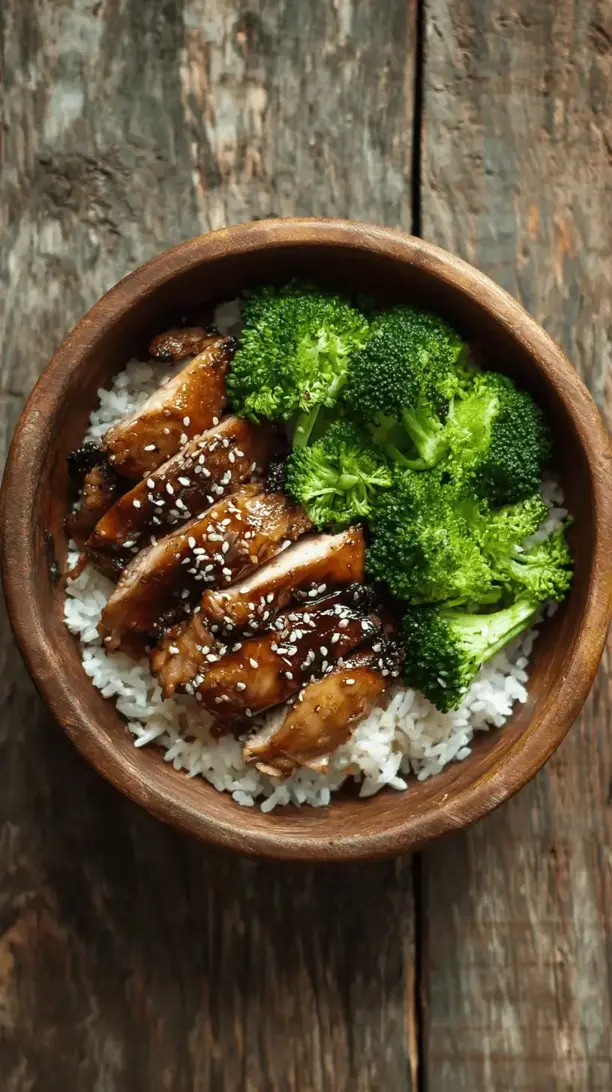
Step 9: It’s assembly time! Divide the fluffy cooked rice among four bowls. Spoon the saucy chicken and broccoli generously over the rice. Top with the fresh julienned carrots, a generous sprinkle of sliced spring onions, and a final flourish of sesame seeds for a little nutty crunch.
Serving Suggestions
Complementary Dishes
- A simple cucumber salad — Thinly sliced cucumbers with a quick dressing of rice vinegar, a pinch of sugar, and a sprinkle of red pepper flakes. The cool, crisp acidity is the perfect contrast to the rich, savory bowl.
- Steamed edamame — A classic, easy side. Just sprinkle the pods with coarse sea salt. It’s a fun, interactive starter that gets everyone excited for the main event.
Drinks
- Iced green tea — The slightly bitter, clean notes of green tea cut through the sweetness of the teriyaki sauce beautifully and are incredibly refreshing.
- A light lager or pale ale — If you’re in the mood for something stronger, the crisp carbonation and mild bitterness of a light beer won’t overpower the dish’s flavors.
Something Sweet
- Mochi ice cream — These little chewy, icy treats are the perfect, light way to end the meal. The subtle sweetness and fun texture are a delightful finish.
- Sliced oranges with a hint of cinnamon — Sometimes simple is best. Fresh, juicy orange segments feel cleansing and bright after a savory meal.
Top Mistakes to Avoid
- Mistake: Adding the cornstarch directly to the hot sauce. This is a surefire way to end up with a lumpy, gloppy mess. Always, always mix cornstarch with a cold liquid first to create a smooth slurry.
- Mistake: Overcrowding the pan when searing the chicken. If you dump all the chicken in at once, it will steam instead of sear. Cook in batches if your pan is small to ensure each piece gets that lovely caramelized surface.
- Mistake: Boiling the sauce after adding the slurry. Once the sauce has thickened, turn the heat down. A vigorous boil can sometimes cause the starch to break down, making the sauce thin out again.
- Mistake: Using old, dried-out ginger. Fresh ginger is plump and juicy. If your ginger root is shriveled and fibrous, its flavor will be weak. A little fresh ginger goes a very long way.
Expert Tips
- Tip: Double the sauce. Honestly, you might want to. Having extra teriyaki sauce to drizzle over your rice is never a bad thing. It also reheats wonderfully for leftovers.
- Tip: Marinate for deeper flavor. If you have an extra 30 minutes, toss the raw chicken pieces in half of the teriyaki sauce (before adding the cornstarch) and let it marinate in the fridge. Then, cook as directed, using the other half of the sauce to glaze at the end.
- Tip: Get creative with veggies. Don’t feel limited to just broccoli and carrots. Thinly sliced bell peppers, snap peas, or even mushrooms would be fantastic additions. Just adjust the cooking time accordingly for softer veggies.
- Tip: For a super glossy finish, add a pat of butter. Right at the end, after you’ve turned off the heat, stir in a tablespoon of cold butter. It makes the sauce incredibly rich and gives it a professional-level sheen.
FAQs
Can I make this Chicken Teriyaki Bowl ahead of time?
Absolutely! You can cook the entire dish and store it in an airtight container in the fridge for up to 3 days. The sauce might thicken up a bit, so when reheating, add a tablespoon or two of water to the skillet or microwave-safe bowl to loosen it up. The vegetables will soften a little upon reheating, but the flavor will still be fantastic.
Is there a way to make this recipe gluten-free?
Yes, it’s very easy! Simply ensure you use tamari instead of regular soy sauce, and double-check that your mirin is gluten-free (some brands contain wheat). All other ingredients are naturally gluten-free. Serve it over your favorite gluten-free grain like rice or quinoa.
My sauce didn’t thicken. What went wrong?
This usually happens for one of two reasons. First, the sauce might not have been simmering when you added the slurry—it needs that heat to activate the starch. Second, you might not have simmered it long enough after adding the slurry. Give it a good minute or two of constant stirring over the heat. If it’s still thin, you can mix another teaspoon of cornstarch with a tablespoon of water and add it in.
Can I use frozen vegetables?
You can, but there’s a catch. Frozen vegetables release a lot of water as they thaw and cook, which can make your sauce watery. If using frozen broccoli, I’d recommend blanching it separately in boiling water first, draining it very well, and then adding it to the skillet at the very end just to heat through.
How can I make the dish spicier?
I love a bit of heat! The easiest way is to add a teaspoon of sriracha or a pinch of red pepper flakes to the sauce when you add the soy sauce and sugar. You could also garnish the finished bowls with a drizzle of chili oil or a sprinkle of togarashi (Japanese chili pepper blend) for a customizable kick.
Chicken Teriyaki Bowl
Whip up a better-than-takeout Chicken Teriyaki Bowl in just 30 minutes! My easy homemade teriyaki sauce & juicy chicken thighs make this a weeknight winner.
Ingredients
Ingredients
-
500 g boneless, skinless chicken thighs, cut into bite-sized pieces
-
2 tbsp neutral oil (like avocado or vegetable oil)
-
1/2 cup soy sauce (or tamari for gluten-free)
-
1/4 cup brown sugar (packed)
-
2 tbsp mirin
-
2 cloves garlic (minced)
-
1 tbsp fresh ginger (grated)
-
1 tbsp cornstarch
-
2 tbsp water
-
1 head broccoli (cut into small florets)
-
1 large carrot (julienned or grated)
-
2 spring onions (thinly sliced)
-
1 tbsp sesame seeds (for garnish)
-
2 cups cooked white rice (jasmine or sushi rice work beautifully)
Instructions
-
Start by prepping all your ingredients. Cut the chicken into even, bite-sized pieces so they cook uniformly. Mince the garlic, grate the ginger, and chop your vegetables. Having everything within arm's reach will make the cooking process feel like a breeze. Go ahead and get your rice cooking if you haven't already—it should be ready around the same time as the chicken.01
-
Heat the oil in your large skillet or wok over medium-high heat. Once the oil is shimmering hot, add the chicken pieces in a single layer. You'll hear a satisfying sizzle. Let the chicken cook undisturbed for 3-4 minutes to get a nice sear on one side before stirring. We're not looking to cook it through completely just yet, just to get some good color.02
-
While the chicken is searing, whisk together the soy sauce, brown sugar, and mirin in a small bowl or measuring cup. In a separate tiny bowl, make your slurry by stirring the cornstarch and cold water together until it's completely smooth with no lumps.03
-
Push the partially cooked chicken to one side of the skillet. Add the minced garlic and grated ginger to the empty space. They'll sizzle and become fragrant in about 30 seconds—be careful not to let them burn! This quick bloom in the hot oil unlocks all their amazing flavor.04
-
Now, pour the soy sauce mixture over the chicken and garlic-ginger. Give everything a good stir to combine. Let it come to a gentle simmer. You'll notice the sauce will be quite thin at first. That's perfectly normal.05
-
Give your cornstarch slurry another quick stir (it can settle) and then drizzle it into the simmering sauce while stirring constantly. Almost magically, the sauce will begin to thicken and turn glossy within a minute or two. This is when the magic happens!06
-
Add your broccoli florets to the skillet and stir them into the sauce. Reduce the heat to medium-low, cover the skillet with a lid, and let it steam for about 3-4 minutes. This will cook the broccoli until it's tender-crisp and bright green.07
-
Uncover the skillet. The sauce should be beautifully thick and coating the back of a spoon. Taste a piece of chicken and adjust the seasoning if needed—maybe a tiny pinch of sugar if it's too salty, or a splash more soy sauce if you want it saltier. Turn off the heat.08
-
It's assembly time! Divide the fluffy cooked rice among four bowls. Spoon the saucy chicken and broccoli generously over the rice. Top with the fresh julienned carrots, a generous sprinkle of sliced spring onions, and a final flourish of sesame seeds for a little nutty crunch.09