
Why You’ll Love This Berry Coconut Chia Parfait
- It’s a make-ahead dream. Seriously, your future self will thank your past self. Waking up to a ready-made, gorgeous breakfast is a game-changer for hectic weeks.
- The texture is pure magic. We’re talking creamy coconut pudding, juicy berries, and a delightful crunch from the toppings. It’s a symphony of contrasts that never gets old.
- Endlessly customizable. Not a fan of strawberries? Use all raspberries. Want a chocolate twist? Add a tablespoon of cacao powder to the chia base. This recipe is a fantastic template for your own creations.
- It feels decadent but is genuinely wholesome. With healthy fats from the coconut, fiber from the chia seeds, and antioxidants from the berries, this parfait is a nourishing choice that satisfies your sweet tooth without any guilt.
Ingredients & Tools
- 1/2 cup chia seeds
- 1 (13.5 oz) can full-fat coconut milk
- 3 tablespoons pure maple syrup, or to taste
- 1 teaspoon pure vanilla extract
- A tiny pinch of fine sea salt
- 1 1/2 cups mixed fresh berries (like strawberries, blueberries, raspberries)
- 1 tablespoon fresh lemon juice
- For serving: toasted coconut flakes, chopped nuts (like almonds or pecans), extra berries, fresh mint
Tools: A medium mixing bowl, a whisk, a smaller bowl for the berries, a spoon or spatula, and 2-4 glasses or jars for assembling.
The quality of your coconut milk really matters here—go for a good brand without a lot of gums or stabilizers for the creamiest result. And don’t skip the pinch of salt! It might seem tiny, but it makes all the flavors pop.
Serves: 2-3 | Prep Time: 15 minutes (+ overnight setting) | Cook Time: 0 minutes | Total Time: 8 hours 15 minutes (mostly inactive)
Before You Start: Tips & Ingredient Notes
- Shake that can! Before you open your coconut milk, give it a really vigorous shake. This helps integrate the creamy solid part with the thinner liquid, giving you a more consistent base to work with.
- Is your chia pudding too thin? If, after the initial 30-minute stir, your mixture still looks too liquidy, don’t panic. Just add another tablespoon or two of chia seeds and stir again. Chia seeds vary in their absorbency a little bit.
- Sweeten to your heart’s content. The amount of maple syrup is a suggestion. Taste your coconut milk first—some are sweeter than others. You can always add more sweetness after it’s set, or drizzle a little extra on top when serving.
- Get creative with your berries. While fresh is lovely, frozen berries work beautifully too! Just thaw them and they’ll release even more juice, creating a fantastic saucy layer. A mix of berries gives you the best flavor complexity.
How to Make Berry Coconut Chia Parfait
Step 1: Create the Chia Base. In your medium mixing bowl, pour in the entire can of coconut milk. Add the chia seeds, maple syrup, vanilla extract, and that all-important pinch of salt. Now, take your whisk and go to town! Whisk continuously for a good minute or two. You want to make sure the chia seeds are evenly distributed and not clumping together at the bottom. The mixture will look quite liquidy at first—that’s perfectly normal. The magic happens as it sits.
Step 2: The First Rest & Stir. Let the bowl sit on your counter for about 30 minutes. After this time, you’ll notice it’s already starting to thicken. Grab your whisk or a spoon and give it another really good stir. This step is crucial for breaking up any clumps that may have formed and ensuring a smooth, lump-free pudding. You’ll see the texture begin to transform.
Step 3: Overnight Magic. Once you’ve done that second stir, cover the bowl tightly with plastic wrap or a lid. Now, pop it into the refrigerator for at least 6 hours, or ideally, overnight. This is where the chia seeds fully hydrate and plump up, turning the liquid into a lovely, spoonable pudding. You’ll know it’s ready when it has a thick, tapioca-like consistency.
Step 4: Prepare the Berry Layer. While the pudding is setting (or right before you assemble), prepare your berries. If you’re using strawberries, hull and slice them. Toss all your berries in a small bowl with the tablespoon of lemon juice. The lemon juice not only adds a bright zing but also helps keep the berries from oxidizing and turning brown. If you like, you can gently mash a few of the berries with a fork to create a more jam-like layer.
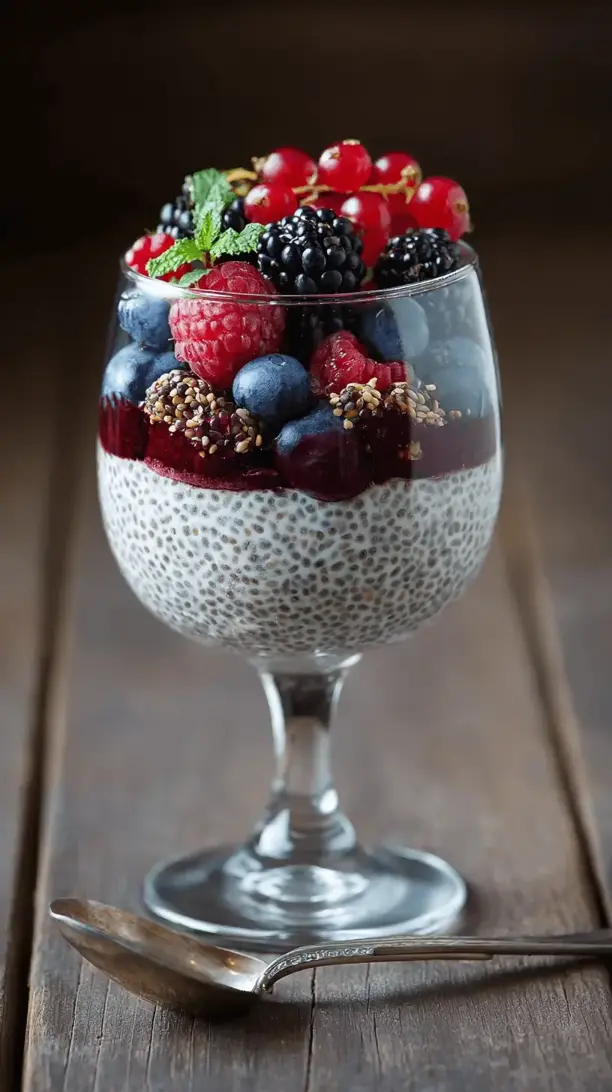
Step 5: Assemble Your Masterpiece. Now for the fun part! Grab your glasses or jars. Start with a layer of the set coconut chia pudding. Then, add a generous spoonful of the macerated berries along with their juices. Repeat the layers until your glass is full, finishing with a berry layer on top. The trick is to be gentle so you get nice, distinct layers.
Step 6: The Grand Finale (Toppings!). Right before serving, sprinkle on your toppings. A handful of toasted coconut flakes adds a wonderful nutty flavor and crunch. Some chopped almonds or pecans provide a contrasting texture. A few extra fresh berries and a sprig of mint make it look absolutely stunning. And there you have it—a restaurant-worthy parfait made right in your own kitchen.
Serving Suggestions
Complementary Dishes
- A simple spinach and avocado salad with a lemon vinaigrette — The creaminess of the avocado and the sharpness of the dressing provide a lovely savory balance to the sweet, creamy parfait, making it perfect for a brunch spread.
- Scrambled eggs with fresh herbs — For a more substantial breakfast, the protein-rich eggs complement the parfait’s lightness, creating a perfectly rounded meal that keeps you satisfied for hours.
- Grilled chicken or turkey sausage — If you’re serving this for a special weekend brunch, a lean protein on the side turns this from a light bite into a full, satisfying feast.
Drinks
- A hot cup of black coffee or strong English Breakfast tea — The bitterness of the coffee or tea cuts through the richness of the coconut milk beautifully, creating a classic and comforting pairing.
- A crisp, cold glass of almond milk or oat milk — Keeping with the plant-based theme, a simple glass of your favorite non-dairy milk is a refreshing and light accompaniment.
- A sparkling water with a squeeze of lime — The bubbles and citrus cleanse the palate between each delicious spoonful, making every bite taste as vibrant as the first.
Something Sweet
- A small, warm almond flour muffin — The nutty flavor of the muffin echoes the toasted toppings on the parfait, and having something warm alongside the cold parfait is a delightful contrast.
- A few squares of dark chocolate (70% cacao or higher) — This is my personal favorite. A bite of rich, slightly bitter chocolate after a spoonful of the sweet parfait is an incredibly sophisticated way to end a meal.
- A dollop of lemon sorbet — If you’re serving the parfait for dessert, a small scoop of tangy sorbet on the side elevates it into a truly elegant and refreshing finale.
Top Mistakes to Avoid
- Mistake: Not stirring enough initially. If you just give it a quick stir and walk away, you’ll end up with a lumpy pudding with chia seeds stuck together in a gelatinous blob. That initial vigorous whisking and the 30-minute stir are non-negotiable for a silky texture.
- Mistake: Using “lite” coconut milk. I’ve tried it, and honestly, the result is watery and lacks the luxurious creaminess that makes this parfait so special. Full-fat coconut milk is essential for the right mouthfeel and richness.
- Mistake: Assembling too far in advance. You can make the components days ahead, but assemble the parfaits right before serving. If they sit assembled for too long, the berry juices will seep down and make the chia pudding a bit soggy.
- Mistake: Skipping the toasting step for your coconut flakes. Toasting takes an extra five minutes but adds a deep, nutty flavor and crucial crunch that completely transforms the topping from bland to brilliant.
Expert Tips
- Tip: Add a flavor infusion. Try steeping a citrus zest (like orange or lime) or a spice (like a cinnamon stick or a few cardamom pods) in the coconut milk mixture overnight. Just remember to remove it before assembling! It’s a simple way to add a subtle, sophisticated layer of flavor.
- Tip: Make a big batch. The chia pudding base keeps wonderfully in a sealed container in the fridge for up to 5 days. Having it ready to go means you can throw together a healthy breakfast or snack in under a minute all week long.
- Tip: Create a swirled version. For a quicker, more homestyle approach, you can simply swirl the macerated berries directly into the entire batch of chia pudding. It’s less elegant but equally delicious, with a beautiful marbled effect.
- Tip: For an extra protein boost. Stir a scoop of your favorite unflavored or vanilla plant-based protein powder into the chia mixture along with the other ingredients. You might need to add a tiny splash more liquid to compensate.
FAQs
Can I use a different type of milk?
Absolutely! While coconut milk gives the richest result, you can use unsweetened almond milk, oat milk, or cashew milk. The texture will be a bit less creamy and more gelatinous, but still delicious. You might find you need slightly fewer chia seeds with thinner milks—start with 1/3 cup and add more after 30 minutes if it’s too runny. The key is to use a milk you enjoy the flavor of, as it will be the dominant taste in the pudding layer.
How long will the assembled parfaits last in the fridge?
They’re best eaten the day they’re assembled for optimal texture. However, they will still be perfectly edible for up to 2 days. The chia pudding might soften a bit from the berry juices, and the crunchy toppings will lose their crunch, so if you’re meal-prepping, I’d keep the components separate and assemble each morning. The chia pudding alone lasts for about 5 days, and the macerated berries for 2-3 days.
My chia pudding is too thick! How can I thin it out?
No problem at all—this is an easy fix. Just whisk in a little extra liquid. A splash of the milk you used (coconut, almond, etc.) or even a bit of water will work. Add it a tablespoon at a time, whisking well after each addition, until it reaches your desired consistency. It should be thick but easily spoonable.
Can I make this without any added sweetener?
You sure can. The berries themselves provide a lot of natural sweetness. If you’re avoiding all sweeteners, simply omit the maple syrup. You might find you want to add a pinch more vanilla extract to enhance the perception of sweetness. Taste the pudding after it’s set, and if you feel it needs a little something, try mashing a very ripe banana and folding it in—it adds natural sweetness and creaminess.
Is there a way to make this faster than overnight?
Yes, there is a bit of a shortcut! If you’re in a pinch, you can make a “quick” chia pudding by using warm (not hot) liquid. Whisk the chia seeds into warmed coconut milk and let it sit for about 30-60 minutes, stirring frequently. It will thicken much faster, though the texture might not be quite as perfectly smooth as the slow-soaked version. It’s a great hack for when a chia craving strikes unexpectedly!
Berry Coconut Chia Parfait
Whip up this dreamy Berry Coconut Chia Parfait! Creamy make-ahead breakfast with fresh berries & crunchy toppings. Perfect for busy mornings or healthy desserts.
Ingredients
Ingredients
-
1/2 cup chia seeds
-
1 can full-fat coconut milk (13.5 oz)
-
3 tablespoons pure maple syrup (or to taste)
-
1 teaspoon pure vanilla extract
-
A tiny pinch fine sea salt
-
1 1/2 cups mixed fresh berries (like strawberries, blueberries, raspberries)
-
1 tablespoon fresh lemon juice
-
toasted coconut flakes (for serving)
-
chopped nuts (like almonds or pecans, for serving)
-
extra berries (for serving)
-
fresh mint (for serving)
Instructions
-
Create the Chia Base. In your medium mixing bowl, pour in the entire can of coconut milk. Add the chia seeds, maple syrup, vanilla extract, and that all-important pinch of salt. Now, take your whisk and go to town! Whisk continuously for a good minute or two. You want to make sure the chia seeds are evenly distributed and not clumping together at the bottom. The mixture will look quite liquidy at first—that's perfectly normal. The magic happens as it sits.01
-
The First Rest & Stir. Let the bowl sit on your counter for about 30 minutes. After this time, you'll notice it's already starting to thicken. Grab your whisk or a spoon and give it another really good stir. This step is crucial for breaking up any clumps that may have formed and ensuring a smooth, lump-free pudding. You'll see the texture begin to transform.02
-
Overnight Magic. Once you've done that second stir, cover the bowl tightly with plastic wrap or a lid. Now, pop it into the refrigerator for at least 6 hours, or ideally, overnight. This is where the chia seeds fully hydrate and plump up, turning the liquid into a lovely, spoonable pudding. You'll know it's ready when it has a thick, tapioca-like consistency.03
-
Prepare the Berry Layer. While the pudding is setting (or right before you assemble), prepare your berries. If you're using strawberries, hull and slice them. Toss all your berries in a small bowl with the tablespoon of lemon juice. The lemon juice not only adds a bright zing but also helps keep the berries from oxidizing and turning brown. If you like, you can gently mash a few of the berries with a fork to create a more jam-like layer.04
-
Assemble Your Masterpiece. Now for the fun part! Grab your glasses or jars. Start with a layer of the set coconut chia pudding. Then, add a generous spoonful of the macerated berries along with their juices. Repeat the layers until your glass is full, finishing with a berry layer on top. The trick is to be gentle so you get nice, distinct layers.05
-
The Grand Finale (Toppings!). Right before serving, sprinkle on your toppings. A handful of toasted coconut flakes adds a wonderful nutty flavor and crunch. Some chopped almonds or pecans provide a contrasting texture. A few extra fresh berries and a sprig of mint make it look absolutely stunning. And there you have it—a restaurant-worthy parfait made right in your own kitchen.06


