
Why You’ll Love This Banana Oatmeal Cups
- Meal prep magic. These cups are the definition of a make-ahead marvel. Bake them once, and you’ve got breakfast sorted for the entire week. They freeze like a dream, too, so you can stash a few for a future emergency.
- Naturally sweet and wholesome. We’re letting super ripe bananas do all the heavy lifting here. The spottier the banana, the better—they bring a deep, caramel-like sweetness that means you really don’t need much added sugar.
- Endlessly customizable. This recipe is your perfect canvas. Feel like chocolate chips? Go for it. Want a nutty crunch? Add some walnuts. It’s a fantastic way to use up little bits of dried fruit or seeds lurking in your cupboard.
- Kid-friendly and fuss-free. If you have little helpers in the kitchen, they’ll love mashing the bananas and stirring the batter. It’s a simple, hands-on recipe that delivers a breakfast everyone will be excited to eat.
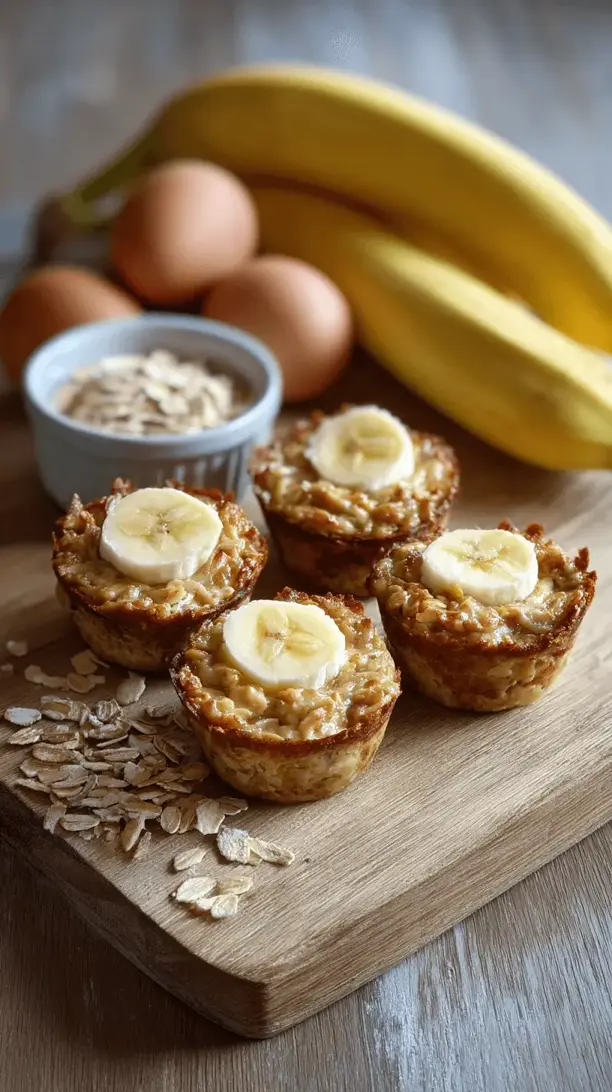
Ingredients & Tools
- 3 large very ripe bananas
- 2 cups old-fashioned rolled oats
- 2 large eggs
- 1/2 cup milk (any kind you like)
- 1/4 cup maple syrup or honey
- 1 tsp vanilla extract
- 1 tsp baking powder
- 1/2 tsp ground cinnamon
- 1/4 tsp salt
- 1/2 cup mix-ins like chocolate chips, chopped nuts, or blueberries
Tools: A 12-cup muffin tin, muffin liners (or a good non-stick spray), a large mixing bowl, a fork or potato masher, a measuring cup, and a cooling rack.
The beauty of this list is its simplicity. Using rolled oats (not instant) gives the cups a wonderful, substantial texture. And that pinch of salt? It’s not optional—it really makes the banana flavor pop and balances the sweetness perfectly.
Serves: 12 | Prep Time: 10 minutes | Cook Time: 20-25 minutes | Total Time: 35 minutes
Before You Start: Tips & Ingredient Notes
- Banana ripeness is non-negotiable. You want those bananas to be covered in brown spots. They should mash easily and be incredibly sweet. This is the secret to avoiding added refined sugar.
- To line or not to line? I’m team muffin liner all the way for easy cleanup. If you’re going bare, make sure to grease the tin very well with butter or non-stick spray. These cups don’t have much oil, so they can stick a little.
- Don’t over-mix the batter. Once you add the oats, just stir until everything is combined. A few lumps of banana are totally fine. Over-mixing can lead to a denser, tougher texture.
- Think about your mix-ins. If you’re using frozen fruit like berries, toss them in a tablespoon of the oat flour first—this helps prevent them from bleeding too much color into the batter. For chocolate chips, mini ones distribute a little more evenly.
How to Make Banana Oatmeal Cups
Step 1: First, preheat your oven to 375°F (190°C). This is a quick recipe, so you want the oven ready to go. Line your muffin tin with paper liners or grease it generously. Now, grab those ripe bananas and peel them into a large mixing bowl. Use a fork or potato masher to mash them really well until you have a relatively smooth, lump-free puree. You’ll notice the amazing sweet aroma already starting to fill your kitchen.
Step 2: To the banana puree, add the eggs, milk, maple syrup (or honey), and vanilla extract. Whisk everything together until it’s fully combined and looks smooth and creamy. The mixture might look a little separated at first, but just keep whisking—it will come together into a lovely, pale yellow liquid.
Step 3: Now, sprinkle in the dry ingredients: the rolled oats, baking powder, cinnamon, and salt. Here’s the trick: switch to a spatula or wooden spoon for this part. Gently fold the dry ingredients into the wet ingredients. Stir just until everything is moistened and you can’t see any dry pockets of oats. A few lumps are perfectly fine—honestly, it’s better than over-mixing.
Step 4: This is your chance to get creative! Gently fold in your chosen mix-ins. Whether it’s a half-cup of dark chocolate chips, some toasted walnuts, or a handful of fresh blueberries, just stir them in until they’re evenly distributed throughout the batter.
Step 5: Using a spoon or a cookie scoop, divide the batter evenly among the 12 prepared muffin cups. They should be filled almost to the top, as these oatmeal cups don’t rise a huge amount. You can smooth the tops a little with the back of your spoon if you like.
Step 6: Carefully place the muffin tin in the preheated oven and bake for 20 to 25 minutes. You’ll know they’re done when the tops are set, look dry, and have a lovely golden-brown color around the edges. A toothpick inserted into the center should come out clean or with just a few moist crumbs (especially if you hit a chocolate chip!).
Step 7: This part is important for texture! Let the cups cool in the muffin tin for about 5 minutes. This allows them to set up and firm a bit. Then, transfer them to a wire cooling rack to cool completely. They’ll be very tender when warm, but they firm up perfectly as they cool.
Serving Suggestions
Complementary Dishes
- A dollop of Greek yogurt — The cool, tangy creaminess is a fantastic contrast to the warm, sweet cups. It also adds a great protein boost to keep you full even longer.
- A side of fresh berries — A handful of raspberries or sliced strawberries adds a fresh, juicy element and a pop of vibrant color to your plate.
- A smear of nut or seed butter — For the ultimate satisfying breakfast, try them with a bit of almond butter or sunflower seed butter. The rich, savory notes are just incredible.
Drinks
- A cold glass of milk — It’s a classic for a reason. The simplicity of cold milk alongside these cozy cups is pure comfort.
- A hot cup of coffee — The nutty, roasted notes of coffee complement the cinnamon and banana flavors beautifully, making for a perfectly balanced morning ritual.
- A creamy latte — If you’re feeling a bit fancy, the steamed milk in a latte mirrors the soft texture of the oatmeal cups for a truly luxurious feel.
Something Sweet
- A drizzle of extra maple syrup — For those mornings when you need an extra treat, a little extra syrup over the top makes them feel like dessert for breakfast.
- A sprinkle of cinnamon sugar — Before baking, you can add a tiny pinch of cinnamon mixed with a teaspoon of sugar on top for a delightful, sparkly crunch.
- A handful of chocolate chips on top — Press a few extra chocolate chips into the tops of the cups right after they come out of the oven for a melty, professional bakery look.
Top Mistakes to Avoid
- Mistake: Using underripe bananas. This is the number one reason for bland cups. Green or yellow bananas just don’t have the same sweetness or mashable texture. If your bananas aren’t spotty, you’ll likely need to add more sweetener.
- Mistake: Over-mixing the batter. I’ve messed this up before too… you want to stir until *just* combined. Gluten isn’t really a concern with oats, but over-working the batter can make the final texture a bit gummy instead of light and tender.
- Mistake: Skipping the cooling time. I know it’s tempting to eat one straight from the oven, but if you try to remove them too soon, they’re likely to fall apart. That 5-minute rest in the tin is crucial for them to set properly.
- Mistake: Not greasing the pan well enough. Since there’s minimal fat in this recipe, they have a tendency to stick if you skip the liners or don’t use enough non-stick spray. A little prevention here saves a lot of frustration later.
Expert Tips
- Tip: Make them gluten-free effortlessly. This recipe is naturally gluten-free if you use certified gluten-free oats. It’s a fantastic option to have in your back pocket for friends or family with dietary restrictions.
- Tip: Create an “overnight” version. You can mix the batter the night before, cover the bowl, and refrigerate it. In the morning, just scoop and bake! The oats will absorb some liquid, making them even heartier.
- Tip: Boost the nutrition sneakily. You can add a tablespoon or two of ground flaxseed or chia seeds to the batter for an extra fiber and omega-3 boost without altering the taste or texture noticeably.
- Tip: Freeze them like a pro. Once completely cool, place the cups in a single layer on a baking sheet to freeze solid, then transfer to a freezer bag. This prevents them from sticking together. To reheat, just pop a frozen cup in the microwave for 60-90 seconds.
FAQs
Can I make these without eggs?
Yes, you can! For an egg-free version, a “flax egg” works wonderfully. Simply mix 1 tablespoon of ground flaxseed with 3 tablespoons of water for each egg you’re replacing (so for this recipe, do this twice). Let it sit for 5-10 minutes until it becomes gelatinous, then use it exactly as you would the eggs. The texture might be a tiny bit denser but still absolutely delicious.
Can I use quick oats instead of old-fashioned rolled oats?
You can, but the texture will be different. Quick oats are cut smaller and absorb more liquid, which will result in a denser, less textured cup. Old-fashioned oats give that perfect, hearty bite. If quick oats are all you have, the recipe will still work, but I’d recommend reducing the milk by a couple of tablespoons to account for the extra absorption.
Why are my oatmeal cups mushy in the middle?
This usually means they needed a few more minutes in the oven. Ovens can vary, so always rely on the visual cues—golden edges and a set top—more than the timer. Also, make sure you’re using rolled oats, not instant oatmeal packets, which have other ingredients that can throw off the liquid ratio. Letting them cool completely also helps them firm up.
How long do these last, and how should I store them?
Once completely cool, store them in an airtight container at room temperature for 2-3 days, or in the refrigerator for up to a week. They are fantastic cold, straight from the fridge! For longer storage, freeze them for up to 3 months. They are the ultimate convenient breakfast.
Can I bake this as one big oatmeal bake instead of individual cups?
Absolutely! Pour the batter into a greased 8×8 inch baking dish and bake at the same temperature. It will likely need a few more minutes—start checking around the 30-minute mark. You’ll get a delicious baked oatmeal that you can slice into squares. It’s a great option for feeding a crowd on a lazy weekend morning.
Banana Oatmeal Cups
Whip up easy Banana Oatmeal Cups for busy mornings! This healthy, make-ahead breakfast is naturally sweet, customizable, and perfect for meal prep. Ready in 35 minutes!
Ingredients
Ingredients
-
3 large very ripe bananas
-
2 cups old-fashioned rolled oats
-
2 large eggs
-
1/2 cup milk (any kind you like)
-
1/4 cup maple syrup or honey
-
1 tsp vanilla extract
-
1 tsp baking powder
-
1/2 tsp ground cinnamon
-
1/4 tsp salt
-
1/2 cup mix-ins like chocolate chips, chopped nuts, or blueberries
Instructions
-
First, preheat your oven to 375°F (190°C). This is a quick recipe, so you want the oven ready to go. Line your muffin tin with paper liners or grease it generously. Now, grab those ripe bananas and peel them into a large mixing bowl. Use a fork or potato masher to mash them really well until you have a relatively smooth, lump-free puree. You'll notice the amazing sweet aroma already starting to fill your kitchen.01
-
To the banana puree, add the eggs, milk, maple syrup (or honey), and vanilla extract. Whisk everything together until it's fully combined and looks smooth and creamy. The mixture might look a little separated at first, but just keep whisking—it will come together into a lovely, pale yellow liquid.02
-
Now, sprinkle in the dry ingredients: the rolled oats, baking powder, cinnamon, and salt. Here's the trick: switch to a spatula or wooden spoon for this part. Gently fold the dry ingredients into the wet ingredients. Stir just until everything is moistened and you can't see any dry pockets of oats. A few lumps are perfectly fine—honestly, it's better than over-mixing.03
-
This is your chance to get creative! Gently fold in your chosen mix-ins. Whether it's a half-cup of dark chocolate chips, some toasted walnuts, or a handful of fresh blueberries, just stir them in until they're evenly distributed throughout the batter.04
-
Using a spoon or a cookie scoop, divide the batter evenly among the 12 prepared muffin cups. They should be filled almost to the top, as these oatmeal cups don't rise a huge amount. You can smooth the tops a little with the back of your spoon if you like.05
-
Carefully place the muffin tin in the preheated oven and bake for 20 to 25 minutes. You'll know they're done when the tops are set, look dry, and have a lovely golden-brown color around the edges. A toothpick inserted into the center should come out clean or with just a few moist crumbs (especially if you hit a chocolate chip!).06
-
This part is important for texture! Let the cups cool in the muffin tin for about 5 minutes. This allows them to set up and firm a bit. Then, transfer them to a wire cooling rack to cool completely. They'll be very tender when warm, but they firm up perfectly as they cool.07


