
Why You’ll Love This Banana Nut Oat Muffins
- They’re the ultimate clean-out-the-kitchen hero. This recipe is incredibly adaptable. If you’re out of walnuts, pecans are fantastic. No oat flour? Just blitz some rolled oats in your blender. It’s a great way to use up those ingredients that are just hanging around.
- The texture is genuinely special. We’re talking a tender, moist crumb from the bananas, a little chew from the oats, and a delightful crunch from the nuts. It’s a symphony of textures in every single bite that keeps things interesting.
- They freeze like a dream. I always double the batch. Pop the cooled muffins into a freezer bag, and you’ve got a healthy-ish snack or quick breakfast on demand for weeks. A quick zap in the microwave or a gentle thaw on the counter brings them right back to life.
- They feel indulgent but are secretly wholesome. With whole grains from the oats, healthy fats from the nuts, and natural sweetness from the bananas, these muffins are a treat you can feel really good about starting your day with.
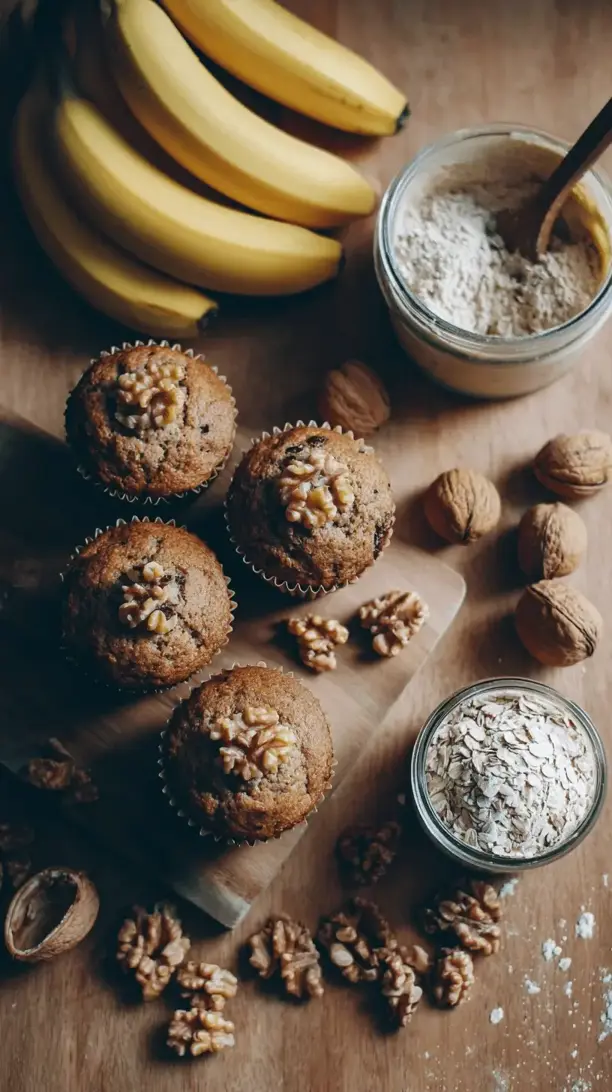
Ingredients & Tools
- 3 large, very ripe bananas (the more black spots, the better!)
- ⅓ cup (80 ml) melted coconut oil or neutral oil like avocado oil
- ½ cup (100 g) light brown sugar, packed
- 1 large egg, at room temperature
- 1 tsp pure vanilla extract
- 1 cup (120 g) whole wheat pastry flour or all-purpose flour
- ½ cup (50 g) old-fashioned rolled oats (plus 2 tbsp for topping)
- 1 tsp baking soda
- ½ tsp baking powder
- ½ tsp ground cinnamon
- ¼ tsp fine sea salt
- ⅔ cup (75 g) chopped walnuts or pecans (plus 1 tbsp for topping)
Tools: 12-cup muffin tin, muffin liners (highly recommended!), a large mixing bowl, a fork or potato masher, a whisk, a spatula, and a cooling rack.
The real stars here are the bananas and the oats. The bananas do the heavy lifting for sweetness and moisture, so don’t be shy with them. And using old-fashioned oats instead of quick oats gives you that wonderful, substantial texture. As for the nuts, toasting them first is a game-changer—it really wakes up their flavor.
Serves: 12 muffins | Prep Time: 15 minutes | Cook Time: 20-22 minutes | Total Time: 40 minutes
Before You Start: Tips & Ingredient Notes
- How ripe is “ripe” for the bananas? You want them to be soft, heavily speckled with brown, or even completely brown. This isn’t just for sweetness; super-ripe bananas mash easier and incorporate into the batter more seamlessly, giving you that iconic moist muffin texture.
- Why room temperature egg? If you add a cold egg to the melted oil, the oil can start to solidify again, which can make your batter a bit grainy. Taking the egg out of the fridge 30 minutes before you bake ensures a smooth, emulsified batter. If you forget, just place the whole egg in a bowl of warm water for 5-10 minutes.
- To toast or not to toast the nuts? I am firmly in the “toast” camp. It takes an extra five minutes but deepens the nutty flavor immensely. Just spread them on a baking sheet and pop them in a 350°F (175°C) oven for 5-7 minutes, until fragrant. Let them cool before adding to the batter.
- The case for muffin liners. These muffins are quite moist, and liners make cleanup an absolute breeze while ensuring they come out of the tin perfectly. If you don’t have liners, be sure to grease the tin very well.
How to Make Banana Nut Oat Muffins
Step 1: First, preheat your oven to 375°F (190°C). This higher initial heat helps the muffins get a nice, domed top. While it’s heating up, line your muffin tin with paper liners or grease it thoroughly. Now, grab your very ripe bananas and plop them into your large mixing bowl. Mash them really well with a fork or potato masher until you have a relatively smooth, lump-free puree. You’ll notice the aroma is already fantastic.
Step 2: To the banana puree, add the melted (and slightly cooled) coconut oil, the packed brown sugar, the room-temperature egg, and the vanilla extract. Whisk all these wet ingredients together until they’re completely combined and the mixture looks uniform. It might look a little separated at first, but just keep whisking—it’ll come together into a lovely, fragrant liquid base.
Step 3: Here’s where we add the dry ingredients. Sprinkle the flour, rolled oats, baking soda, baking powder, cinnamon, and salt right on top of the wet mixture. I like to give the dry ingredients a quick stir with the whisk right on top before I incorporate them into the wet—this just ensures the leavening agents are evenly distributed. Then, switch to a spatula and gently fold everything together. The trick is to stop folding the moment you no longer see streaks of flour. A few lumps are totally fine; overmixing is the enemy of a tender muffin!
Step 4: Now for the crunch! Add about two-thirds of your chopped, toasted nuts to the batter. Fold them in gently, just once or twice, until they’re evenly dispersed. You’ll want to save the rest for that beautiful, tempting topping.
Step 5: Divide the batter evenly among the 12 muffin cups. I like using a cookie scoop for this—it’s less messy and ensures they’re all the same size. They should be filled nearly to the top for a nice, bakery-style muffin. Now, sprinkle the tops with the remaining oats and nuts. This not only looks pretty but adds a wonderful textural contrast.
Step 6: Bake for 18-22 minutes. You’re looking for golden brown tops and a toothpick inserted into the center of a muffin that comes out clean or with just a few moist crumbs attached. The smell in your kitchen will be absolutely divine. Let the muffins cool in the tin for about 5 minutes—this helps them set—before transferring them to a wire rack to cool completely. I know it’s hard, but try to let them cool a bit before diving in!
Serving Suggestions
Complementary Dishes
- A bowl of Greek yogurt with berries — The tangy, creamy yogurt and fresh, bright berries cut through the sweetness of the muffin beautifully, making it feel like a complete, balanced breakfast.
- A simple scrambled egg or two — For a more substantial morning meal, the savory, protein-rich eggs pair wonderfully with the sweet, spiced notes of the muffin.
- A warm apple cinnamon compote — If you’re feeling fancy, spooning a little warm, spiced fruit compote over a split muffin turns it into a decadent yet simple dessert.
Drinks
- A hot cup of black coffee — This is the classic pairing for a reason. The bitterness of the coffee highlights the muffin’s warm spices and sweetness perfectly.
- A cold glass of milk — Whether it’s dairy or your favorite plant-based alternative, there’s something timeless and comforting about muffins and milk.
- A chai latte — The spices in a chai latte—cinnamon, cardamom, cloves—echo the warm spices in the muffin, creating a really cozy flavor experience.
Something Sweet
- A drizzle of almond butter — For an extra treat, split a warm muffin and drizzle the inside with creamy almond butter. It melts slightly and adds a rich, nutty depth.
- A scoop of vanilla bean ice cream — Warm muffin, cold ice cream… need I say more? This is the ultimate dessert transformation.
- A simple honey glaze — Whisk together a little powdered sugar, a touch of milk, and a drizzle of honey, then spoon it over the cooled muffins for a slightly sweeter, bakery-style finish.
Top Mistakes to Avoid
- Mistake: Overmixing the batter. This is the number one reason muffins turn out tough or dense. Gluten develops when you overwork the flour. Once the wet and dry ingredients are combined, just stop. A few lumps are your friend.
- Mistake: Using underripe bananas. Yellow, firm bananas just don’t have the same sweetness or moisture content. Your muffins will be bland and dry. Wait for those spots! If you’re in a pinch, you can ripen bananas quickly by baking them (in their peels) at 300°F for 15-20 minutes.
- Mistake: Not filling the muffin cups enough. If you’re too cautious and only fill them 2/3 full, you’ll end up with flat, sad muffins. Be brave! Fill them nearly to the top for a beautiful, domed crown.
- Mistake: Skipping the cooling step in the tin. If you try to take the muffins out immediately, they’re too delicate and might break apart. Letting them rest for 5 minutes allows them to set and firm up, making them much easier to handle.
Expert Tips
- Tip: For an extra flavor boost, brown your butter. Instead of melting the coconut oil, melt 6 tablespoons of unsalted butter in a saucepan until it foams and turns a golden brown with a nutty aroma. Let it cool slightly before using. It adds an incredible depth of flavor.
- Tip: Make your own oat flour in seconds. If you want an even more oat-forward muffin, you can replace half the all-purpose flour with oat flour. Just pulse ½ cup of rolled oats in a blender until it resembles a fine powder. It’s cheaper and fresher than store-bought!
- Tip: Add a handful of dark chocolate chips. Because… chocolate. Fold in ½ cup of dark chocolate chips with the nuts for a next-level variation. The bitter chocolate pairs amazingly with the sweet banana.
- Tip: For a sugar-free option, lean on the bananas. You can reduce the brown sugar to ¼ cup if your bananas are extremely ripe and sweet. The muffins will be less sweet but still delicious and moist.
FAQs
Can I make these gluten-free?
Absolutely! The easiest swap is to use a 1:1 gluten-free all-purpose flour blend in place of the whole wheat or regular flour. Just make sure your oats are certified gluten-free, as oats are often processed in facilities that also handle wheat. The texture might be a tad more delicate, but they’ll be just as delicious.
How should I store these muffins?
Once completely cool, store them in an airtight container at room temperature for up to 3 days. For longer storage, they freeze exceptionally well. Wrap each muffin individually in plastic wrap and place them all in a freezer bag. They’ll keep for up to 3 months. Thaw at room temperature or warm gently in the microwave or oven.
Can I use quick oats instead of old-fashioned rolled oats?
You can, but the texture will be different. Quick oats are cut smaller and will absorb more moisture, resulting in a less distinct oat texture and a potentially denser muffin. Old-fashioned oats give you that lovely, chewy bite, so I highly recommend sticking with them if you can.
My muffins didn’t dome. What happened?
This usually points to one of two things: your baking powder or baking soda might be old and lost its potency (check the expiration date!), or your oven temperature might be off. An oven thermometer is a cheap and invaluable tool to ensure your oven is actually at the temperature it says it is. Also, make sure you’re baking at a high enough heat initially—that burst of heat is crucial for the rise.
Can I make this into a loaf instead?
Yes, you can make a lovely banana bread! Pour the batter into a greased 9×5-inch loaf pan and bake at 350°F (175°C) for 55-65 minutes, or until a toothpick inserted into the center comes out clean. The baking time will be much longer, so keep an eye on it and tent it with foil if the top browns too quickly.
Banana Nut Oat Muffins
Whip up my easy Banana Nut Oat Muffins! This one-bowl recipe uses ripe bananas & oats for a moist, wholesome breakfast. Perfect for meal prep & freezing. Ready in 40 mins!
Ingredients
Ingredients
-
3 large, very ripe bananas (the more black spots, the better!)
-
⅓ cup melted coconut oil or neutral oil like avocado oil (80 ml)
-
½ cup light brown sugar (100 g, packed)
-
1 large egg (at room temperature)
-
1 tsp pure vanilla extract
-
1 cup whole wheat pastry flour or all-purpose flour (120 g)
-
½ cup old-fashioned rolled oats (50 g (plus 2 tbsp for topping))
-
1 tsp baking soda
-
½ tsp baking powder
-
½ tsp ground cinnamon
-
¼ tsp fine sea salt
-
⅔ cup chopped walnuts or pecans (75 g (plus 1 tbsp for topping))
Instructions
-
First, preheat your oven to 375°F (190°C). This higher initial heat helps the muffins get a nice, domed top. While it's heating up, line your muffin tin with paper liners or grease it thoroughly. Now, grab your very ripe bananas and plop them into your large mixing bowl. Mash them really well with a fork or potato masher until you have a relatively smooth, lump-free puree. You'll notice the aroma is already fantastic.01
-
To the banana puree, add the melted (and slightly cooled) coconut oil, the packed brown sugar, the room-temperature egg, and the vanilla extract. Whisk all these wet ingredients together until they're completely combined and the mixture looks uniform. It might look a little separated at first, but just keep whisking—it'll come together into a lovely, fragrant liquid base.02
-
Here's where we add the dry ingredients. Sprinkle the flour, rolled oats, baking soda, baking powder, cinnamon, and salt right on top of the wet mixture. I like to give the dry ingredients a quick stir with the whisk right on top before I incorporate them into the wet—this just ensures the leavening agents are evenly distributed. Then, switch to a spatula and gently fold everything together. The trick is to stop folding the moment you no longer see streaks of flour. A few lumps are totally fine; overmixing is the enemy of a tender muffin!03
-
Now for the crunch! Add about two-thirds of your chopped, toasted nuts to the batter. Fold them in gently, just once or twice, until they're evenly dispersed. You'll want to save the rest for that beautiful, tempting topping.04
-
Divide the batter evenly among the 12 muffin cups. I like using a cookie scoop for this—it's less messy and ensures they're all the same size. They should be filled nearly to the top for a nice, bakery-style muffin. Now, sprinkle the tops with the remaining oats and nuts. This not only looks pretty but adds a wonderful textural contrast.05
-
Bake for 18-22 minutes. You're looking for golden brown tops and a toothpick inserted into the center of a muffin that comes out clean or with just a few moist crumbs attached. The smell in your kitchen will be absolutely divine. Let the muffins cool in the tin for about 5 minutes—this helps them set—before transferring them to a wire rack to cool completely. I know it's hard, but try to let them cool a bit before diving in!06


