
Why You’ll Love This Banana Nice Cream with Peanut Butter
- It’s unbelievably creamy. Frozen bananas, when blended, take on this incredible, velvety texture that’s shockingly similar to traditional dairy ice cream. The peanut butter adds an extra layer of richness that makes it feel truly indulgent.
- You control the sweetness. The ripe bananas provide all the natural sugar you need, but you can easily adjust it. A dash of maple syrup or a pinch of dates can take it over the top if you like it sweeter.
- It’s a five-minute wonder. Seriously, from freezer to bowl in almost no time flat. It’s faster than going to the store, and you know exactly what’s in it. Perfect for those instant cravings.
- Endlessly customizable. This recipe is a fantastic base. Once you’ve mastered the basic technique, you can add chocolate chips, a swirl of jam, or even a sprinkle of sea salt to create your own signature flavor.
Ingredients & Tools
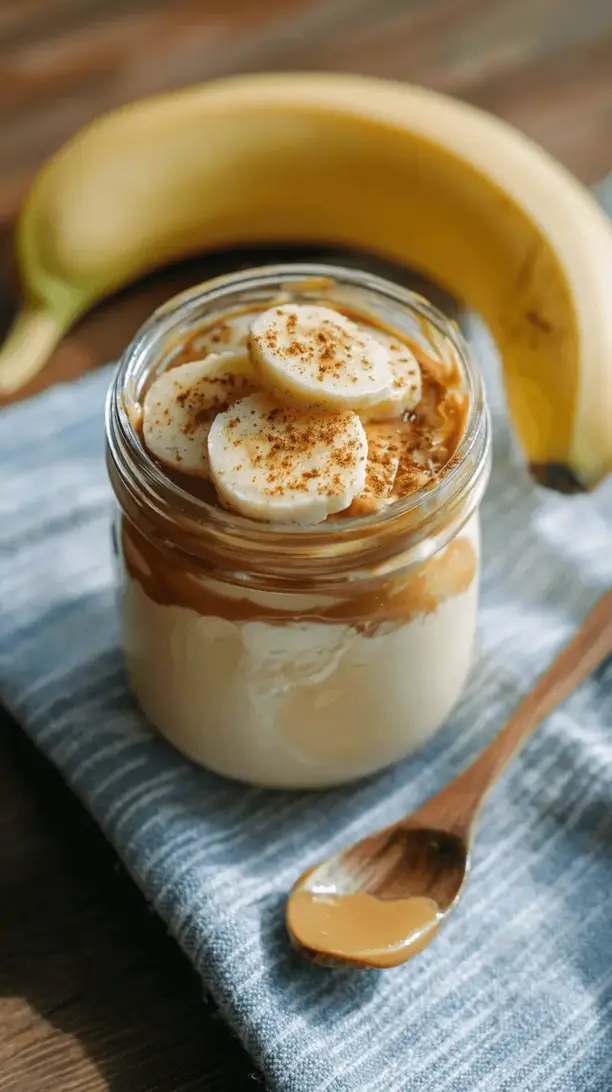
- 4 large ripe bananas (the spottier, the better!)
- 1/4 cup creamy, unsweetened peanut butter
- 1-2 tablespoons milk of choice (almond, oat, or coconut work beautifully)
- 1/2 teaspoon pure vanilla extract
- 1 tiny pinch of fine sea salt (optional, but it makes the flavors pop)
Tools: A high-speed blender or a food processor, a baking sheet, parchment paper, and a spatula.
The key here is the bananas—they have to be very ripe for maximum sweetness and creaminess. As for the peanut butter, using a natural, runny kind (the kind where the oil separates) will give you the smoothest results, but any creamy variety will work. The milk is just there to help the blades get going; you might not even need it if your blender is powerful enough.
Serves: 2-3 | Prep Time: 5 minutes (plus freezing) | Cook Time: 0 minutes | Total Time: 5 minutes
Before You Start: Tips & Ingredient Notes
- Banana Ripeness is Non-Negotiable. Don’t even think about using yellow bananas. You need them to be covered in brown spots. This ensures they’re sweet enough to mimic the sugar in ice cream and soft enough to blend into that dreamy texture.
- The Freezing Method Matters. Slice your bananas before freezing! Freezing them whole will make them nearly impossible to blend unless you have a commercial-grade machine. Laying the slices in a single layer on a parchment-lined tray prevents them from becoming one giant, unworkable banana lump.
- Patience is Your Secret Ingredient. When you first start blending, it will look like coarse sand or gravel. Don’t panic! Keep blending, scraping down the sides, and trusting the process. It will suddenly come together into a smooth, soft-serve consistency.
- Think About Your Peanut Butter. If you use a super-stiff, sugary peanut butter, you might need to add a bit more liquid to get things moving. A natural, drippy peanut butter incorporates much more easily and offers a purer, richer peanut flavor.
How to Make Banana Nice Cream with Peanut Butter
Step 1: Prepare and Freeze the Bananas. Start by peeling your very ripe bananas. Slice them into coins about 1/2-inch thick—this increases the surface area and helps them freeze faster and blend more easily. Spread the banana coins in a single layer on a parchment paper-lined baking sheet or plate. Pop this into the freezer for at least 4-5 hours, but ideally overnight. You’ll know they’re ready when the slices are frozen solid and rock-hard.
Step 2: Combine the Ingredients. Take your frozen banana slices and add them directly to the bowl of your food processor or high-speed blender. Add the peanut butter, vanilla extract, and that tiny pinch of salt. Hold off on the milk for now. The trick is to start with the least amount of liquid possible to achieve the creamiest result.
Step 3: The Blending Process. Now, secure the lid and start blending on low, then gradually increase to high. At first, it’s going to be loud and look like coarse crumbs. This is totally normal! You might need to stop the machine and use your spatula to scrape down the sides a few times. Be patient—this is the most crucial part. After a minute or two, the magic happens: the mixture will suddenly clump together, then smooth out into a thick, creamy, soft-serve consistency.
Step 4: Adjust the Consistency. Once the mixture is mostly smooth, take a look. If it’s having trouble coming together and looks a bit dry or crumbly, that’s when you add the milk. Start with just one tablespoon, blend again, and see if that helps it become velvety. Only add the second tablespoon if absolutely necessary. You want it thick and scoopable, not soupy.
Step 5: Serve or Freeze for Later. At this point, your nice cream is ready to eat! It will have the perfect texture of soft-serve ice cream. Scoop it directly into bowls and enjoy immediately. If you prefer a firmer, scoopable ice cream, transfer the mixture to a loaf pan or an airtight container and freeze it for another 1-2 hours. Just know that it will freeze very hard because there’s no added fat or sugar to keep it soft; you may need to let it sit on the counter for 5-10 minutes before scooping.
Serving Suggestions
Complementary Dishes
- A warm, gooey brownie — The contrast of the cold, creamy nice cream against a rich, slightly warm chocolate brownie is an absolute dream. It creates a makeshift banana-peanut butter sundae that’s impossible to resist.
- Fresh berry compote — The bright, tangy acidity of simmered strawberries or raspberries cuts through the richness of the peanut butter beautifully, adding a lovely swirl of color and freshness.
- Toasted coconut flakes — For a little tropical twist, a generous sprinkle of toasted coconut adds a wonderful nutty flavor and a delightful crunchy texture that plays so well with the creaminess.
Drinks
- A cold glass of almond milk — It keeps the nutty theme going and is a simple, classic pairing that just feels right. It’s like the drinkable version of your dessert.
- Strong black coffee — The bitterness of a good espresso or strong brew is a fantastic counterpart to the sweetness of the bananas and the richness of the peanut butter. It’s a very grown-up way to enjoy this treat.
- A creamy oat milk latte — If you want to lean into the cozy, creamy vibes, a warm latte makes this feel like a decadent dessert coffee break.
Something Sweet
- Dark chocolate chunks — Pushing a few pieces of high-quality dark chocolate into the nice cream right before serving gives you little pockets of intense, bittersweet flavor that elevate the whole experience.
- A drizzle of salted caramel sauce — A little goes a long way here, but the sweet-and-salty combination with the peanut butter is just next-level delicious. Opt for a vegan version if needed.
- Crumbled peanut butter cookies — For the ultimate peanut butter lover, crumbling a favorite cookie on top doubles down on the flavor and adds a fantastic chewy-crunchy element.
Top Mistakes to Avoid
- Mistake: Using underripe bananas. This is the number one reason nice cream can taste bland or have a weird, starchy texture. The sweetness and creaminess come from the bananas breaking down, which only happens when they’re super ripe.
- Mistake: Adding too much liquid too soon. I’ve messed this up before too—you get impatient and pour in the milk right at the beginning. This will prevent the bananas from whipping up properly and you’ll end up with a smooth but icy mixture instead of a creamy one.
- Mistake: Not freezing the banana slices individually. If you toss whole bananas or a big clump of slices into a bag to freeze, they’ll fuse into a solid block. Your blender will struggle, and you risk burning out the motor. The single layer on a tray is non-negotiable for easy blending.
- Mistake: Over-blending once it’s smooth. Once it has transformed into a creamy consistency, stop blending! If you keep going, the friction from the blades will start to warm it up, melting it back into a banana-peanut butter smoothie.
Expert Tips
- Tip: For an ultra-luxurious texture, add a tablespoon of coconut cream. This adds a tiny bit of healthy fat that makes the final product even creamier and helps it stay a bit softer when stored in the freezer. It’s a pro move for ice cream perfection.
- Tip: Make “nice cream” packs for instant desserts. Once your banana slices are frozen, portion them out into zip-top bags—enough for one batch per bag. Then, when a craving hits, you can just grab a bag, add your peanut butter, and blend. It streamlines the process even more.
- Tip: Get creative with mix-ins after blending. Once the base is smooth, pulse in your additions. Chocolate chips, chopped nuts, or even a swirl of raspberry jam should be folded in at the very end with just a few pulses to avoid over-mixing and turning the color muddy.
- Tip: If it gets too soft, re-freeze it. If you’re serving a crowd and the nice cream is getting melty on the counter, simply pour it back into a container and freeze it again. The texture might be a tad icier, but it’s still perfectly delicious.
FAQs
Can I make this without a high-powered blender or food processor?
You can, but it requires a little more effort. A standard blender will work, but you’ll likely need to add a bit more liquid (milk) to get the blades moving, and you’ll have to stop and scrape down the sides very frequently. A food processor is actually often easier for this recipe than a standard blender. The key is patience—don’t force it by adding too much liquid all at once. Let the machine work in short bursts.
How long can I store banana nice cream in the freezer?
It will keep for about 1-2 months in an airtight container. However, it will freeze very solid because there are no stabilizers. When you’re ready to eat it, let it sit on the counter for 5-15 minutes to thaw slightly until it’s scoopable. You can also microwave it for 10-15 seconds to soften it up quickly, but be careful not to melt it!
Can I use a different nut butter?
Absolutely! This recipe is incredibly versatile. Almond butter, cashew butter, or even sunflower seed butter (for a nut-free version) would all be fantastic. Each will impart its own unique flavor profile. Almond butter will give a slightly milder, toastier note, while cashew butter will be incredibly rich and creamy.
Why did my nice cream turn out icy?
This usually happens for one of two reasons. First, not enough fat: the peanut butter provides fat, but if you skimp on it or use a very low-fat version, the result can be icier. Second, over-blending after adding liquid: if you blend for too long once the milk is in, the mixture can warm up and then re-freeze into larger ice crystals. Blend just until smooth and creamy, then stop immediately.
Is it possible to make this sugar-free?
It is naturally refined-sugar-free if you rely solely on the sweetness of the ripe bananas. If you find it’s not sweet enough for your taste, instead of refined sugar, try adding a pitted medjool date or two along with the bananas during blending, or a tiny drizzle of pure maple syrup. This keeps it whole-foods based while adjusting the sweetness.
Banana Nice Cream With Peanut Butter
Craving ice cream? Try this creamy Banana Nice Cream with Peanut Butter! A healthy, 5-minute dessert with no added sugar. Your new favorite guilt-free treat is here.
Ingredients
Ingredients
-
4 large ripe bananas (the spottier, the better!)
-
1/4 cup creamy, unsweetened peanut butter
-
1-2 tablespoons milk of choice (almond, oat, or coconut work beautifully)
-
1/2 teaspoon pure vanilla extract
-
1 tiny pinch fine sea salt (optional, but it makes the flavors pop)
Instructions
-
Prepare and Freeze the Bananas. Start by peeling your very ripe bananas. Slice them into coins about 1/2-inch thick—this increases the surface area and helps them freeze faster and blend more easily. Spread the banana coins in a single layer on a parchment paper-lined baking sheet or plate. Pop this into the freezer for at least 4-5 hours, but ideally overnight. You'll know they're ready when the slices are frozen solid and rock-hard.01
-
Combine the Ingredients. Take your frozen banana slices and add them directly to the bowl of your food processor or high-speed blender. Add the peanut butter, vanilla extract, and that tiny pinch of salt. Hold off on the milk for now. The trick is to start with the least amount of liquid possible to achieve the creamiest result.02
-
The Blending Process. Now, secure the lid and start blending on low, then gradually increase to high. At first, it's going to be loud and look like coarse crumbs. This is totally normal! You might need to stop the machine and use your spatula to scrape down the sides a few times. Be patient—this is the most crucial part. After a minute or two, the magic happens: the mixture will suddenly clump together, then smooth out into a thick, creamy, soft-serve consistency.03
-
Adjust the Consistency. Once the mixture is mostly smooth, take a look. If it's having trouble coming together and looks a bit dry or crumbly, that's when you add the milk. Start with just one tablespoon, blend again, and see if that helps it become velvety. Only add the second tablespoon if absolutely necessary. You want it thick and scoopable, not soupy.04
-
Serve or Freeze for Later. At this point, your nice cream is ready to eat! It will have the perfect texture of soft-serve ice cream. Scoop it directly into bowls and enjoy immediately. If you prefer a firmer, scoopable ice cream, transfer the mixture to a loaf pan or an airtight container and freeze it for another 1-2 hours. Just know that it will freeze very hard because there's no added fat or sugar to keep it soft; you may need to let it sit on the counter for 5-10 minutes before scooping.05


