
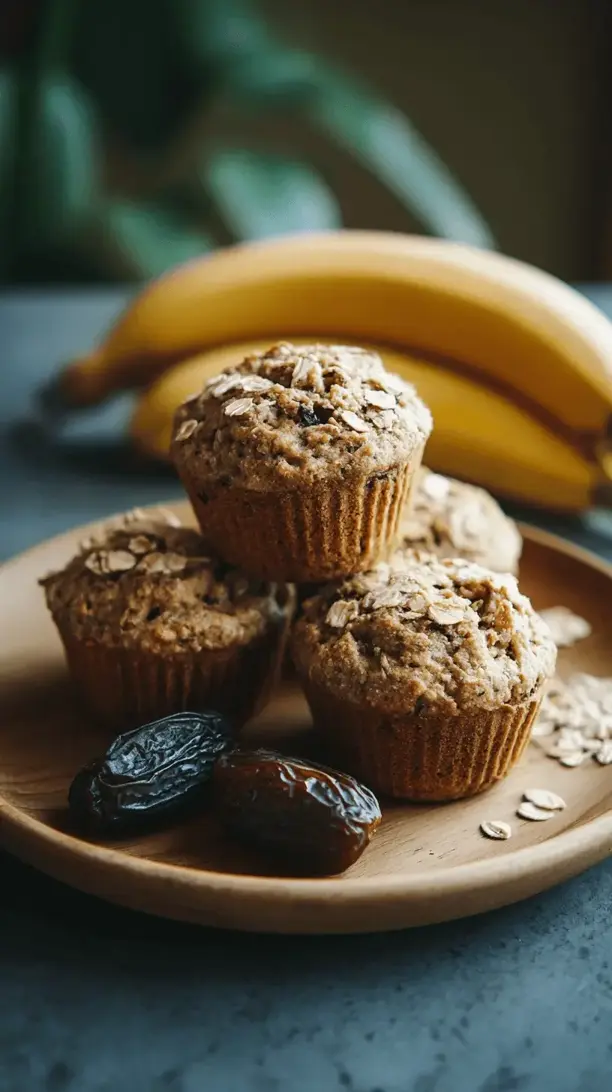
Why You’ll Love This Banana Date Oat Muffins
- They’re the perfect texture. The combination of mashed banana and oats creates a muffin that’s incredibly moist and satisfyingly hearty without being dense or gummy. Every bite is a delightful mix of soft crumb and chewy dates.
- Naturally sweetened, perfectly balanced. Ripe bananas and sticky-sweet dates do all the heavy lifting here. You get a deep, caramel-like sweetness that’s far more interesting than plain sugar, and it pairs so beautifully with the warm, toasty notes of the oats.
- They’re a fantastic make-ahead breakfast or snack. These muffins freeze like a dream and are just as good thawed as they are fresh from the oven. Toss one in your bag for a mid-morning pick-me-up—it’s a much better option than a sad, store-bought granola bar.
- Incredibly simple to whip up. No fancy equipment or complicated techniques required. It’s a straightforward, one-bowl (mostly!) affair that’s practically foolproof. Even if you’re not a confident baker, you can absolutely nail these.
Ingredients & Tools
- 3 large, very ripe bananas (the blacker, the better!)
- 2 large eggs, at room temperature
- ⅓ cup (80 ml) melted coconut oil or neutral oil (like avocado or grapeseed)
- ⅓ cup (115 g) pure maple syrup or honey
- 1 tsp pure vanilla extract
- 1 ½ cups (150 g) old-fashioned rolled oats (not instant)
- 1 cup (125 g) whole wheat pastry flour or all-purpose flour
- 1 tsp baking soda
- 1 tsp ground cinnamon
- ½ tsp fine sea salt
- ¾ cup (120 g) pitted dates, chopped into small pieces
Tools: A 12-cup muffin tin, muffin liners (or a good non-stick spray), a large mixing bowl, a fork or potato masher, a smaller bowl, a whisk, and an ice cream scoop (for easy, mess-free portioning).
The quality of your bananas and dates really makes a difference here. Those spotty, almost-black bananas are packed with natural sugar, which means a sweeter, more flavorful muffin. And for the dates, Medjool are my top choice—they’re so plump and soft—but any pitted, soft date will work beautifully.
Serves: 12 muffins | Prep Time: 15 minutes | Cook Time: 20-22 minutes | Total Time: 40 minutes
Before You Start: Tips & Ingredient Notes
- Banana ripeness is non-negotiable. Seriously, don’t use yellow bananas. You want them to be covered in brown spots, soft, and super easy to mash. This is the key to maximum sweetness and moisture.
- How to chop sticky dates. If your dates are a little dry, soak them in hot water for 10 minutes, then drain and pat dry. To prevent them from clumping together when you mix them in, toss the chopped dates in a teaspoon of the measured flour—it creates a light coating that helps them distribute evenly.
- Why room temperature eggs? Cold eggs can cause the melted coconut oil to solidify on contact, which can affect the texture of your batter. If you forget, just place the eggs in a bowl of warm water for 5 minutes to take the chill off.
- Don’t overmix the batter. This is the golden rule of muffin-making. Once you add the dry ingredients to the wet, stir just until the flour disappears. A few lumps are absolutely fine! Overmixing leads to tough, tunnel-ridden muffins.
How to Make Banana Date Oat Muffins
Step 1: First, preheat your oven to 350°F (175°C). This is crucial for giving the muffins an immediate lift when they hit the heat. Line your muffin tin with paper liners or grease it thoroughly. Now, grab those ripe bananas and peel them into your large mixing bowl. Use a fork or a potato masher to mash them really well—you want them to be relatively smooth, with just a few small lumps for texture. The aroma at this stage is already so promising.
Step 2: To the mashed banana, add the room-temperature eggs, melted coconut oil, maple syrup, and vanilla extract. Whisk everything together until it’s completely combined and smooth. You’ll notice the mixture will look a bit glossy and emulsified. If you’re using coconut oil and see a few small solid bits, don’t panic; it will all work out in the oven.
Step 3: In your smaller bowl, whisk together the rolled oats, flour, baking soda, cinnamon, and salt. This ensures the leavening agent and spices are evenly distributed throughout the dry ingredients. Now, here’s the important part: pour the dry ingredients into the wet ingredients. Using a spatula, gently fold the mixture together. Stop stirring the moment you no longer see streaks of flour. Remember, a few dry spots are better than an overmixed batter.
Step 4: Now, add your chopped dates. If you tossed them in a bit of flour, they should sprinkle in nicely without clumping. Fold them into the batter gently, just until they’re evenly dispersed. The batter will be quite thick, which is exactly what you want for a sturdy, domed muffin top.
Step 5: Using an ice cream scoop or a large spoon, divide the batter evenly among the 12 muffin cups. I like to fill them almost to the top for a nice, bakery-style crown. You can sprinkle a few extra rolled oats on top of each one for a pretty, rustic look before baking.
Step 6: Slide the muffin tin into your preheated oven and bake for 20-22 minutes. You’ll know they’re done when the tops are golden brown and spring back lightly when touched, and a toothpick inserted into the center of a muffin comes out clean or with just a few moist crumbs (but no wet batter).
Step 7: This is the hardest part: let the muffins cool in the tin for about 5 minutes. This allows them to set up so they don’t fall apart when you take them out. Then, transfer them to a wire rack to cool completely. I know it’s tempting, but try to let them cool for at least 15 minutes before diving in—the flavors really settle and develop as they cool.
Serving Suggestions
Complementary Dishes
- A bowl of Greek yogurt with berries — The tangy, creamy yogurt and fresh, bright berries cut through the sweetness of the muffins perfectly for a balanced breakfast.
- A simple scrambled egg or two — For a more substantial morning meal, the savory, protein-rich eggs pair wonderfully with the sweet, carb-y muffins.
- A warm, spiced apple compote — Lean into the cozy, autumnal vibes by serving a muffin alongside softly stewed apples with a dash of cinnamon.
Drinks
- A strong cup of black coffee — The bitterness of the coffee is a classic, unbeatable partner to the sweet, spiced notes of the muffin.
- A glass of cold milk or a latte — It’s a timeless combination for a reason. The creaminess is just so comforting.
- A spicy chai tea latte — The warm spices in the chai echo the cinnamon in the muffins, creating a really harmonious flavor experience.
Something Sweet
- A small drizzle of almond butter — For an extra-special treat, warm a muffin slightly and drizzle a little almond butter over the top. The nutty flavor is incredible.
- A scoop of vanilla bean ice cream — Transform a muffin into a decadent dessert by splitting it warm and serving it à la mode.
- A simple honey glaze — Whisk together a little powdered sugar, honey, and a splash of milk for a quick, sweet glaze to drizzle over the cooled muffins.
Top Mistakes to Avoid
- Mistake: Using underripe bananas. Yellow bananas lack the intense sweetness and moisture that this recipe relies on. Your muffins will be bland and dry. Wait for those bananas to get seriously spotty!
- Mistake: Overmixing the batter. I’ve messed this up before too… it’s so easy to just keep stirring. But overmixing develops the gluten in the flour, resulting in a tough, chewy texture instead of a light, tender crumb. Fold, don’t beat!
- Mistake: Not properly preparing the dates. If you just chop dry, sticky dates and dump them in, they’ll all clump together in one big ball. Taking the extra minute to toss them in flour ensures every bite gets a little piece of date.
- Mistake: Skipping the cooling time in the tin. If you try to remove the muffins immediately, they’re too delicate and are likely to break apart. The 5-minute rest is essential for structural integrity.
Expert Tips
- Tip: For an extra flavor boost, toast your oats. Spread the rolled oats on a baking sheet and toast them in a 350°F oven for 5-7 minutes until fragrant and lightly golden. Let them cool before using. This deepens their nutty flavor incredibly.
- Tip: Make them gluten-free with one simple swap. Use a certified gluten-free oat brand and swap the whole wheat flour for a 1:1 gluten-free baking blend. The texture will be just as wonderful.
- Tip: Create a “streusel” topping for a bakery-style finish. Mix 2 tbsp each of oats, flour, and brown sugar with 1 tbsp of melted butter until crumbly. Sprinkle over the batter before baking for a delightful crunchy top.
- Tip: Freeze individual muffins for instant gratification. Once completely cool, wrap each muffin tightly in plastic wrap and place them in a freezer bag. They’ll keep for up to 3 months. To enjoy, just thaw at room temperature or microwave for 30-45 seconds.
FAQs
Can I use quick oats instead of old-fashioned rolled oats?
You can, but the texture will be different. Quick oats are cut smaller and absorb more moisture, which can make the muffins a bit denser and more cake-like, rather than having the distinct, hearty chew of old-fashioned oats. If it’s all you have, go for it, but rolled oats are definitely preferred for the best texture.
My muffins didn’t dome nicely. What happened?
A few things can cause flat muffins. The most common culprit is old baking soda—check the expiration date! Also, make sure your oven is fully preheated. If the batter sits in a cool oven, the leavening agents can lose their oomph before they get hot. Finally, an overmixed batter can also lead to flat tops. Next time, be extra gentle when folding.
Can I make these without eggs?
Yes, you can try a “flax egg.” Mix 1 tablespoon of ground flaxseed with 3 tablespoons of water for each egg needed, and let it sit for 5 minutes to gel up. So for this recipe, you’d use two flax eggs. The muffins might be a tad more dense but will still be delicious.
How should I store these muffins?
Once completely cool, store them in an airtight container at room temperature for up to 3 days. Because they’re so moist, I don’t recommend refrigerating them, as it can dry them out. For longer storage, freezing is definitely the way to go.
Can I add nuts or chocolate chips?
Absolutely! These muffins are a fantastic base. A half-cup of chopped walnuts or pecans would add a lovely crunch. And who can say no to chocolate? A half-cup of dark chocolate chips would be a delicious addition. Just fold them in along with the dates.
Banana Date Oat Muffins
Whip up my incredibly moist Banana Date Oat Muffins! This easy, one-bowl recipe uses ripe bananas & sweet dates for a wholesome, bakery-style treat. Perfect for breakfast or a snack.
Ingredients
Ingredients
-
3 large, very ripe bananas (the blacker, the better!)
-
2 large eggs (at room temperature)
-
⅓ cup melted coconut oil or neutral oil (80 ml)
-
⅓ cup pure maple syrup or honey (115 g)
-
1 tsp pure vanilla extract
-
1 ½ cups old-fashioned rolled oats (150 g, not instant)
-
1 cup whole wheat pastry flour or all-purpose flour (125 g)
-
1 tsp baking soda
-
1 tsp ground cinnamon
-
½ tsp fine sea salt
-
¾ cup pitted dates, chopped into small pieces (120 g)
Instructions
-
First, preheat your oven to 350°F (175°C). This is crucial for giving the muffins an immediate lift when they hit the heat. Line your muffin tin with paper liners or grease it thoroughly. Now, grab those ripe bananas and peel them into your large mixing bowl. Use a fork or a potato masher to mash them really well—you want them to be relatively smooth, with just a few small lumps for texture. The aroma at this stage is already so promising.01
-
To the mashed banana, add the room-temperature eggs, melted coconut oil, maple syrup, and vanilla extract. Whisk everything together until it's completely combined and smooth. You'll notice the mixture will look a bit glossy and emulsified. If you're using coconut oil and see a few small solid bits, don't panic; it will all work out in the oven.02
-
In your smaller bowl, whisk together the rolled oats, flour, baking soda, cinnamon, and salt. This ensures the leavening agent and spices are evenly distributed throughout the dry ingredients. Now, here's the important part: pour the dry ingredients into the wet ingredients. Using a spatula, gently fold the mixture together. Stop stirring the moment you no longer see streaks of flour. Remember, a few dry spots are better than an overmixed batter.03
-
Now, add your chopped dates. If you tossed them in a bit of flour, they should sprinkle in nicely without clumping. Fold them into the batter gently, just until they're evenly dispersed. The batter will be quite thick, which is exactly what you want for a sturdy, domed muffin top.04
-
Using an ice cream scoop or a large spoon, divide the batter evenly among the 12 muffin cups. I like to fill them almost to the top for a nice, bakery-style crown. You can sprinkle a few extra rolled oats on top of each one for a pretty, rustic look before baking.05
-
Slide the muffin tin into your preheated oven and bake for 20-22 minutes. You'll know they're done when the tops are golden brown and spring back lightly when touched, and a toothpick inserted into the center of a muffin comes out clean or with just a few moist crumbs (but no wet batter).06
-
This is the hardest part: let the muffins cool in the tin for about 5 minutes. This allows them to set up so they don't fall apart when you take them out. Then, transfer them to a wire rack to cool completely. I know it's tempting, but try to let them cool for at least 15 minutes before diving in—the flavors really settle and develop as they cool.07


