Why You’ll Love This Balsamic Glazed Roasted Cauliflower
- It’s a total flavor bomb. We’re not just roasting here; we’re creating layers of taste. The high-heat roast brings out the cauliflower’s natural sweetness, which is then perfectly balanced by the tangy, rich balsamic glaze. It’s a symphony in your mouth.
- It’s deceptively simple. With just a handful of pantry staples, you can create a side dish that looks and tastes like it came from a fancy restaurant. The process is straightforward—chop, roast, glaze, devour. No complicated techniques required.
- The texture is everything. You get the best of both worlds: tender, almost creamy florets on the inside and those delightfully crispy, caramelized edges on the outside. That contrast is what keeps you coming back for another forkful.
- It’s incredibly versatile. This cauliflower plays well with so many main courses, from a simple roast chicken to a hearty lentil loaf. It’s also fantastic served over a bed of greens for a warm salad or even tossed with pasta.
Ingredients & Tools
- 1 large head of cauliflower (about 2 to 2.5 pounds)
- 3 tablespoons extra virgin olive oil, divided
- 1 teaspoon kosher salt
- ½ teaspoon freshly ground black pepper
- ½ cup good-quality balsamic vinegar
- 2 tablespoons pure maple syrup or honey
- 2 cloves garlic, minced
- 1 teaspoon fresh thyme leaves (or ½ tsp dried)
- Optional for serving: Fresh parsley, chopped, and a sprinkle of flaky sea salt.
Tools: A large rimmed baking sheet, parchment paper or a silicone baking mat, a small saucepan, a large mixing bowl.
Don’t be tempted to skip the parchment paper—it makes cleanup an absolute breeze and prevents the sticky glaze from cementing itself to your pan. And when I say “good-quality” balsamic, I don’t mean you need to break the bank on a 50-year-aged bottle; just avoid the super cheap, overly acidic ones. A mid-range bottle will reduce into a beautifully balanced glaze.
Serves: 4 as a side | Prep Time: 10 minutes | Cook Time: 30-35 minutes | Total Time: 40-45 minutes
Before You Start: Tips & Ingredient Notes
- Cauliflower size matters. Try to cut your florets into roughly equal sizes—about 1 to 1.5 inches. This ensures they all cook at the same rate, so you don’t end up with some burnt pieces and some undercooked ones. A little variation is fine, but aim for consistency.
- Don’t crowd the pan! This is the golden rule of roasting. If you pile all the cauliflower onto a small baking sheet, it will steam instead of roast. We want dry heat to hit every surface to get those beautiful brown, crispy bits. Use a large enough sheet so the florets have some personal space.
- The glaze reduction is key. You’ll know your balsamic glaze is ready when it coats the back of a spoon and, if you drag a spatula through it, it leaves a clear path that’s slow to fill in. It will thicken significantly as it cools, so taking it off the heat at the right moment prevents it from turning into candy in the pan.
- Fresh vs. dried herbs. Fresh thyme is lovely here, but dried works perfectly well too. If using dried, add it with the salt and pepper before roasting so the heat can wake up its oils. If using fresh, I like to add it to the glaze at the end for a brighter flavor.
How to Make Balsamic Glazed Roasted Cauliflower
Step 1: Prep the Cauliflower and Oven. First, preheat your oven to 425°F (220°C). This high heat is non-negotiable for achieving that perfect caramelization. While the oven heats up, prepare your cauliflower. Remove the green leaves and cut the head into florets. The trick is to slice through the core of the cauliflower to create florets with flat edges—these flat surfaces will get wonderfully crispy against the hot baking sheet. Place all the florets in a large mixing bowl.
Step 2: Season and Oil the Florets. To the bowl of cauliflower, add 2 tablespoons of the olive oil, the kosher salt, and the black pepper. If you’re using dried thyme, add it now. Use your hands to toss everything together, making sure each floret is evenly coated with the oil and seasonings. This hands-on method is the best way to ensure nothing is missed. You’ll notice the cauliflower will start to look a little glossy—that’s exactly what you want.
Step 3: The First Roast. Line your large baking sheet with parchment paper and spread the seasoned cauliflower out in a single, even layer. Make sure the florets aren’t touching each other too much. Pop the sheet into the preheated oven and roast for 20 minutes. You’re looking for the edges to just start turning a light golden brown and the stems to become tender when pierced with a fork.
Step 4: Create the Glaze. While the cauliflower is roasting, it’s glaze time! In a small saucepan, combine the balsamic vinegar, maple syrup (or honey), the remaining 1 tablespoon of olive oil, and the minced garlic. Bring this mixture to a gentle simmer over medium heat, then immediately reduce the heat to low. Let it bubble away gently for about 8-10 minutes, stirring occasionally. You’ll notice the smell will change from sharp and vinegary to sweet and rich. The glaze is ready when it has reduced by about half and nicely coats a spoon.
Step 5: Glaze and Finish Roasting. After the initial 20 minutes, carefully remove the baking sheet from the oven. The cauliflower should be partially cooked and starting to brown. Pour the warm balsamic glaze over the hot cauliflower. Add the fresh thyme now if you’re using it. Use a spatula to gently toss everything together, ensuring each piece gets a beautiful, glossy coat. Spread the glazed cauliflower back into a single layer and return the pan to the oven for another 10-15 minutes. This final roast allows the glaze to caramelize and cling to the florets, creating that signature sticky finish.
Step 6: Serve Immediately. Once the cauliflower is tender and the edges are dark and caramelized, it’s done! Transfer it to a serving platter. For a final touch of freshness and a bit of crunch, sprinkle with some chopped fresh parsley and a pinch of flaky sea salt. This dish is best enjoyed hot, right out of the oven, when the textures are at their peak.
Serving Suggestions
Complementary Dishes
- Herb-Roasted Chicken — The simple, savory flavors of a classic roast chicken are the perfect canvas for the bold, tangy cauliflower. They complement each other without competing.
- Creamy Polenta or Mashed Potatoes — Spoon the cauliflower and any extra glaze over a soft, creamy base. The combination of textures and the way the polenta or potatoes soak up the glaze is absolutely divine.
- Pan-Seared Salmon — The richness of the salmon pairs beautifully with the acidity of the balsamic glaze, creating a really well-balanced and elegant plate.
Drinks
- A crisp Pinot Grigio or Sauvignon Blanc — The bright acidity in these white wines will cut through the sweetness of the glaze and refresh your palate between bites.
- A light-bodied red like Pinot Noir — If you prefer red wine, a fruity, low-tannin Pinot Noir won’t overpower the dish and will harmonize with the earthy, sweet notes.
- Sparkling Water with Lemon — A non-alcoholic option that provides a bubbly, clean contrast to the rich and sticky glaze, making each bite taste vibrant.
Something Sweet
- Dark Chocolate Avocado Mousse — The deep, bitter notes of dark chocolate are a fantastic follow-up to the sweet and savory cauliflower, and the mousse is light enough to not feel too heavy.
- Lemon Sorbet — This is the ultimate palate cleanser. The sharp, citrusy zing of a good sorbet is incredibly refreshing after the rich flavors of the main course.
- Almond Biscotti — A simple, not-too-sweet cookie to nibble on with a cup of coffee or tea. The nuttiness echoes the roasted flavors from the cauliflower beautifully.
Top Mistakes to Avoid
- Mistake: Using a cheap, harsh balsamic vinegar. The glaze is the star here, and a low-quality vinegar can make it taste unpleasantly sharp and acidic instead of sweet and complex. A mid-range, moderately aged balsamic makes all the difference.
- Mistake: Overcrowding the baking sheet. I’ve messed this up before too, thinking I could fit it all on one pan. If the florets are piled on top of each other, they release moisture and steam, preventing them from getting crispy. Use two sheets if you need to!
- Mistake: Burning the glaze. The sugar in the maple syrup can go from caramelized to burnt very quickly. Keep the heat on low once it simmers and watch it carefully during the last few minutes of reduction. It should be thick and syrupy, not black and bitter.
- Mistake: Skipping the final roast after glazing. Tossing the cauliflower in the glaze and serving it immediately is good, but giving it those extra 10-15 minutes in the oven is what transforms it from good to unforgettable. This step caramelizes the glaze onto the cauliflower.
Expert Tips
- Tip: Add a touch of heat. For a subtle kick, add a pinch of red pepper flakes to the balsamic glaze as it simmers. The sweet, tangy, and spicy combination is seriously addictive.
- Tip: Make it a meal. Turn this side into a main dish by adding a can of drained chickpeas to the baking sheet for the last 15 minutes of roasting. You’ll get a fantastic vegetarian dinner with extra protein and fiber.
- Tip: Prep ahead for easy entertaining. You can cut the cauliflower into florets a day in advance; just store them in an airtight container in the fridge. The balsamic glaze can also be made ahead and gently reheated before using.
- Tip: Get creative with leftovers. Chop any leftover roasted cauliflower and toss it into a frittata or a grain bowl the next day. It adds a huge punch of flavor to your lunch.
FAQs
Can I make this recipe ahead of time?
You can do some components ahead! The cauliflower can be chopped and stored in the fridge a day early. The balsamic glaze can be made and refrigerated in a jar for up to a week—just gently reheat it to make it pourable. However, for the best texture, I recommend roasting and glazing the cauliflower just before serving. If you must reheat leftovers, a quick trip under the broiler for a few minutes will help re-crisp it better than a microwave.
My glaze is too thin/too thick. What happened?
If it’s too thin, you likely just need to simmer it a bit longer. The reduction process takes time, and it will suddenly start to thicken up. If it’s too thick (perhaps it cooled into a sticky candy), don’t panic! Simply add a teaspoon of warm water at a time back into the saucepan and whisk over low heat until it reaches a syrupy consistency again.
Can I use frozen cauliflower?
You can, but honestly, the results won’t be the same. Frozen cauliflower has a much higher water content, which means it will steam and become soft rather than achieving those crisp, caramelized edges we’re after. If it’s your only option, thaw it completely and pat it very, very dry with paper towels before tossing with oil.
Is there a substitute for maple syrup?
Absolutely! Honey is a perfect one-to-one substitute. Agave nectar would also work well. If you need a sugar-free option, you could try a monk fruit sweetener that measures like sugar, but keep a very close eye on it as it might reduce and caramelize differently.
Why is my cauliflower soggy?
Sogginess is almost always caused by one of two things: overcrowding the pan (which leads to steaming) or not using a hot enough oven. Make sure your oven is fully preheated to 425°F and that your florets have plenty of space on the baking sheet. Using parchment paper also helps by absorbing any excess moisture.
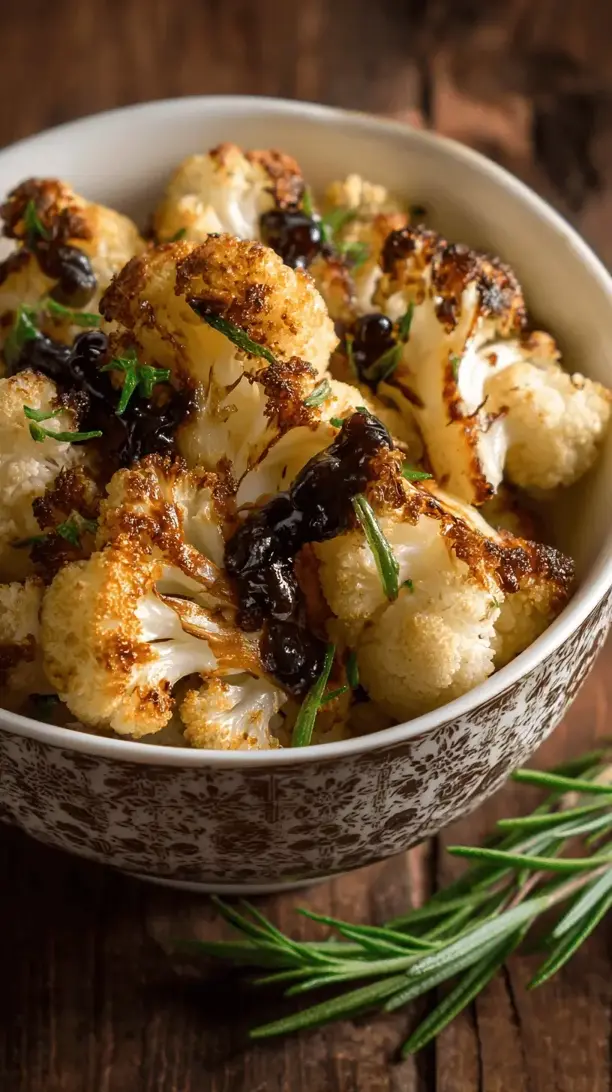
Balsamic Glazed Roasted Cauliflower
Transform humble cauliflower into a spectacular side dish! This easy balsamic glazed roasted cauliflower recipe delivers crispy, caramelized perfection with a sweet & savory glaze.
Ingredients
Ingredients
-
1 large head cauliflower (about 2 to 2.5 pounds)
-
3 tablespoons extra virgin olive oil (divided)
-
1 teaspoon kosher salt
-
½ teaspoon black pepper (freshly ground)
-
½ cup balsamic vinegar (good-quality)
-
2 tablespoons maple syrup or honey (pure)
-
2 cloves garlic (minced)
-
1 teaspoon thyme leaves (fresh (or ½ tsp dried))
-
parsley (Optional for serving: fresh, chopped)
-
flaky sea salt (Optional for serving: a sprinkle)
Instructions
-
Prep the Cauliflower and Oven. First, preheat your oven to 425°F (220°C). This high heat is non-negotiable for achieving that perfect caramelization. While the oven heats up, prepare your cauliflower. Remove the green leaves and cut the head into florets. The trick is to slice through the core of the cauliflower to create florets with flat edges—these flat surfaces will get wonderfully crispy against the hot baking sheet. Place all the florets in a large mixing bowl.01
-
Season and Oil the Florets. To the bowl of cauliflower, add 2 tablespoons of the olive oil, the kosher salt, and the black pepper. If you're using dried thyme, add it now. Use your hands to toss everything together, making sure each floret is evenly coated with the oil and seasonings. This hands-on method is the best way to ensure nothing is missed. You'll notice the cauliflower will start to look a little glossy—that's exactly what you want.02
-
The First Roast. Line your large baking sheet with parchment paper and spread the seasoned cauliflower out in a single, even layer. Make sure the florets aren't touching each other too much. Pop the sheet into the preheated oven and roast for 20 minutes. You're looking for the edges to just start turning a light golden brown and the stems to become tender when pierced with a fork.03
-
Create the Glaze. While the cauliflower is roasting, it's glaze time! In a small saucepan, combine the balsamic vinegar, maple syrup (or honey), the remaining 1 tablespoon of olive oil, and the minced garlic. Bring this mixture to a gentle simmer over medium heat, then immediately reduce the heat to low. Let it bubble away gently for about 8-10 minutes, stirring occasionally. You'll notice the smell will change from sharp and vinegary to sweet and rich. The glaze is ready when it has reduced by about half and nicely coats a spoon.04
-
Glaze and Finish Roasting. After the initial 20 minutes, carefully remove the baking sheet from the oven. The cauliflower should be partially cooked and starting to brown. Pour the warm balsamic glaze over the hot cauliflower. Add the fresh thyme now if you're using it. Use a spatula to gently toss everything together, ensuring each piece gets a beautiful, glossy coat. Spread the glazed cauliflower back into a single layer and return the pan to the oven for another 10-15 minutes. This final roast allows the glaze to caramelize and cling to the florets, creating that signature sticky finish.05
-
Serve Immediately. Once the cauliflower is tender and the edges are dark and caramelized, it's done! Transfer it to a serving platter. For a final touch of freshness and a bit of crunch, sprinkle with some chopped fresh parsley and a pinch of flaky sea salt. This dish is best enjoyed hot, right out of the oven, when the textures are at their peak.06