
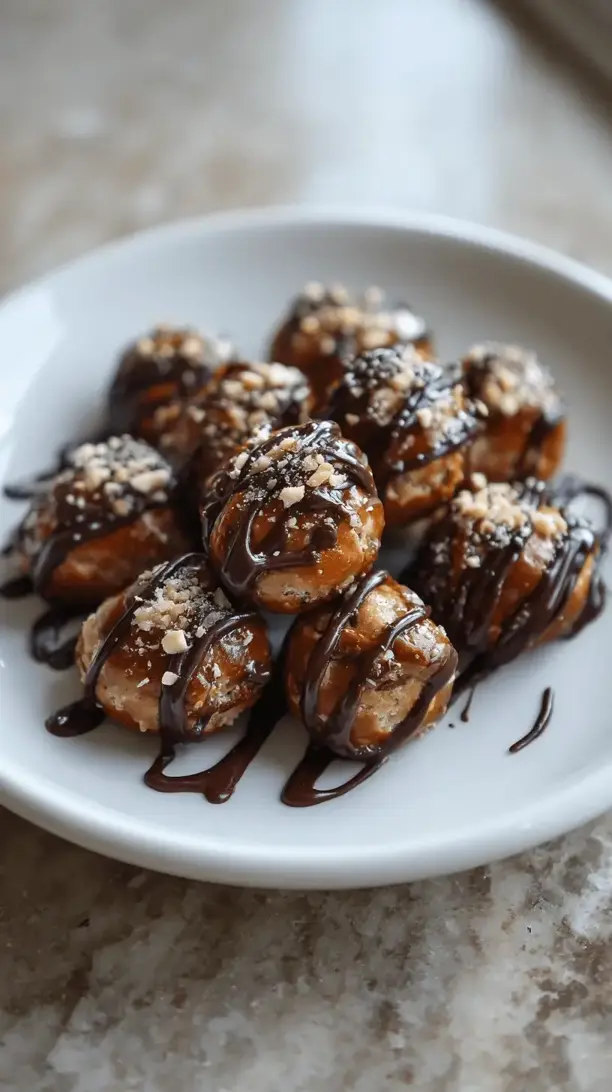
Why You’ll Love This Almond Butter Pretzel Bites
- The perfect texture party. You get the satisfying crunch from the pretzel, the smooth, creamy melt of the almond butter, and the crisp snap of the dark chocolate shell. It’s a symphony of textures in every single bite.
- Surprisingly simple to make. Honestly, there’s no baking involved and the process is mostly about assembly. It’s a fantastic recipe to make with kids or when you want a kitchen project that doesn’t require a ton of cleanup or technical skill.
- Endlessly customizable. Once you’ve got the basic method down, you can run wild. Swap the almond butter for peanut or cashew butter, use milk or white chocolate, or add toppings like crushed nuts, coconut flakes, or even a drizzle of extra chocolate.
- They feel like a gourmet treat. These bites look like you picked them up from a fancy chocolatier, but you made them yourself! They’re perfect for gifting, serving at parties, or just impressing yourself on a Tuesday.
Ingredients & Tools
- 200 g mini pretzel twists (about 4 cups)
- 1/2 cup creamy, drippy almond butter (see notes below!)
- 200 g high-quality dark chocolate chips or baking bars (around 60-70% cocoa)
- 1 tbsp coconut oil
- 1/2 tsp flaky sea salt, for sprinkling
Tools: A medium microwave-safe bowl (or a double boiler), a baking sheet, parchment paper, a small spoon or piping bag, a fork or dipping tool.
The quality of your ingredients really shines here, especially the almond butter and chocolate. Using a natural, drippy almond butter (the kind where the oil might separate) is key for that smooth, easy-to-work-with texture. And a good dark chocolate will melt smoothly and taste far superior to candy melts or lower-quality chips—it makes all the difference.
Serves: Makes about 30-40 bites | Prep Time: 20 minutes | Setting Time: 30 minutes | Total Time: 50 minutes
Before You Start: Tips & Ingredient Notes
- Why drippy almond butter? The oils in natural, unstirred almond butter make it wonderfully fluid and easy to spoon into the pretzels. If your almond butter is very thick and dry, you can gently warm it for 10-15 seconds in the microwave to make it more pourable.
- Chocolate chopping hack. If you’re using a chocolate bar instead of chips, chop it into small, uniform pieces. This helps it melt evenly and prevents any lumps or burnt bits. Smaller pieces = smoother melting.
- The coconut oil secret. That tablespoon of coconut oil isn’t just for show. It thins the melted chocolate slightly, making it easier to dip and giving the finished shell a beautiful, glossy sheen and a crisp snap.
- Parchment paper is non-negotiable. Seriously, don’t try to use wax paper or foil. Parchment paper ensures the chocolate-covered bites will peel off cleanly without any frustrating sticking or tearing.
How to Make Almond Butter Pretzel Bites
Step 1: Prep Your Station. First things first, line your baking sheet with parchment paper. This is your staging area. Then, lay out a good number of your mini pretzel twists on the sheet—you’ll want to fill them right on the sheet to avoid a messy transfer later. Give them a little space between each other so they’re not touching.
Step 2: Fill the Pretzels. Now for the fun part—the filling! Grab your almond butter. If it’s been in the fridge, you might need to let it come to room temperature or give it a very brief zap in the microwave to make it stir-able. Using a small spoon (a 1/4 teaspoon measuring spoon works perfectly) or a piping bag with a small tip, carefully place a small dollop of almond butter into the center of each pretzel. The trick is not to overfill—you want enough to taste it, but not so much that it squirts out the sides when you bite into it. A little goes a long way!
Step 3: Melt the Chocolate. This is the most crucial step for a smooth finish. Place your chocolate chips and the tablespoon of coconut oil in a microwave-safe bowl. Microwave in 30-second bursts, stirring thoroughly after each interval. Be patient! It might look unmelted after the first stir, but keep going. It usually takes about 90 seconds total. Stop when there are just a few small lumps left; the residual heat will melt them as you stir. Alternatively, you can use a double boiler for even more control.
Step 4: The Dipping Dance. Using a fork (or a specialty dipping tool), gently lower a filled pretzel into the melted chocolate. Swirl it around to coat it completely. Lift it out, let the excess chocolate drip back into the bowl, and then carefully place it back onto the parchment paper. You’ll notice the chocolate should look glossy and smooth. Repeat with all the pretzel bites, working relatively quickly as the chocolate will start to set.
Step 5: The Finishing Touch. Before the chocolate sets, this is your moment to shine. Grab that flaky sea salt and give each bite a tiny, elegant sprinkle. The salt not only looks pretty but it also enhances the sweet and salty flavor profile beautifully. Don’t skip this!
Step 6: Let Them Set. Now, patience. You need to let the chocolate harden completely. You can leave the tray on the counter if your kitchen is cool, but for faster results, pop the entire baking sheet into the refrigerator for about 20-30 minutes. You’ll know they’re ready when you tap the chocolate and it makes a firm, crisp sound.
Serving Suggestions
Complementary Dishes
- A fresh fruit platter — The bright, juicy acidity of berries, apple slices, or orange segments provides a lovely, refreshing contrast to the rich, decadent bites.
- A sharp cheese board — Serve these alongside some aged cheddar, manchego, and creamy brie. The savory, salty cheeses make the sweet pretzel bites taste even more dessert-like.
Drinks
- Cold brew coffee or iced latte — The bitterness of the coffee is a classic partner for dark chocolate, cutting through the richness and making for a truly sophisticated pairing.
- A glass of chilled oat milk — For a non-caffeinated option, the creamy, slightly sweet nature of oat milk complements the almond butter and chocolate perfectly.
Something Sweet
- Mini oatmeal raisin cookies — The chewy, spiced flavor of these cookies continues the homestyle, comforting vibe without being overly rich.
- A simple bowl of vanilla bean ice cream — Place a few pretzel bites on the side of a scoop. The cold creaminess with the crunchy bites is a textural dream.
Top Mistakes to Avoid
- Mistake: Using thick, dry nut butter. This is the number one issue. If your almond butter is stiff and difficult to stir, it will be a nightmare to get into the pretzels and you’ll end up breaking them. Always opt for a natural, runny variety.
- Mistake: Overheating the chocolate. If you microwave the chocolate for too long without stirring, it can seize up—becoming a thick, grainy mess. Low and slow, with frequent stirring, is the only way to go. I’ve messed this up before too, and it’s a real heartbreaker.
- Mistake: Skipping the coconut oil. It might seem like a small ingredient, but it’s vital for achieving that professional, thin coating of chocolate that sets with a snap. Without it, the chocolate can be too thick and clunky.
- Mistake: Adding the salt too late. If you wait until the chocolate is set, the salt crystals won’t stick. You have a small window right after dipping to get that perfect sprinkle.
Expert Tips
- Tip: Create a “double boiler” with a saucepan and a heatproof bowl. If you’re nervous about microwaving chocolate, this method is foolproof. Bring a small amount of water to a simmer in a saucepan, place a bowl on top (ensuring the bottom doesn’t touch the water), and melt your chocolate and oil in the bowl. It provides gentle, indirect heat.
- Tip: Use a piping bag for neat filling. Spooning is fine, but if you want really clean, professional-looking bites, spoon the almond butter into a small piping bag (or a plastic bag with the corner snipped off). You’ll have much more control and less mess.
- Tip: Speed up the setting process. If you’re in a real hurry, after the chocolate has set in the fridge for about 10 minutes, you can transfer the bites to the freezer for a final 5-minute chill. Just don’t leave them in there too long or they can develop condensation when they come out.
- Tip: Make a double batch for gifting. These are incredible gifts! Layer them in a small cardboard box or a glass jar with layers of parchment paper in between. They travel well and everyone will be so impressed.
FAQs
Can I use a different type of nut butter?
Absolutely! This recipe is wonderfully adaptable. Creamy peanut butter is a classic choice, and cashew butter would be deliciously mild and buttery. Just make sure whatever you use is the natural, drippy kind. Avoid butters with added sugars or hydrogenated oils, as they can be too stiff and may not pair as well with the chocolate.
How should I store these, and how long do they last?
Store them in an airtight container in the refrigerator. The cold helps keep the chocolate firm and the almond butter fresh. They will last for up to two weeks this way, though I doubt they’ll stick around that long! You can also freeze them for up to three months. Just thaw in the fridge for an hour before serving.
My chocolate seized and became grainy. Can I fix it?
Oh, we’ve all been there. It’s usually caused by a tiny bit of moisture getting into the chocolate. All is not lost! Try stirring in a teaspoon of additional coconut oil or even a neutral oil like vegetable oil. Sometimes this can bring it back to a smooth consistency. If it’s really bad, it’s best to start over, unfortunately.
Can I use milk or white chocolate instead?
You sure can! Milk chocolate will make for a sweeter, milder bite, while white chocolate will create a beautiful contrast with the almond butter. The same melting rules apply. Just note that white chocolate is more delicate and can burn even more easily, so be extra gentle when melting it.
My pretzels keep breaking when I fill them. Help!
This usually means one of two things: either your pretzels are a bit stale (always check for freshness!) or you’re applying too much pressure. Try using a lighter touch when spooning in the filling. If they are particularly fragile, you can also try slightly larger pretzel twists, which tend to be a bit sturdier than the mini ones.
Almond Butter Pretzel Bites
Whip up irresistible Almond Butter Pretzel Bites! This easy, no-bake recipe combines sweet, salty & crunchy for the perfect treat. Ready in under an hour. Get the recipe!
Ingredients
Ingredients
-
200 g mini pretzel twists (about 4 cups)
-
1/2 cup creamy, drippy almond butter (see notes below!)
-
200 g high-quality dark chocolate chips or baking bars (around 60-70% cocoa)
-
1 tbsp coconut oil
-
1/2 tsp flaky sea salt (for sprinkling)
Instructions
-
Prep Your Station. First things first, line your baking sheet with parchment paper. This is your staging area. Then, lay out a good number of your mini pretzel twists on the sheet—you'll want to fill them right on the sheet to avoid a messy transfer later. Give them a little space between each other so they're not touching.01
-
Fill the Pretzels. Now for the fun part—the filling! Grab your almond butter. If it's been in the fridge, you might need to let it come to room temperature or give it a very brief zap in the microwave to make it stir-able. Using a small spoon (a 1/4 teaspoon measuring spoon works perfectly) or a piping bag with a small tip, carefully place a small dollop of almond butter into the center of each pretzel. The trick is not to overfill—you want enough to taste it, but not so much that it squirts out the sides when you bite into it. A little goes a long way!02
-
Melt the Chocolate. This is the most crucial step for a smooth finish. Place your chocolate chips and the tablespoon of coconut oil in a microwave-safe bowl. Microwave in 30-second bursts, stirring thoroughly after each interval. Be patient! It might look unmelted after the first stir, but keep going. It usually takes about 90 seconds total. Stop when there are just a few small lumps left; the residual heat will melt them as you stir. Alternatively, you can use a double boiler for even more control.03
-
The Dipping Dance. Using a fork (or a specialty dipping tool), gently lower a filled pretzel into the melted chocolate. Swirl it around to coat it completely. Lift it out, let the excess chocolate drip back into the bowl, and then carefully place it back onto the parchment paper. You'll notice the chocolate should look glossy and smooth. Repeat with all the pretzel bites, working relatively quickly as the chocolate will start to set.04
-
The Finishing Touch. Before the chocolate sets, this is your moment to shine. Grab that flaky sea salt and give each bite a tiny, elegant sprinkle. The salt not only looks pretty but it also enhances the sweet and salty flavor profile beautifully. Don't skip this!05
-
Let Them Set. Now, patience. You need to let the chocolate harden completely. You can leave the tray on the counter if your kitchen is cool, but for faster results, pop the entire baking sheet into the refrigerator for about 20-30 minutes. You'll know they're ready when you tap the chocolate and it makes a firm, crisp sound.06


