
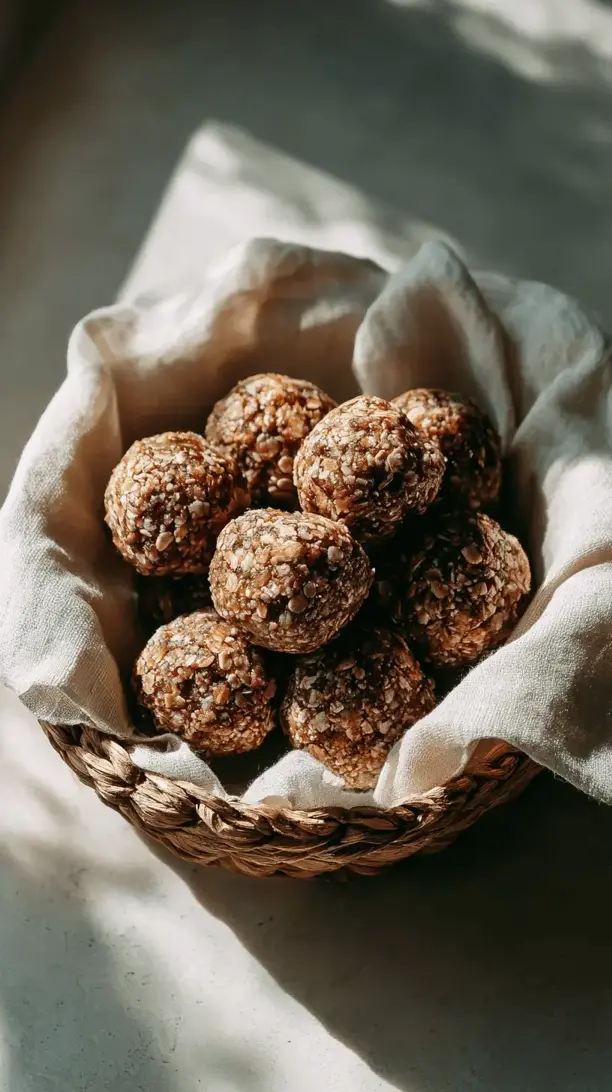
Why You’ll Love This Almond Butter Oat Balls
- They are incredibly simple. You don’t need any fancy equipment or baking skills. If you can stir ingredients in a bowl, you can absolutely master this recipe. It’s genuinely foolproof.
- The customization options are endless. Think of this recipe as a perfect base canvas. You can add chocolate chips, dried fruit, seeds, or spices to make them your own every single time.
- They are a powerhouse of lasting energy. Thanks to the combination of complex carbs from the oats, healthy fats from the almond butter, and a touch of natural sweetness, these balls provide a steady release of energy without the crash.
- They are the perfect meal-prep hero. A batch made on a lazy afternoon means you have a healthy, portable snack ready for the entire week. They store beautifully in the fridge or freezer.
Ingredients & Tools
- 1 ½ cups old-fashioned rolled oats
- ½ cup creamy almond butter (see notes below!)
- ⅓ cup honey or pure maple syrup
- ¼ cup ground flaxseed
- 1 tsp pure vanilla extract
- A generous pinch of fine sea salt
- Optional add-ins: ¼ cup mini chocolate chips, ¼ cup chopped dried cranberries, 2 tbsp chia seeds, ½ tsp cinnamon
Tools: A medium mixing bowl, a sturdy spatula or spoon, a baking sheet (optional, for setting), and parchment paper.
The quality of your almond butter really makes a difference here—look for one with just almonds (and maybe salt) listed on the jar. The honey or maple syrup isn’t just for sweetness; it’s the glue that holds everything together, so don’t be tempted to skimp!
Serves: Makes 12-14 balls | Prep Time: 15 minutes | Chill Time: 30 minutes | Total Time: 45 minutes
Before You Start: Tips & Ingredient Notes
- Rolled oats are non-negotiable. Quick oats will absorb the moisture differently and can make the texture a bit pasty. Old-fashioned rolled oats give you that perfect, chewy bite.
- Check your almond butter’s consistency. If it’s super thick and dry, your mixture might be crumbly. If it’s very oily, the balls might be too soft. A nice, stir-able consistency is ideal. If it’s dry, you can add a tiny bit more honey or a teaspoon of melted coconut oil.
- Why the chill time matters. I know, waiting is the hardest part! But this step is crucial for the oats to soften slightly and for all the flavors to meld together. It also firms everything up, making the balls much easier to roll and handle.
- Get your hands ready. The mixture will be thick and a bit sticky. Using slightly damp hands is the ultimate pro-tip for rolling perfectly smooth balls without the mess.
How to Make Almond Butter Oat Balls
Step 1: Combine your dry ingredients. In your medium mixing bowl, add the 1 ½ cups of rolled oats, ¼ cup of ground flaxseed, and that generous pinch of salt. If you’re using any dry add-ins like chia seeds or cinnamon, add them now. Give everything a good stir with your spatula to evenly distribute the ingredients. You’ll notice how the flaxseed sort of disappears into the oats—that’s perfect.
Step 2: Create the wet mixture. To the same bowl, add the ½ cup of almond butter, ⅓ cup of honey (or maple syrup), and 1 teaspoon of vanilla extract. Now, this is where the arm workout begins! Use your spatula to really mix everything together. At first, it might seem like it won’t come together, but keep stirring. After a minute or so, you’ll see a thick, uniform dough forming. If you’re adding chocolate chips or dried fruit, fold them in now until they’re just distributed.
Step 3: The all-important chill. Cover the bowl with a lid or plastic wrap and pop it into the refrigerator for at least 30 minutes. This rest period allows the oats to absorb the moisture from the almond butter and honey, which makes the mixture less sticky and much easier to handle. Trust me, this step is a game-changer.
Step 4: Roll into balls. After the chilling time, prepare a small bowl of water. Dampen your hands—this is the secret to non-stick rolling! Scoop out about a tablespoon of the mixture. I like to use a small cookie scoop for uniformity, but a spoon works just fine. Roll the scoop firmly between your palms to form a tight, smooth ball. If the mixture cracks, it might need a tiny bit more moisture; a drop of water or honey mixed in can fix it. Place each finished ball on a plate or a parchment-lined baking sheet.
Step 5: Final set and storage. Once all the balls are rolled, you can enjoy one right away—a chef’s treat! For the best texture and firmness, I recommend letting them set in the fridge for another 15-20 minutes. Then, transfer them to an airtight container. They’ll keep happily in the fridge for up to two weeks, or you can freeze them for up to three months.
Serving Suggestions
Complementary Dishes
- A fresh fruit platter — The bright, juicy acidity of berries, apple slices, or orange segments provides a lovely contrast to the rich, dense texture of the oat balls.
- A small cup of Greek yogurt — Dunking a ball into some creamy, tangy yogurt creates a perfect balance of flavors and adds a boost of protein for a more substantial snack.
- A green smoothie — Pair one or two balls with your favorite green smoothie for a complete, on-the-go breakfast that feels both light and satisfyingly filling.
Drinks
- Cold brew coffee or iced latte — The nutty, slightly sweet notes of the balls complement the deep, roasted flavors of coffee beautifully, making for an ideal morning or afternoon pairing.
- A glass of unsweetened almond milk — Keep the almond theme going! A cold glass of almond milk is a classic, soothing companion that enhances the nutty flavor.
- Herbal tea like chamomile or peppermint — For an evening treat, these gentle teas won’t overpower the subtle sweetness and make for a very calming ritual.
Something Sweet
- A few squares of dark chocolate — If you want to lean into the dessert vibe, having a piece of high-quality dark chocolate alongside a ball feels incredibly decadent but still mindful.
- A baked apple — The warm, soft, and spiced apple is a fantastic textural and temperature contrast to the cool, chewy oat ball.
- A small scoop of vanilla bean ice cream — For a real treat, place a couple of oat balls on top of a scoop of vanilla ice cream. The combination of temperatures and textures is honestly divine.
Top Mistakes to Avoid
- Mistake: Using quick oats instead of old-fashioned rolled oats. The texture will be completely different—more mushy and less chewy. Rolled oats are essential for the right mouthfeel.
- Mistake: Skipping the chilling step. I’ve been impatient before too, and it always leads to a sticky, frustrating rolling session and balls that don’t hold their shape well. The chill is non-negotiable for success.
- Mistake: Not measuring the almond butter correctly. If you scoop it out with a measuring cup, make sure to pack it in firmly for an accurate measurement. A dry, under-measured scoop can lead to a crumbly mixture that won’t bind.
- Mistake: Adding too many liquid sweeteners to fix a dry mix. If your mixture is dry, add liquid one teaspoon at a time. It’s easy to overdo it and end up with a batter that’s too wet and sticky to roll.
Expert Tips
- Tip: Toast your oats for a deeper flavor. Spread the rolled oats on a baking sheet and toast them in a 350°F (175°C) oven for 8-10 minutes, until fragrant and lightly golden. Let them cool completely before using. This adds a wonderful nutty depth to the final balls.
- Tip: Use a cookie scoop for perfect portions. A small (1-tablespoon) cookie scoop isn’t just for cookies! It ensures all your balls are the same size, which means they’ll set evenly and look professional.
- Tip: Create a flavor rotation. Divide your base mixture into two or three smaller bowls before chilling. Mix chocolate chips into one, dried cherries into another, and maybe some coconut flakes into the third. You get a variety of snacks from one batch!
- Tip: Roll them in a coating for extra flair. After rolling the balls, you can roll them in extra ground flaxseed, unsweetened cocoa powder, or finely shredded coconut. This adds visual appeal and a little extra texture.
FAQs
Can I use a different nut or seed butter?
Absolutely! This recipe is very adaptable. Creamy peanut butter is a classic swap. Sunflower seed butter works wonderfully for a nut-free version—just be aware it might give the balls a slightly greenish tint over time (it’s harmless!). Cashew butter would be deliciously mild. The key is to use a butter that’s drippy and stir-able, not rock hard.
My mixture is too dry and crumbly. What can I do?
This usually happens if the almond butter was particularly thick. Don’t worry, it’s an easy fix! Add more liquid a teaspoon at a time. You can use more honey/maple syrup, or even a tiny bit of water or milk (dairy or non-dairy). Mix thoroughly after each addition until the mixture holds together when you press it between your fingers.
My mixture is too wet and sticky. How do I fix it?
If your balls are refusing to hold their shape and are overly sticky, the mixture likely needs more dry ingredients. Add more rolled oats, a tablespoon at a time, mixing well after each addition until the consistency is firm enough to roll. A little extra ground flaxseed can also help absorb excess moisture.
How long do these last, and can I freeze them?
Stored in an airtight container in the refrigerator, they’ll stay fresh and delicious for up to two weeks. They also freeze exceptionally well! Place them in a single layer on a baking sheet to freeze solid, then transfer to a freezer bag or container. They’ll keep for up to 3 months. You can thaw them in the fridge overnight or eat them straight from the freezer—they have a great frozen texture, almost like a little energy bite popsicle!
Are these suitable for a gluten-free diet?
Yes, but with one important caveat: you must ensure your oats are certified gluten-free. Oats are naturally gluten-free, but they are often processed in facilities that also handle wheat, leading to cross-contamination. If you’re cooking for someone with celiac disease or a serious sensitivity, always check the packaging.
Almond Butter Oat Balls
Whip up no-bake Almond Butter Oat Balls in 15 mins! This easy, healthy snack recipe is perfect for energy boosts & meal prep. Customizable with chocolate chips or dried fruit.
Ingredients
Ingredients
-
1 ½ cups old-fashioned rolled oats
-
½ cup creamy almond butter (see notes below!)
-
⅓ cup honey or pure maple syrup
-
¼ cup ground flaxseed
-
1 tsp pure vanilla extract
-
A generous pinch fine sea salt
-
¼ cup mini chocolate chips (optional add-in)
-
¼ cup chopped dried cranberries (optional add-in)
-
2 tbsp chia seeds (optional add-in)
-
½ tsp cinnamon (optional add-in)
Instructions
-
Combine your dry ingredients. In your medium mixing bowl, add the 1 ½ cups of rolled oats, ¼ cup of ground flaxseed, and that generous pinch of salt. If you're using any dry add-ins like chia seeds or cinnamon, add them now. Give everything a good stir with your spatula to evenly distribute the ingredients. You'll notice how the flaxseed sort of disappears into the oats—that's perfect.01
-
Create the wet mixture. To the same bowl, add the ½ cup of almond butter, ⅓ cup of honey (or maple syrup), and 1 teaspoon of vanilla extract. Now, this is where the arm workout begins! Use your spatula to really mix everything together. At first, it might seem like it won't come together, but keep stirring. After a minute or so, you'll see a thick, uniform dough forming. If you're adding chocolate chips or dried fruit, fold them in now until they're just distributed.02
-
The all-important chill. Cover the bowl with a lid or plastic wrap and pop it into the refrigerator for at least 30 minutes. This rest period allows the oats to absorb the moisture from the almond butter and honey, which makes the mixture less sticky and much easier to handle. Trust me, this step is a game-changer.03
-
Roll into balls. After the chilling time, prepare a small bowl of water. Dampen your hands—this is the secret to non-stick rolling! Scoop out about a tablespoon of the mixture. I like to use a small cookie scoop for uniformity, but a spoon works just fine. Roll the scoop firmly between your palms to form a tight, smooth ball. If the mixture cracks, it might need a tiny bit more moisture; a drop of water or honey mixed in can fix it. Place each finished ball on a plate or a parchment-lined baking sheet.04
-
Final set and storage. Once all the balls are rolled, you can enjoy one right away—a chef's treat! For the best texture and firmness, I recommend letting them set in the fridge for another 15-20 minutes. Then, transfer them to an airtight container. They'll keep happily in the fridge for up to two weeks, or you can freeze them for up to three months.05


