
Why You’ll Love This Almond Butter Chocolate Bark
- It’s unbelievably simple. You really don’t need any special skills or equipment here. If you can melt chocolate and swirl a spoon, you are more than qualified to make this bark. It’s a fantastic recipe to make with kids, too, because the process is so hands-on and fun.
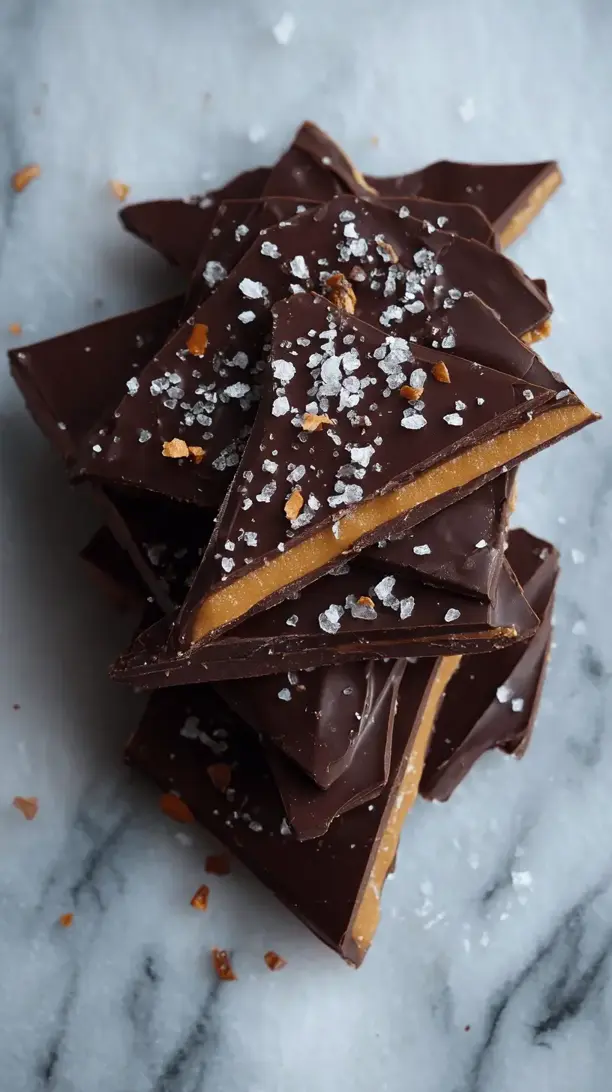
- The sweet-and-salty balance is perfection. The deep, slightly bitter notes of the dark chocolate are beautifully cut by the creamy sweetness of the almond butter, and that flaky sea salt on top? It’s not just a garnish—it’s the key ingredient that ties everything together and makes each bite incredibly moreish.
- It’s a crowd-pleaser with a healthy twist. While it feels indulgent, using high-quality dark chocolate and natural almond butter means you’re getting a treat with less refined sugar and more good-for-you fats. It’s the perfect answer when you want something decadent but don’t want to feel weighed down afterwards.
- It makes for a truly thoughtful gift. Breaking a large sheet of homemade bark into rustic pieces and packing it into a cute box or jar is one of the easiest ways to show someone you care. It looks professional and tastes incredible, and people are always so impressed that you made it yourself.
Ingredients & Tools
- 300 g high-quality dark chocolate (around 70% cocoa), chopped
- 120 g smooth, natural almond butter (the runny, drippy kind)
- 1/2 tsp flaky sea salt (like Maldon), plus more for finishing
- Optional toppings: a handful of roasted almonds, chopped; a sprinkle of cacao nibs; a dusting of flaky sea salt.
Tools: A medium-sized heatproof bowl, a baking sheet, parchment paper or a silicone baking mat, a small saucepan for a double boiler (or a microwave-safe bowl), a spatula or spoon.
Now, a quick word on ingredients. The quality of your chocolate is paramount here—it’s the star of the show, so choose one you genuinely enjoy eating on its own. For the almond butter, make sure it’s well-stirred and at room temperature so it’s nice and pourable. That flaky sea salt is non-negotiable for that final, perfect crunch.
Serves: 8-10 | Prep Time: 10 minutes | Cook Time: 5 minutes | Total Time: 15 minutes (plus 1 hour chilling)
Before You Start: Tips & Ingredient Notes
- Why chop the chocolate? If you’re using a chocolate bar, chopping it into small, even pieces is crucial. It melts much more evenly and quickly than large chunks, which helps prevent it from seizing up and becoming grainy. You’ll thank yourself for taking this extra minute.
- What’s the deal with almond butter consistency? You want that natural, oily almond butter that separates in the jar. The oilier it is, the easier it will be to swirl. If your almond butter is very thick and dry, you can gently warm it for a few seconds to make it more fluid.
- To microwave or not to microwave? You can melt the chocolate either way! Using a double boiler (a bowl set over a pan of simmering water) gives you more control and minimizes the risk of burning. The microwave is faster but requires you to stir in short, frequent bursts. The trick is low and slow, no matter which method you choose.
- Parchment paper is your best friend. Do not skip lining your baking sheet. It ensures your beautiful bark will release perfectly without any frustrating sticking. A silicone baking mat works wonderfully, too.
How to Make Almond Butter Chocolate Bark
Step 1: Prepare Your Pan. First things first, grab your baking sheet and line it neatly with a piece of parchment paper. Smooth it out so there aren’t any major wrinkles, but a few small ones are totally fine. Having your pan ready to go is key because melted chocolate waits for no one! Set this prepared pan aside on your counter.
Step 2: Melt the Chocolate. This is the most critical step. Place your chopped chocolate into a heatproof bowl. If using a double boiler, set the bowl over a saucepan with about an inch of gently simmering water, making sure the bottom of the bowl doesn’t touch the water. Stir continuously with a dry spatula until the chocolate is about 75% melted, then take it off the heat and keep stirring—the residual heat will melt the rest. This prevents overheating. If microwaving, heat in 30-second bursts on medium power, stirring well after each interval, until smooth.
Step 3: Spread and Swirl. Pour the beautifully melted chocolate onto your prepared baking sheet. Use your spatula to spread it into an even layer, about 1/4-inch thick. It doesn’t have to be a perfect rectangle—rustic is charming! Now, dollop spoonfuls of the almond butter all over the surface of the chocolate. Take a knife or the tip of your spatula and gently swirl the almond butter into the chocolate. Don’t over-mix! You want beautiful, distinct marbling, not a homogenous blend.
Step 4: The Salty Finish. This is where the magic happens. Immediately, before the chocolate sets, sprinkle the flaky sea salt evenly over the entire surface. If you’re using any optional toppings like chopped almonds or cacao nibs, now is the time to scatter them over the top. Gently press them in just slightly so they adhere as the chocolate hardens.
Step 5: Chill to Set. Carefully transfer the entire baking sheet to your refrigerator. Let the bark chill, undisturbed, for at least 1 hour, or until it’s completely firm to the touch. You’ll know it’s ready when you tap the surface and it feels solid. Rushing this step is a common mistake—patience is a virtue here!
Step 6: Break and Enjoy. Once the bark is fully set, take it out of the fridge. Lift the parchment paper to remove the entire slab from the pan. Now for the fun part: break it into irregular, rustic pieces with your hands. You can also use a knife to cut cleaner shapes, but I love the organic, craggy look of hand-broken bark. It’s ready to serve immediately!
Serving Suggestions
Complementary Dishes
- A simple cheese board — The richness of the bark pairs wonderfully with sharp cheeses like aged cheddar or a creamy blue cheese, creating a sophisticated sweet-and-savory platter.
- Fresh fruit like berries or orange segments — The bright, acidic burst of fresh fruit cuts through the richness of the chocolate and cleanses the palate beautifully between bites.
- A bowl of vanilla bean ice cream — Crumble a piece of the bark over top for an instant, decadent dessert upgrade with fantastic texture contrast.
Drinks
- A strong cup of black coffee — The bitterness of the coffee is a classic and perfect partner for dark chocolate, making for a truly elevated afternoon break.
- A glass of full-bodied red wine — Think Cabernet Sauvignon or Zinfandel; the tannins and fruit notes in the wine will complement the deep cocoa flavors wonderfully.
- A cold glass of oat or almond milk — For a non-alcoholic option, the creamy, slightly sweet plant-based milk is a comforting and delicious pairing.
Something Sweet
- Almond biscotti — Double down on the almond flavor with a crunchy, not-too-sweet biscotti for a coffee-dunking delight.
- Orange and cardamom shortbread cookies — The citrus and spice notes provide a lovely, fragrant contrast to the deep chocolate, making the whole dessert experience more complex.
- Vanilla panna cotta — The silky, delicate flavor of panna cotta acts as a blank canvas that lets the bold flavors of the bark truly shine.
Top Mistakes to Avoid
- Mistake: Getting any water or steam in the melting chocolate. Chocolate and water are arch-enemies. Even a single drop of water or too much steam from the double boiler can cause the chocolate to “seize,” turning it into a thick, grainy paste. Always ensure all your tools are completely dry.
- Mistake: Overheating the chocolate. If you blast the chocolate with too much heat, it can burn or become dull and chalky when it sets (this is called ‘bloom’). It’s still safe to eat, but the texture and appearance suffer. Low and slow is the mantra.
- Mistake: Swirling the almond butter too vigorously. You want beautiful marbling, not a muddy mixture. A few gentle figure-eight motions with a knife are all you need. Less is more in this artistic step.
- Mistake: Not letting it set completely. I know, the anticipation is killer! But if you try to break the bark before it’s fully firm, it will bend and crack in unsatisfying ways instead of giving you those perfect, sharp breaks. Trust the process.
Expert Tips
- Tip: Add a tiny pinch of instant coffee. When melting your chocolate, stir in about 1/4 teaspoon of instant coffee granules or espresso powder. It won’t make it taste like coffee, but it will deepen and enhance the chocolate flavor incredibly.
- Tip: Temper your chocolate for a professional snap. If you want that glossy finish and satisfying *snap*, you can temper the chocolate. It’s a more advanced technique involving precise temperature control, but it’s worth it for special occasions. A cheat’s method is to stir in a handful of finely chopped, unmelted chocolate at the end of melting to help seed the crystals.
- Tip: Customize with different nut butters. While almond butter is fantastic, feel free to experiment! Cashew butter is wonderfully mild and creamy, while peanut butter gives a more classic, familiar flavor. You could even use a swirl of two different butters.
- Tip: Use it as a mix-in. Once broken, store the larger pieces and save the small crumbs and shards. They are incredible stirred into yogurt, sprinkled over oatmeal, or used as an ice cream topping. Zero waste!
FAQs
How should I store the almond butter chocolate bark, and how long does it last?
Store the bark in an airtight container in the refrigerator. It will keep beautifully for up to 2 weeks. You can also freeze it for up to 3 months; just separate the layers with parchment paper. The cold actually makes the texture even snappier! Let it sit at room temperature for a few minutes before serving if you prefer a slightly softer bite.
Can I use milk or white chocolate instead of dark?
Absolutely! Milk chocolate will make for a sweeter, creamier bark, and white chocolate creates a lovely contrast with the almond butter. Just be aware that these chocolates are more sensitive to heat and can burn more easily, so be extra gentle when melting. You might also want to reduce or omit the extra sea salt if using a sweeter chocolate base.
My almond butter is really thick and won’t swirl. What can I do?
No problem! Simply scoop the thick almond butter into a small microwave-safe bowl and heat it for 10-15 seconds, just until it becomes more fluid and pourable. Stir it well before dolloping it onto the chocolate. Be careful not to overheat it, or it could become oily.
Why did my chocolate get dull and streaky after it set?
This is called sugar or fat bloom. It happens when the chocolate is exposed to temperature fluctuations (like taking it in and out of the fridge) or wasn’t tempered. It’s perfectly safe to eat and the taste is unaffected, but the appearance isn’t as glossy. For a guaranteed glossy finish, proper tempering is the key, but for a simple homemade bark, we’re going for taste over perfection!
Can I make this recipe vegan?
Yes, it’s very easy to make vegan! Just ensure you use a high-quality dark chocolate that is certified vegan (some contain milk solids). Most natural almond butters are naturally vegan, but always double-check the label to be sure. That’s it—you’re all set for a delicious plant-based treat.
Almond Butter Chocolate Bark
Whip up irresistible Almond Butter Chocolate Bark in 15 mins! My easy recipe features dark chocolate, creamy almond butter & flaky sea salt for the perfect sweet & salty treat.
Ingredients
Ingredients
-
300 g high-quality dark chocolate (around 70% cocoa), chopped
-
120 g smooth, natural almond butter (the runny, drippy kind)
-
1/2 tsp flaky sea salt (like Maldon) (plus more for finishing)
-
a handful Optional toppings: roasted almonds, chopped
-
a sprinkle Optional toppings: cacao nibs
-
a dusting Optional toppings: flaky sea salt
Instructions
-
Prepare Your Pan. First things first, grab your baking sheet and line it neatly with a piece of parchment paper. Smooth it out so there aren't any major wrinkles, but a few small ones are totally fine. Having your pan ready to go is key because melted chocolate waits for no one! Set this prepared pan aside on your counter.01
-
Melt the Chocolate. This is the most critical step. Place your chopped chocolate into a heatproof bowl. If using a double boiler, set the bowl over a saucepan with about an inch of gently simmering water, making sure the bottom of the bowl doesn't touch the water. Stir continuously with a dry spatula until the chocolate is about 75% melted, then take it off the heat and keep stirring—the residual heat will melt the rest. This prevents overheating. If microwaving, heat in 30-second bursts on medium power, stirring well after each interval, until smooth.02
-
Spread and Swirl. Pour the beautifully melted chocolate onto your prepared baking sheet. Use your spatula to spread it into an even layer, about 1/4-inch thick. It doesn't have to be a perfect rectangle—rustic is charming! Now, dollop spoonfuls of the almond butter all over the surface of the chocolate. Take a knife or the tip of your spatula and gently swirl the almond butter into the chocolate. Don't over-mix! You want beautiful, distinct marbling, not a homogenous blend.03
-
The Salty Finish. This is where the magic happens. Immediately, before the chocolate sets, sprinkle the flaky sea salt evenly over the entire surface. If you're using any optional toppings like chopped almonds or cacao nibs, now is the time to scatter them over the top. Gently press them in just slightly so they adhere as the chocolate hardens.04
-
Chill to Set. Carefully transfer the entire baking sheet to your refrigerator. Let the bark chill, undisturbed, for at least 1 hour, or until it's completely firm to the touch. You'll know it's ready when you tap the surface and it feels solid. Rushing this step is a common mistake—patience is a virtue here!05
-
Break and Enjoy. Once the bark is fully set, take it out of the fridge. Lift the parchment paper to remove the entire slab from the pan. Now for the fun part: break it into irregular, rustic pieces with your hands. You can also use a knife to cut cleaner shapes, but I love the organic, craggy look of hand-broken bark. It's ready to serve immediately!06


