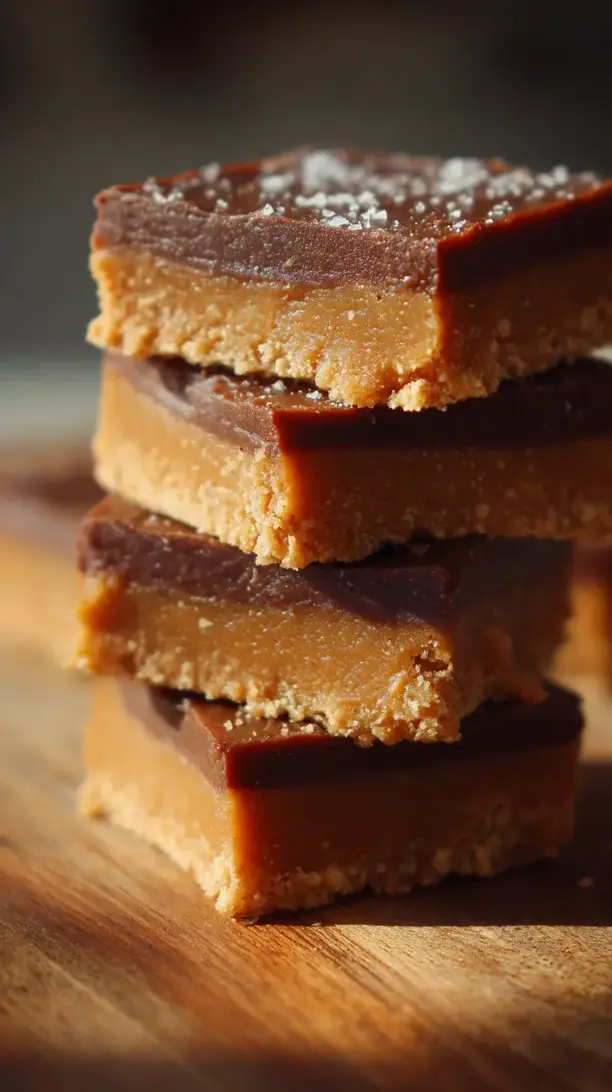
Why You’ll Love This Almond Butter Fudge Squares
- Incredibly Simple to Make. Honestly, if you can stir ingredients together in a bowl, you can make this fudge. There’s no baking, no fancy equipment, and the whole process is wonderfully straightforward.
- The Perfect Texture. We’re aiming for that classic fudge consistency—firm enough to hold its shape but soft enough to melt delightfully on your tongue. It’s a little bit creamy, a little bit dense, and entirely satisfying.
- Wholesome & Satisfying. Because we’re using almond butter and a good quality chocolate, these squares feel like a treat that’s actually nourishing. They’re rich enough that one square truly satisfies the urge for something sweet.
- Endlessly Customizable. Feel like adding a sprinkle of sea salt on top? Or maybe some chopped nuts? This recipe is a fantastic base for your own creative twists, making it fun to make again and again.
Ingredients & Tools
- 1 cup creamy, unsalted almond butter
- 1/2 cup coconut oil, softened
- 1/3 cup pure maple syrup
- 1/4 cup cocoa powder, unsweetened
- 1 tsp pure vanilla extract
- 1/4 tsp fine sea salt
- 1/4 cup dark chocolate chips (for drizzling, optional)
Tools: 8×8 inch baking pan, parchment paper, medium mixing bowl, whisk or spatula, small saucepan or double boiler (for optional drizzle)
The quality of your almond butter really makes a difference here—look for one where the only ingredient is almonds. And that coconut oil? It’s what gives the fudge its firm, sliceable texture once chilled, so don’t skip it!
Nutrition (per serving)
- Calories: 180 kcal
- Protein: 4 g
- Fat: 15 g
- Carbohydrates: 9 g
- Fiber: 2 g
Serves: 16 | Prep Time: 10 minutes | Chill Time: 2 hours | Total Time: 2 hours 10 minutes
Before You Start: Tips & Ingredient Notes
- Check Your Almond Butter. For the best texture and flavor, use a natural, drippy almond butter that’s well-stirred. If it’s too dry or stiff, the fudge might not come together smoothly.
- Softened, Not Melted, Coconut Oil. You want your coconut oil to be soft, like the consistency of softened butter. If it’s completely liquid, it can separate from the almond butter. If it’s rock solid, it won’t blend properly.
- Line Your Pan Properly. Taking an extra minute to line your pan with parchment paper, leaving some overhang on two sides, is a game-changer. It creates little “handles” that make lifting the entire slab of fudge out for slicing incredibly easy.
- Taste Your Batter. Before you press the mixture into the pan, give it a little taste. This is your chance to adjust the salt or sweetness to your personal preference. A little extra pinch of salt can really make the chocolate flavor pop.
How to Make Almond Butter Fudge Squares
Step 1: First, prepare your pan. Line an 8×8 inch baking dish with parchment paper, making sure the paper hangs over at least two opposite sides. This is your ticket to effortlessly removing the whole block of fudge later, so don’t skip it! Set the pan aside for now.
Step 2: In a medium-sized mixing bowl, combine the creamy almond butter, softened coconut oil, and maple syrup. If your almond butter is particularly stiff, you can gently warm the jar in a bowl of warm water for a few minutes to make it easier to stir. Use a whisk or a sturdy spatula to mix everything together until it’s completely smooth and well-incorporated. You’ll notice the mixture becomes glossy and uniform.
Step 3: Now, sift in the cocoa powder. Sifting is a small step that makes a big difference—it prevents any pesky lumps of cocoa from hiding in your otherwise silky fudge batter. Add the vanilla extract and the sea salt as well. Stir, stir, stir! Keep mixing until the cocoa powder is fully absorbed and you have a thick, dark, and wonderfully chocolatey batter.
Step 4: This is the perfect time to do a quick taste test. Dip a clean spoon in and see what you think. Does it need another tiny pinch of salt? Maybe a tiny drizzle more maple syrup? Adjust to your heart’s content. Once you’re happy, transfer the entire mixture to your prepared pan.
Step 5: Use your spatula or the back of a spoon to press the fudge mixture firmly and evenly into the pan. You want a nice, smooth, flat surface. Getting it even now means you’ll get beautiful, uniform squares later. If you’re adding an optional chocolate drizzle, now is the time to let the pan chill while you prepare it.
Step 6 (Optional Drizzle): Melt the dark chocolate chips gently. You can do this in a double boiler or in short bursts in the microwave, stirring frequently until smooth. Drizzle the melted chocolate artfully over the top of the fudge. You can use a spoon or fork for thin lines, or just go for a rustic, swirly look.
Step 7: The final and most crucial step: patience! Carefully place the pan in the refrigerator. You need to let it chill for at least 2 hours, or until it is completely firm to the touch. Don’t be tempted to cut it early, or you’ll end up with a messy, soft fudge. Let the fridge work its magic.
Step 8: Once the fudge is fully set, use the parchment paper handles to lift the entire block out of the pan and onto a cutting board. Use a sharp knife to slice it into 16 squares (or 25 smaller bites!). For super clean cuts, you can warm the knife under hot water and wipe it dry between slices.
Serving Suggestions
Complementary Dishes
- A Fresh Fruit Platter — The bright, juicy acidity of berries or orange slices provides a lovely, refreshing contrast to the rich, dense fudge.
- A Cheese Board — A sharp, aged cheddar or a creamy goat cheese can create a surprisingly delicious sweet-and-savory bite when paired with a small piece of fudge.
Drinks
- Black Coffee or Espresso — The bitterness of a strong coffee is the perfect companion to the sweet, nutty chocolate, making for a truly sophisticated pairing.
- Cold Oat Milk — The creamy, slightly sweet and neutral flavor of oat milk is a wonderful, dairy-free way to wash down each delicious bite.
Something Sweet
- Vanilla Bean Coconut Ice Cream — Serving a square slightly softened on top of a scoop of ice cream turns it into an decadent, restaurant-style dessert.
Top Mistakes to Avoid
- Using the Wrong Almond Butter: If you use almond butter that has added sugar or stabilizers, it can throw off the texture and sweetness of your fudge. Stick to a natural, runny variety for the best results.
- Not Chilling Long Enough: I know it’s tempting, but if you try to cut the fudge before it’s completely firm, it will be soft, messy, and won’t hold its square shape. Set a timer and walk away!
- Overheating the Coconut Oil: If your coconut oil is fully melted and hot when you mix it in, it can cause the almond butter to separate, creating a greasy layer. Soft and scoopable is the goal.
- Skipping the Sifting: Cocoa powder is notoriously clumpy. If you just dump it in, you’ll likely end up with little dry pockets of cocoa in your finished fudge, which isn’t the smooth experience we’re after.
Expert Tips
- Tip: For an extra flavor dimension, try using a roasted almond butter. It has a deeper, toastier nut flavor that pairs incredibly well with the dark chocolate notes.
- Tip: If you want to get fancy with presentation, before chilling, press a few whole almonds or a light sprinkle of flaky sea salt onto the surface of the fudge. It looks beautiful and adds a nice textural crunch.
- Tip: For perfectly clean cuts every single time, use a large chef’s knife and clean it with hot water between each slice. The heat helps the knife glide through the firm fudge without dragging or cracking it.
- Tip: If your kitchen is very warm, these fudge squares are best stored in the refrigerator. They can soften and become quite messy at room temperature if it’s too hot. Think of them as a chilled treat!
FAQs
Can I use a different nut butter?
Absolutely! This recipe is quite versatile. Creamy, unsalted peanut butter or cashew butter would work wonderfully. Just make sure it’s a natural, drippy style for the right consistency. The flavor will change, of course—peanut butter will give you a more classic peanut fudge vibe, which is also delicious.
My fudge is too soft, what happened?
This usually means it didn’t chill long enough, or your ratios were a bit off. Did you accurately measure the coconut oil? Also, if your kitchen is warm, it might need even longer in the fridge. Pop it back in for another hour. If it’s still soft, it can be enjoyed as a delicious, spoonable fudge sauce over ice cream!
How long do these keep for?
Stored in an airtight container in the refrigerator, these fudge squares will stay fresh and maintain their perfect texture for up to two weeks. They also freeze beautifully for up to 3 months. Just thaw in the fridge before serving.
Can I make these without maple syrup?
You can, but the results will be different. Another liquid sweetener like agave nectar or honey would be the best direct substitute. If you use a granulated sweetener, you’ll likely need to gently heat the mixture to help it dissolve, which can affect the texture.
Why did my fudge separate and look oily?
This is almost always due to a temperature issue. If your coconut oil was too hot or your almond butter was too cold when combined, they can struggle to emulsify. The key is having all your ingredients at a similar, cool room temperature for a smooth, homogenous mixture.
Almond Butter Fudge Squares
Make these easy, no-bake Almond Butter Fudge Squares with just 5 ingredients! A rich, healthy dessert ready in 10 minutes. Get the simple recipe now!
Ingredients
For the fudge:
-
1 cup creamy, unsalted almond butter
-
1/2 cup coconut oil (softened)
-
1/3 cup pure maple syrup
-
1/4 cup cocoa powder (unsweetened)
-
1 tsp pure vanilla extract
-
1/4 tsp fine sea salt
-
1/4 cup dark chocolate chips (for drizzling, optional)
Instructions
-
First, prepare your pan. Line an 8x8 inch baking dish with parchment paper, making sure the paper hangs over at least two opposite sides. This is your ticket to effortlessly removing the whole block of fudge later, so don’t skip it! Set the pan aside for now.01
-
In a medium-sized mixing bowl, combine the creamy almond butter, softened coconut oil, and maple syrup. If your almond butter is particularly stiff, you can gently warm the jar in a bowl of warm water for a few minutes to make it easier to stir. Use a whisk or a sturdy spatula to mix everything together until it’s completely smooth and well-incorporated. You’ll notice the mixture becomes glossy and uniform.02
-
Now, sift in the cocoa powder. Sifting is a small step that makes a big difference—it prevents any pesky lumps of cocoa from hiding in your otherwise silky fudge batter. Add the vanilla extract and the sea salt as well. Stir, stir, stir! Keep mixing until the cocoa powder is fully absorbed and you have a thick, dark, and wonderfully chocolatey batter.03
-
This is the perfect time to do a quick taste test. Dip a clean spoon in and see what you think. Does it need another tiny pinch of salt? Maybe a tiny drizzle more maple syrup? Adjust to your heart's content. Once you’re happy, transfer the entire mixture to your prepared pan.04
-
Use your spatula or the back of a spoon to press the fudge mixture firmly and evenly into the pan. You want a nice, smooth, flat surface. Getting it even now means you’ll get beautiful, uniform squares later. If you’re adding an optional chocolate drizzle, now is the time to let the pan chill while you prepare it.05
-
Melt the dark chocolate chips gently. You can do this in a double boiler or in short bursts in the microwave, stirring frequently until smooth. Drizzle the melted chocolate artfully over the top of the fudge. You can use a spoon or fork for thin lines, or just go for a rustic, swirly look.06
-
The final and most crucial step: patience! Carefully place the pan in the refrigerator. You need to let it chill for at least 2 hours, or until it is completely firm to the touch. Don’t be tempted to cut it early, or you’ll end up with a messy, soft fudge. Let the fridge work its magic.07
-
Once the fudge is fully set, use the parchment paper handles to lift the entire block out of the pan and onto a cutting board. Use a sharp knife to slice it into 16 squares (or 25 smaller bites!). For super clean cuts, you can warm the knife under hot water and wipe it dry between slices.08