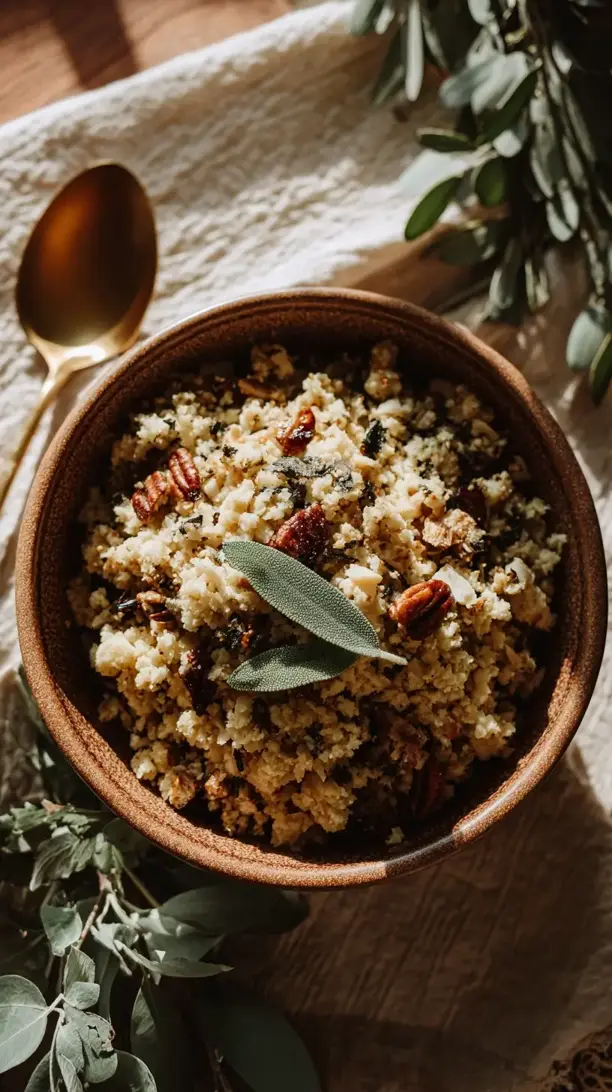
Why You’ll Love This Cauliflower Rice Stuffing
- It’s incredibly flavorful and satisfying. You won’t feel like you’re missing out on anything. The combination of sautéed vegetables, fresh herbs, and a rich broth creates a deeply savory experience that’s just as comforting as the original.
- It’s wonderfully light and fresh. Because we’re using cauliflower rice as the base, the texture is fluffy and delicate, not dense or heavy. It’s the perfect side dish when you want to balance out a richer meal.
- It’s surprisingly versatile. This isn’t just for Thanksgiving! It pairs beautifully with roasted chicken, a weeknight pork chop, or even a simple piece of fish. It’s a year-round hero in my kitchen.
- The texture is just perfect. When cooked correctly, the cauliflower has a tender bite that mimics the softness of bread, while the celery and nuts (if you use them) add a lovely, welcome crunch.
Ingredients & Tools
- 1 large head of cauliflower, riced (about 4-5 cups)
- 3 tbsp butter or olive oil (or a mix!)
- 1 medium yellow onion, finely diced
- 3 stalks celery, finely diced
- 3 cloves garlic, minced
- 2 tsp fresh sage, finely chopped
- 1 tsp fresh thyme leaves
- 1/2 cup vegetable or chicken broth
- 1/4 cup chopped fresh parsley
- 1/2 cup toasted pecans or walnuts (optional, but recommended)
- To taste, salt and freshly ground black pepper
Tools: A large skillet (12-inch is ideal), a sharp knife, a box grater or food processor for ricing the cauliflower.
A quick note on the cauliflower: you can buy pre-riced cauliflower to save time, but honestly, doing it yourself from a fresh head gives you the best texture and avoids any excess moisture. And don’t skip toasting the nuts if you’re using them—that nutty aroma is just… everything.
Nutrition (per serving)
- Calories: 145 kcal
- Protein: 4 g
- Fat: 10 g
- Carbohydrates: 12 g
- Fiber: 5 g
Serves: 6 | Prep Time: 15 minutes | Cook Time: 20 minutes | Total Time: 35 minutes
Before You Start: Tips & Ingredient Notes
- Don’t skip the veggie sauté. This is where the foundational flavor is built. Taking the time to cook the onion and celery until they’re soft and sweet is non-negotiable for a truly delicious result.
- Fresh herbs make a world of difference. I know dried herbs are convenient, but for this recipe, fresh sage and thyme are worth the extra few minutes. Their flavor is brighter and more aromatic, which really lifts the whole dish.
- Manage your cauliflower moisture. If you’re ricing your own cauliflower, you might notice some water released during cooking. The trick is to cook it over medium-high heat so that liquid evaporates, giving you a fluffy, not soggy, stuffing.
- Toast your nuts. If you’re adding nuts, toasting them in a dry pan for a few minutes until fragrant will unlock their oils and maximize their flavor. It’s a simple step with a huge payoff.
How to Make Cauliflower Rice Stuffing
Step 1: Prepare Your Cauliflower Rice. If you’re starting with a whole head of cauliflower, remove the leaves and core, then chop the florets into chunks. You can rice the cauliflower by pulsing it in a food processor until it resembles coarse crumbs, or by using the large holes of a box grater. Be careful not to over-process it into a puree—you want a texture similar to couscous or coarse sand. Set your riced cauliflower aside. You should have about 4 to 5 cups.
Step 2: Sauté the Aromatics. Place your large skillet over medium heat and add the butter or olive oil. Once it’s melted and shimmering, add the diced onion and celery. Cook, stirring occasionally, for about 6-8 minutes, until the vegetables have softened and become translucent. You’ll notice they’ll start to smell sweet and fragrant. This is the flavor base of your stuffing, so don’t rush it!
Step 3: Add the Garlic and Herbs. Push the onion and celery to one side of the skillet and add the minced garlic to the cleared space. Let it cook for just 30 seconds to a minute until it becomes incredibly fragrant—be careful not to let it burn! Then, stir in the fresh sage and thyme, mixing everything together so the herbs can warm and release their beautiful oils.
Step 4: Cook the Cauliflower Rice. Now, add all of your riced cauliflower to the skillet. Increase the heat to medium-high. Stir everything together thoroughly, ensuring the cauliflower is coated in the butter and herb mixture. Cook for about 8-10 minutes, stirring fairly frequently. You’re looking for the cauliflower to become tender but not mushy. You’ll notice it might release some water initially; this is normal. The higher heat will help that liquid evaporate, leaving you with a dry, fluffy texture.
Step 5: Deglaze with Broth. Pour in the vegetable or chicken broth. As it hits the hot pan, it will sizzle and steam—this is a good thing! Use your spoon to scrape up any browned bits from the bottom of the skillet; that’s pure flavor. Let the broth simmer and reduce for about 2-3 minutes. This step adds a layer of savory depth and helps all the flavors meld together beautifully.
Step 6: Finish and Season. Turn off the heat. Stir in the fresh parsley and the toasted nuts, if you’re using them. Now, taste your creation. This is the most important part. Season generously with salt and freshly ground black pepper. The salt will really make the herb and vegetable flavors pop. Give it one final stir, and it’s ready to serve!
Serving Suggestions
Complementary Dishes
- Roasted Turkey or Chicken — The classic pairing for a reason. The savory, herby stuffing is a perfect match for juicy, roasted poultry.
- Pork Tenderloin with a Mustard Glaze — The slight sweetness of the pork and the tangy glaze complement the earthy flavors of the sage and cauliflower beautifully.
- Pan-Seared Salmon with a Lemon Dill Sauce — For a lighter meal, the rich salmon and bright sauce are a fantastic contrast to the warm, comforting stuffing.
Drinks
- A Crisp Chardonnay — A wine with a little bit of body and notes of apple and citrus can stand up to the herbal notes without overpowering the dish.
- Sparkling Apple Cider — The effervescence and subtle sweetness are a delightful, non-alcoholic pairing that feels festive and fresh.
- An Amber Ale — The malty, caramel notes in the beer mirror the toasted, savory elements in the stuffing for a really cozy combination.
Something Sweet
- Spiced Pear Galette — The warm spices and soft, sweet pears are a lovely, rustic follow-up that continues the cozy, autumnal theme.
- Pumpkin Cheesecake Mousse — It’s light and airy, providing a smooth and creamy contrast to the textured stuffing you just enjoyed.
- Dark Chocolate and Sea Salt Bark — A few pieces of rich, bittersweet chocolate with a hint of salt is a simple yet sophisticated way to end the meal.
Top Mistakes to Avoid
- Overcrowding the pan. If your skillet is too small, the cauliflower will steam instead of sauté, leading to a soggy, watery stuffing. Use the biggest skillet you have to allow for evaporation.
- Underseasoning. Cauliflower needs a good amount of salt to really shine. Be bold with your seasoning, and always, always taste at the end before serving. I’ve messed this up before too, and it’s a easy fix that makes all the difference.
- Burning the garlic. Garlic cooks in a flash and turns bitter if it burns. Add it towards the end of the aromatic cook time and keep it moving for just 30-60 seconds until fragrant.
- Skipping the broth deglaze. That sizzle when the liquid hits the pan lifts all the caramelized bits (the “fond”) which are packed with flavor. It’s a simple step that adds a ton of complexity.
Expert Tips
- Tip: For a deeper, richer flavor, try browning the butter before you add your onions and celery. Just melt the butter and continue to cook it until it turns a golden brown color and smells nutty. It adds an incredible depth that pairs wonderfully with the sage.
- Tip: If you want to make this ahead of time, you can cook the entire dish, let it cool, and store it in the fridge. Reheat it in a skillet over medium heat, adding a tiny splash of broth to refresh it. The texture holds up surprisingly well!
- Tip: For a flavor boost, add a teaspoon of finely grated lemon zest along with the parsley at the end. The bright, citrusy note cuts through the richness and makes the herb flavors even more vibrant.
- Tip: If you love a more “stuffing-like” texture, spread the finished mixture on a baking sheet and pop it under the broiler for 2-3 minutes to get some crispy, golden-brown edges. Just watch it carefully!
FAQs
Can I make this Cauliflower Rice Stuffing ahead of time?
Absolutely, and it’s a great timesaver for holidays. Let the cooked stuffing cool completely to room temperature, then transfer it to an airtight container. It will keep in the refrigerator for up to 3 days. When you’re ready to serve, reheat it in a large skillet over medium heat. You might need to add a tablespoon or two of broth to loosen it up and bring back that perfect fluffy texture. I don’t recommend freezing it, as the cauliflower can become a bit watery upon thawing.
Can I use frozen cauliflower rice?
You can, but you need to adjust your method. Frozen cauliflower rice contains a lot more water. The key is to cook it from frozen in a dry skillet first, without any oil, to drive off as much moisture as possible. Once it’s relatively dry and tender, push it to the side and proceed with sautéing your aromatics in butter in the same pan. This extra step prevents a soggy final dish.
Is this recipe gluten-free and dairy-free?
It is naturally gluten-free! To make it dairy-free, simply substitute the butter with a good quality olive oil or your favorite vegan butter. The flavor profile will be slightly different but still absolutely delicious. Just make sure your broth is also certified gluten-free if that’s a concern for you.
What can I use instead of nuts for a crunch?
If you have a nut allergy or just want to switch things up, toasted sunflower seeds or pumpkin seeds (pepitas) are a fantastic alternative. They provide that same satisfying crunch and a lovely, toasty flavor. Sautéed mushrooms, chopped up small, can also add a wonderful meaty, textured element.
My stuffing turned out a bit wet. How can I fix it?
Don’t worry, this happens! The water content in cauliflower can vary. If your stuffing is too moist, just return the skillet to medium-high heat and cook, stirring frequently, for another 3-5 minutes to allow the excess liquid to evaporate. If it’s still too wet, you can even transfer it to a baking sheet and spread it out in a thin layer—the increased surface area will help it dry out much faster.
Cauliflower Rice Stuffing
Make this delicious Cauliflower Rice Stuffing for a lighter take on the classic holiday side. It's gluten-free, packed with flavor, and ready in 35 minutes. Get the recipe!
Ingredients
For the Ingredients
-
1 large head cauliflower (riced (about 4-5 cups))
-
3 tbsp butter or olive oil (or a mix!)
-
1 medium yellow onion (finely diced)
-
3 stalks celery (finely diced)
-
3 cloves garlic (minced)
-
2 tsp fresh sage (finely chopped)
-
1 tsp fresh thyme leaves
-
1/2 cup vegetable or chicken broth
-
1/4 cup chopped fresh parsley
-
1/2 cup toasted pecans or walnuts (optional, but recommended)
-
salt and freshly ground black pepper (to taste)
Instructions
-
Prepare Your Cauliflower Rice. If you’re starting with a whole head of cauliflower, remove the leaves and core, then chop the florets into chunks. You can rice the cauliflower by pulsing it in a food processor until it resembles coarse crumbs, or by using the large holes of a box grater. Be careful not to over-process it into a puree—you want a texture similar to couscous or coarse sand. Set your riced cauliflower aside. You should have about 4 to 5 cups.01
-
Sauté the Aromatics. Place your large skillet over medium heat and add the butter or olive oil. Once it’s melted and shimmering, add the diced onion and celery. Cook, stirring occasionally, for about 6-8 minutes, until the vegetables have softened and become translucent. You’ll notice they’ll start to smell sweet and fragrant. This is the flavor base of your stuffing, so don’t rush it!02
-
Add the Garlic and Herbs. Push the onion and celery to one side of the skillet and add the minced garlic to the cleared space. Let it cook for just 30 seconds to a minute until it becomes incredibly fragrant—be careful not to let it burn! Then, stir in the fresh sage and thyme, mixing everything together so the herbs can warm and release their beautiful oils.03
-
Cook the Cauliflower Rice. Now, add all of your riced cauliflower to the skillet. Increase the heat to medium-high. Stir everything together thoroughly, ensuring the cauliflower is coated in the butter and herb mixture. Cook for about 8-10 minutes, stirring fairly frequently. You’re looking for the cauliflower to become tender but not mushy. You’ll notice it might release some water initially; this is normal. The higher heat will help that liquid evaporate, leaving you with a dry, fluffy texture.04
-
Deglaze with Broth. Pour in the vegetable or chicken broth. As it hits the hot pan, it will sizzle and steam—this is a good thing! Use your spoon to scrape up any browned bits from the bottom of the skillet; that’s pure flavor. Let the broth simmer and reduce for about 2-3 minutes. This step adds a layer of savory depth and helps all the flavors meld together beautifully.05
-
Finish and Season. Turn off the heat. Stir in the fresh parsley and the toasted nuts, if you’re using them. Now, taste your creation. This is the most important part. Season generously with salt and freshly ground black pepper. The salt will really make the herb and vegetable flavors pop. Give it one final stir, and it’s ready to serve!06