
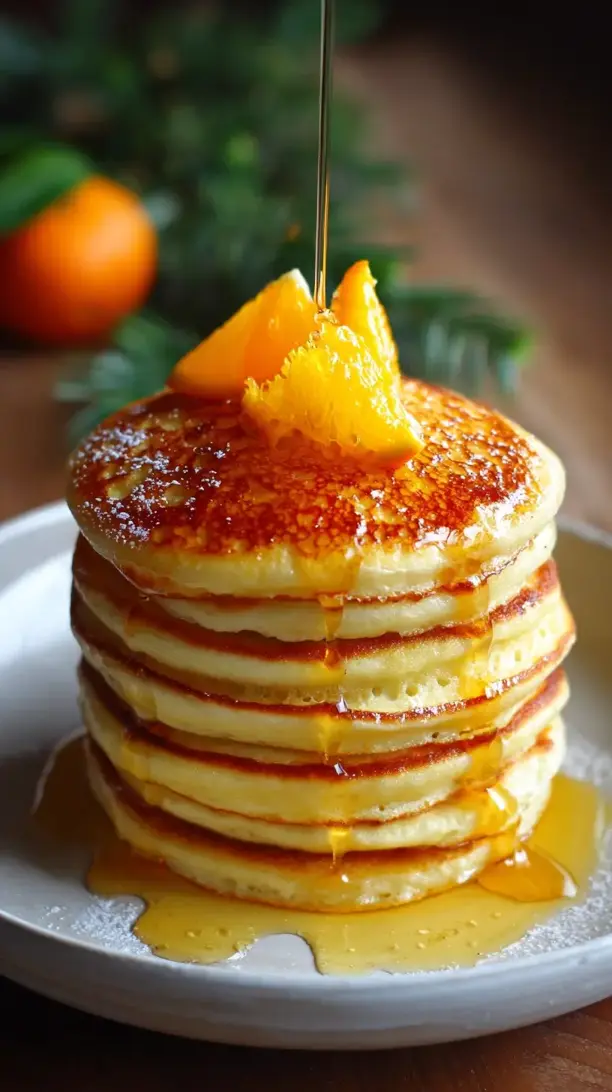
Why You’ll Love This Orange Vanilla Pancakes
- A Burst of Sunshine in Every Bite. The fresh orange zest and juice aren’t just subtle hints here—they’re the star of the show, giving these pancakes a vibrant, wake-you-up flavor that’s far more exciting than your standard buttermilk version.
- Incredibly Light and Fluffy Texture. The trick is in the gentle mixing and a touch of baking powder, which creates those perfect little air pockets. You’ll get a stack that’s tender and cloud-like, yet still satisfyingly substantial.
- Your Kitchen Will Smell Amazing. Honestly, the scent of orange and vanilla swirling together as they cook on the griddle is half the pleasure. It’s an aroma that just spells comfort and happiness.
- Endlessly Customizable. While perfect on their own, these pancakes are a fantastic canvas. You can fold in dark chocolate chips, a handful of blueberries, or even a sprinkle of toasted nuts to make them your own.
Ingredients & Tools
- 240 g all-purpose flour
- 2 tbsp granulated sugar
- 2 tsp baking powder
- 1/2 tsp baking soda
- 1/2 tsp fine sea salt
- 240 ml buttermilk
- 120 ml fresh orange juice (from about 1-2 large oranges)
- 1 large egg
- 3 tbsp unsalted butter, melted and slightly cooled, plus more for cooking
- 2 tsp pure vanilla extract
- Zest of 1 large orange
Tools: A large mixing bowl, a whisk, a smaller bowl, a griddle or large non-stick skillet, a ladle or measuring cup, and a spatula.
Using fresh orange juice and zest is non-negotiable here—it makes all the difference in achieving that bright, authentic flavor. And that buttermilk? It’s the secret weapon for tenderness and a slight tang that balances the sweetness perfectly.
Serves: 3-4 (makes about 8-10 pancakes) | Prep Time: 10 minutes | Cook Time: 15 minutes | Total Time: 25 minutes
Before You Start: Tips & Ingredient Notes
- Zest First, Juice Second. This is a cardinal rule of citrus cooking! Always zest your orange before you cut it and juice it. It’s infinitely easier to zest a whole, firm fruit.
- Don’t Overmix the Batter. A few lumps in your pancake batter are not just okay, they’re ideal. Overmixing develops the gluten in the flour, which can lead to tough, chewy pancakes instead of light, fluffy ones.
- What if I don’t have buttermilk? No worries! You can make a great substitute by placing 1 tablespoon of white vinegar or lemon juice in a measuring cup and then adding enough regular milk to reach the 240 ml line. Let it sit for 5 minutes until it curdles slightly.
- Test Your Baking Powder. If your baking powder is old, your pancakes won’t rise properly. To test it, sprinkle a little into a cup of hot water. If it fizzes vigorously, it’s good to go. If not, it’s time for a new tin.
How to Make Orange Vanilla Pancakes
Step 1: Combine the Dry Ingredients. In your large mixing bowl, whisk together the flour, sugar, baking powder, baking soda, and salt. This isn’t just about mixing—whisking thoroughly ensures the leavening agents are evenly distributed, which is key for a uniform rise. You’ll end up with a light, aerated dry mix that’s ready to welcome the wet ingredients.
Step 2: Whisk Together the Wet Ingredients. In the smaller bowl, combine the buttermilk, fresh orange juice, egg, melted butter, and vanilla extract. Whisk them until they are just combined; you don’t need to beat them into a frenzy. Then, stir in the vibrant orange zest. The mixture might look a little curdled because of the acid in the orange juice reacting with the buttermilk—this is totally normal and will all come together in the next step.
Step 3: The Grand Union. Now, pour the wet ingredients into the bowl with the dry ingredients. Use your whisk or a spatula to gently fold everything together. The goal is to moisten all the flour—stop mixing the moment you no longer see dry streaks. Remember, a lumpy batter is a happy batter! Overmixing is the enemy of fluffiness.
Step 4: Let the Batter Rest. This is a small but mighty step. Let the batter sit untouched for about 5-10 minutes. This allows the flour to fully hydrate and the baking powder to start its magical work, creating tiny bubbles that will give you an incredibly tender crumb. You’ll notice the batter thicken slightly.
Step 5: Preheat and Prep Your Cooking Surface. While the batter rests, heat your griddle or skillet over medium heat. I like to test if it’s ready by flicking a few drops of water onto the surface—if they dance and evaporate quickly, you’re good to go. Add a small pat of butter and swirl it to coat the surface. That sizzle is the sound of success.
Step 6: Cook to Golden-Brown Perfection. Using a ladle or a 1/4-cup measure, pour the batter onto the hot griddle. Cook until you see bubbles forming on the surface and the edges look set and slightly dry, about 2-3 minutes. This is your sign to peek underneath—the bottom should be a beautiful golden brown. Then, slide your spatula underneath and flip with confidence! Cook for another 1-2 minutes on the second side until equally golden and cooked through.
Step 7: Keep Them Warm. As you cook subsequent batches, place the finished pancakes in a single layer on a baking sheet in a low oven (about 95°C / 200°F) to keep them warm and delightful for everyone until you’re ready to serve. This prevents them from getting soggy.
Serving Suggestions
Complementary Dishes
- Crispy Smoked Bacon or Sausage — The salty, savory crunch is the perfect counterpoint to the sweet, citrusy pancakes, creating a truly balanced breakfast plate.
- Scrambled Eggs with Chives — For a more substantial brunch, add some soft, creamy scrambled eggs. The subtle onion flavor from the chives complements the orange beautifully.
Drinks
- Freshly Brewed Coffee — The bitterness of a good cup of coffee cuts through the sweetness and enhances the warm vanilla notes, making for a classic, unbeatable pairing.
- Glass of Cold Milk — Sometimes, the simple, creamy comfort of an ice-cold glass of milk is exactly what you need alongside a stack of warm pancakes.
Something Sweet
- Maple Syrup and Whipped Cream — Drizzle with pure maple syrup and a dollop of lightly sweetened whipped cream for a truly decadent treat. The maple’s deep flavor is fantastic with the citrus.
- Fresh Berry Compote — Gently warmed berries with a hint of sugar create a vibrant, slightly tart sauce that makes the orange flavor pop even more.
Top Mistakes to Avoid
- Mistake: Cooking on too high heat. This is probably the most common pancake error. If the pan is too hot, the outside will burn before the inside has a chance to cook through, leaving you with a raw, doughy center. Medium heat is your friend—it allows for that perfect golden-brown exterior and a fully cooked, fluffy interior.
- Mistake: Pressing down on the pancakes with the spatula. I’ve messed this up before too… it’s so tempting! But pressing down squeezes out all the precious air bubbles you worked so hard to create, resulting in dense, flat pancakes. Just let them be.
- Mistake: Using baking powder that’s lost its potency. As mentioned before, old baking powder won’t provide the necessary lift. Your pancakes will be disappointingly flat. Always do the quick water test if you’re unsure about its age.
- Mistake: Flipping too early. Patience is key. Wait for those bubbles to form on the surface and the edges to look set. If you try to flip too soon, the pancake might tear or not hold its shape properly.
Expert Tips
- Tip: For supremely fluffy pancakes, separate the egg. Add the yolk with the other wet ingredients, but whip the egg white separately until it holds soft peaks. Then, fold it into the finished batter as the very last step. This incorporates extra air for an unbelievably light texture.
- Tip: Infuse your syrup. Gently warm your maple syrup in a small saucepan with a few strips of orange zest and a vanilla bean pod (or an extra teaspoon of extract) for 5 minutes. Strain it out before serving for an next-level, flavor-matched syrup.
- Tip: Make a big batch and freeze them. These pancakes freeze beautifully. Let them cool completely, then layer them between sheets of parchment paper in a freezer bag. To reheat, just pop them in the toaster for a quick and delicious weekday breakfast.
- Tip: Use an ice cream scoop for perfectly portioned pancakes. A trigger-release ice cream scoop ensures every pancake is the same size, which means they’ll all cook at the same rate. It’s a little hack that makes the process so much smoother.
FAQs
Can I make the batter the night before?
I wouldn’t recommend making the full batter ahead of time. The baking powder will lose its effectiveness overnight, and the batter can become too thick as the flour continues to absorb liquid, leading to dense pancakes. A better plan is to mix the dry ingredients and the wet ingredients in separate containers the night before. In the morning, just combine them and cook—you’ll still save time without sacrificing quality.
Can I use bottled orange juice instead of fresh?
Honestly, I really don’t recommend it. Fresh orange juice has a bright, vibrant flavor that bottled juice just can’t match. Bottled juice often has a cooked or processed taste and can be overly sweet, which will throw off the balance of the recipe. Squeezing your own is quick and makes a world of difference in the final taste.
My pancakes are turning out flat. What did I do wrong?
Flat pancakes are usually a sign of an issue with your leavening agent. The most common culprit is expired baking powder. Give it the hot water test! Another possibility is overmixing the batter, which deflates the air bubbles. Finally, make sure your measurements are accurate—too much liquid or not enough flour can also lead to a batter that spreads too thin on the griddle.
How can I tell when the pancake is ready to flip?
Look for three key signs. First, the top surface will be covered with little bubbles that have started to pop. Second, the edges will look matte and set, rather than wet and glossy. And third, when you slide your spatula under a corner, the bottom should be a consistent golden-brown color. If it’s still pale, give it another 30 seconds.
Can I make these pancakes vegan?
You can certainly try a vegan adaptation! For the egg, a flax egg (1 tbsp ground flaxseed mixed with 3 tbsp water) often works well in pancakes. Use a plant-based milk mixed with a tablespoon of vinegar for the buttermilk, and substitute the butter with a neutral oil or vegan butter. The flavor profile will be a bit different, but you can still achieve a lovely, citrusy pancake.
Orange Vanilla Pancakes
Wake up to sunshine! My fluffy Orange Vanilla Pancakes recipe combines fresh citrus zing with warm vanilla for a truly special breakfast. Easy, from-scratch, and pure morning joy.
Ingredients
Ingredients
-
240 g all-purpose flour
-
2 tbsp granulated sugar
-
2 tsp baking powder
-
1/2 tsp baking soda
-
1/2 tsp fine sea salt
-
240 ml buttermilk
-
120 ml fresh orange juice (from about 1-2 large oranges)
-
1 large egg
-
3 tbsp unsalted butter (melted and slightly cooled, plus more for cooking)
-
2 tsp pure vanilla extract
-
1 orange zest (of 1 large orange)
Instructions
-
Combine the Dry Ingredients. In your large mixing bowl, whisk together the flour, sugar, baking powder, baking soda, and salt. This isn't just about mixing—whisking thoroughly ensures the leavening agents are evenly distributed, which is key for a uniform rise. You'll end up with a light, aerated dry mix that's ready to welcome the wet ingredients.01
-
Whisk Together the Wet Ingredients. In the smaller bowl, combine the buttermilk, fresh orange juice, egg, melted butter, and vanilla extract. Whisk them until they are just combined; you don't need to beat them into a frenzy. Then, stir in the vibrant orange zest. The mixture might look a little curdled because of the acid in the orange juice reacting with the buttermilk—this is totally normal and will all come together in the next step.02
-
The Grand Union. Now, pour the wet ingredients into the bowl with the dry ingredients. Use your whisk or a spatula to gently fold everything together. The goal is to moisten all the flour—stop mixing the moment you no longer see dry streaks. Remember, a lumpy batter is a happy batter! Overmixing is the enemy of fluffiness.03
-
Let the Batter Rest. This is a small but mighty step. Let the batter sit untouched for about 5-10 minutes. This allows the flour to fully hydrate and the baking powder to start its magical work, creating tiny bubbles that will give you an incredibly tender crumb. You'll notice the batter thicken slightly.04
-
Preheat and Prep Your Cooking Surface. While the batter rests, heat your griddle or skillet over medium heat. I like to test if it's ready by flicking a few drops of water onto the surface—if they dance and evaporate quickly, you're good to go. Add a small pat of butter and swirl it to coat the surface. That sizzle is the sound of success.05
-
Cook to Golden-Brown Perfection. Using a ladle or a 1/4-cup measure, pour the batter onto the hot griddle. Cook until you see bubbles forming on the surface and the edges look set and slightly dry, about 2-3 minutes. This is your sign to peek underneath—the bottom should be a beautiful golden brown. Then, slide your spatula underneath and flip with confidence! Cook for another 1-2 minutes on the second side until equally golden and cooked through.06
-
Keep Them Warm. As you cook subsequent batches, place the finished pancakes in a single layer on a baking sheet in a low oven (about 95°C / 200°F) to keep them warm and delightful for everyone until you're ready to serve. This prevents them from getting soggy.07