
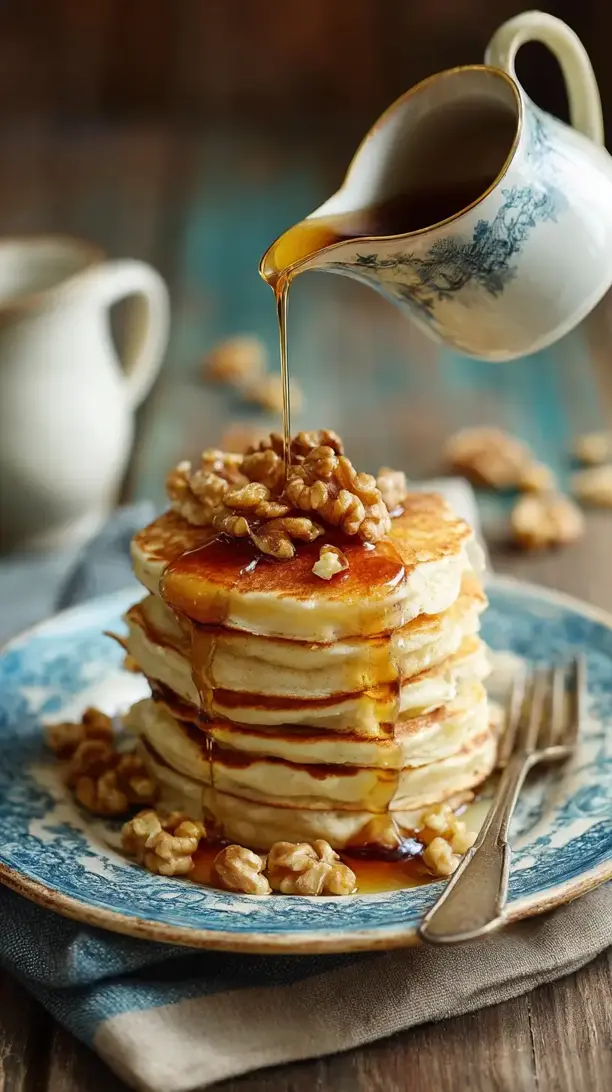
Why You’ll Love This Maple Walnut Pancakes
- Flavour in every layer. We’re not just drizzling maple syrup on top; we’re weaving its warm, woody sweetness right through the batter itself, and then we’re amplifying it with the nutty, toasty crunch of walnuts.
- The perfect fluffy texture. The combination of buttermilk and a gentle hand when mixing gives these pancakes an incredibly light and tender crumb. They’re substantial without being heavy—the ideal vehicle for all that maple goodness.
- A truly aromatic experience. From the moment you toast the walnuts to the final flip on the griddle, your kitchen will smell like a cozy autumn dream. It’s a sensory journey that makes the cooking process just as enjoyable as eating.
- Surprisingly simple to master. While they taste special enough for a holiday brunch, the method is straightforward weekender material. You’ll feel like a pro breakfast chef with minimal effort, honestly.
Ingredients & Tools
- 180 g all-purpose flour
- 2 tsp baking powder
- 1/2 tsp baking soda
- 1/2 tsp fine sea salt
- 1 large egg, at room temperature
- 360 ml buttermilk, well-shaken
- 60 ml pure maple syrup, plus more for serving
- 2 tbsp unsalted butter, melted and slightly cooled
- 1 tsp vanilla extract
- 100 g walnuts, roughly chopped
- Butter or oil for greasing the pan
Tools: A large mixing bowl, a medium mixing bowl, a whisk, a flexible spatula, a large non-stick skillet or griddle, and a 1/4-cup measuring cup for portioning.
The quality of your maple syrup really matters here—it’s the star of the show. Using a darker, Grade A Amber or even Grade B syrup will give you a much deeper, more complex flavour than a lighter grade. And that buttermilk isn’t just for tang; its acidity reacting with the baking soda is what gives us those gorgeous, airy bubbles.
Serves: 3-4 (makes about 10-12 pancakes) | Prep Time: 15 minutes | Cook Time: 15 minutes | Total Time: 30 minutes
Before You Start: Tips & Ingredient Notes
- Why toast the walnuts? Toasting is non-negotiable. It transforms them from a slightly bitter, soft nut into a crunchy, deeply fragrant powerhouse. That nutty aroma is what will make your pancakes taste next-level.
- Room temperature ingredients are key. A cold egg hitting melted butter can cause the butter to solidify into little bits. Letting your egg and buttermilk sit out for 20 minutes ensures a smooth, homogenous batter for the most even cooking.
- Don’t overmix the batter. This is the golden rule of pancake making. A few lumps are absolutely fine—in fact, they’re desirable. Overmixing develops the gluten in the flour, leading to tough, chewy pancakes instead of light, fluffy ones.
- Get your pan to the right temperature. Too hot, and the outside burns before the inside cooks. Too low, and you get pale, greasy pancakes. A flick of water should sizzle and dance across the surface before you add your batter.
How to Make Maple Walnut Pancakes
Step 1: Toast the Walnuts. Place a dry skillet over medium heat. Add the chopped walnuts and toast for 3-5 minutes, stirring frequently, until they become fragrant and take on a slightly darker colour. Be vigilant—they can go from perfectly toasted to burnt in seconds. Immediately transfer them to a plate to stop the cooking process. You’ll notice their aroma completely changes, becoming warm and inviting.
Step 2: Combine the Dry Ingredients. In your large mixing bowl, whisk together the flour, baking powder, baking soda, and salt. This isn’t just about mixing; you’re aerating the flour and ensuring the leaveners are evenly distributed, which is crucial for a consistent rise. Give the bowl a little shake to level everything out.
Step 3: Whisk the Wet Ingredients. In the medium bowl, whisk the room-temperature egg until it’s pale and frothy. This incorporates air. Then, whisk in the buttermilk, maple syrup, melted (and cooled!) butter, and vanilla extract. The mixture should look smooth and well-combined. You’ll see little bubbles from the buttermilk—that’s a good sign!
Step 4: Bring It All Together. Pour the wet ingredients into the dry ingredients. Now, with your spatula, gently fold them together. Use a broad, sweeping motion, going around the bowl and through the center. Stop as soon as you no longer see large pockets of dry flour. The batter will be thick and lumpy—this is exactly what you want. Gently fold in the toasted walnuts.
Step 5: Preheat and Test the Pan. Place your skillet or griddle over medium heat. Let it get properly hot for a couple of minutes. To test, flick a few drops of water onto the surface; if they sizzle and evaporate quickly, you’re ready. Lightly grease the surface with butter or a neutral oil.
Step 6: Cook the Pancakes. Using your 1/4-cup measure, pour batter onto the hot skillet, leaving space for them to spread. You’ll notice bubbles forming on the surface and the edges starting to look set after about 2-3 minutes. Once the bubbles have popped and the edges are dry, it’s time to flip. Slide your spatula underneath and flip with confidence. Cook for another 1-2 minutes on the second side, until golden brown and cooked through.
Step 7: Keep Them Warm. As you cook the batches, transfer the finished pancakes to a wire rack set on a baking sheet in a low-temperature oven (about 95°C/200°F). This keeps them warm and crispy. Stacking them on a plate will make the steam soften them, but the wire rack allows air to circulate.
Serving Suggestions
Complementary Dishes
- Crispy Smoked Bacon or Sausage — The salty, savoury fat is a perfect counterpoint to the sweet, maple-infused pancakes. It creates that classic sweet-and-salty balance that’s just irresistible.
- Fresh Berry Compote — A quick simmer of blueberries or raspberries with a touch of lemon juice adds a bright, tart element that cuts through the richness beautifully.
Drinks
- A Strong Cup of Coffee — The bitterness of a good dark roast coffee is the ideal palate cleanser between bites of sweet, fluffy pancake. It just feels right.
- Cold Glass of Milk — Sometimes the classic choice is the best. There’s something wonderfully nostalgic about pancakes and a tall, cold glass of milk.
Something Sweet
- Extra Maple Syrup and Butter — This is a must. Let a pat of good salted butter melt into the top and drizzle with even more of that glorious maple syrup. Don’t be shy.
- Whipped Cream or Greek Yogurt — For a touch of decadence or a tangy contrast, a dollop of lightly sweetened whipped cream or thick Greek yogurt is fantastic.
Top Mistakes to Avoid
- Mistake: Overmixing the batter. This is the number one reason pancakes turn out tough. Gluten development is the enemy of fluffiness. A lumpy batter is a happy batter.
- Mistake: Flipping too early. If you try to flip before the surface is covered with popped bubbles, you’ll end up with a messy, undercooked pancake. Patience is key—wait for those visual cues.
- Mistake: Using a pan that’s too hot or too cold. I’ve messed this up before too. An overly hot pan burns the outside; a cool pan makes the pancakes absorb grease and cook up pale. The water sizzle test is your best friend.
- Mistake: Pressing down on the pancakes with the spatula after flipping. This squeezes out all the precious air you worked so hard to create! Just let them be. They’ll cook through on their own.
Expert Tips
- Tip: Let the batter rest for 5 minutes. After you’ve mixed it, just walk away. This allows the flour to fully hydrate and the gluten to relax, resulting in a more tender pancake. You’ll see the batter thicken slightly.
- Tip: Use a cookie scoop for mini-pancakes. If you’re feeding a crowd or want a fun presentation, a small cookie or ice cream scoop is perfect for creating uniform, silver-dollar-sized pancakes that are great for kids.
- Tip: Make a “test” pancake first. Cook one small pancake first to check your heat level and seasoning. This is your chance to adjust the batter (a pinch more salt?) or the pan temperature before committing to a whole batch.
- Tip: Freeze extras for a quick breakfast. These pancakes freeze beautifully. Let them cool completely, then layer them between parchment paper in a freezer bag. Reheat in a toaster or oven for a nearly-instant gourmet breakfast on a busy day.
FAQs
Can I make the batter the night before?
Honestly, I wouldn’t recommend it for the fluffiest results. The baking powder and soda will lose their oomph overnight, leading to denser pancakes. A better plan is to mix the dry ingredients and wet ingredients in separate bowls the night before. In the morning, just combine them and cook—it takes 2 minutes and makes all the difference.
I don’t have buttermilk. What can I use?
No problem! A great quick substitute is to add 1 tablespoon of white vinegar or lemon juice to a measuring jug, then top it up to the 360ml line with regular milk. Stir and let it sit for 5-10 minutes until it curdles slightly. It works like a charm and provides the necessary acidity for the reaction with the baking soda.
My pancakes are turning out flat. What did I do wrong?
Flat pancakes usually point to old or expired baking powder or soda. They lose their potency over time. Check the expiration date on your containers. Another culprit could be overmixing, which deflates the air bubbles. Next time, try a fresher box of leavener and be extra gentle with the folding.
Can I make these gluten-free or vegan?
Absolutely! For gluten-free, use a 1:1 gluten-free flour blend. For vegan, use a flax egg (1 tbsp ground flaxseed mixed with 3 tbsp water, let sit 5 mins) instead of the egg, a plant-based milk with lemon juice for the buttermilk, and vegan butter. The cooking method remains exactly the same.
How can I tell if the pancakes are cooked through without cutting them open?
The best indicator is the bubble-and-edge test. Wait for the bubbles on the surface to pop and for the edges to look matte and set. You can also gently press the center with your finger; if it springs back, it’s done. If it leaves an indent, it needs another minute. With practice, you’ll just know by looking at them.
Maple Walnut Pancakes
Wake up to the best Maple Walnut Pancakes! Fluffy, golden, & packed with toasted nuts & real maple syrup right in the batter. My simple, from-scratch recipe turns breakfast into a celebration.
Ingredients
Ingredients
-
180 g all-purpose flour
-
2 tsp baking powder
-
1/2 tsp baking soda
-
1/2 tsp fine sea salt
-
1 large egg (at room temperature)
-
360 ml buttermilk (well-shaken)
-
60 ml pure maple syrup (plus more for serving)
-
2 tbsp unsalted butter (melted and slightly cooled)
-
1 tsp vanilla extract
-
100 g walnuts (roughly chopped)
-
Butter or oil (for greasing the pan)
Instructions
-
Toast the Walnuts. Place a dry skillet over medium heat. Add the chopped walnuts and toast for 3-5 minutes, stirring frequently, until they become fragrant and take on a slightly darker colour. Be vigilant—they can go from perfectly toasted to burnt in seconds. Immediately transfer them to a plate to stop the cooking process. You'll notice their aroma completely changes, becoming warm and inviting.01
-
Combine the Dry Ingredients. In your large mixing bowl, whisk together the flour, baking powder, baking soda, and salt. This isn't just about mixing; you're aerating the flour and ensuring the leaveners are evenly distributed, which is crucial for a consistent rise. Give the bowl a little shake to level everything out.02
-
Whisk the Wet Ingredients. In the medium bowl, whisk the room-temperature egg until it's pale and frothy. This incorporates air. Then, whisk in the buttermilk, maple syrup, melted (and cooled!) butter, and vanilla extract. The mixture should look smooth and well-combined. You'll see little bubbles from the buttermilk—that's a good sign!03
-
Bring It All Together. Pour the wet ingredients into the dry ingredients. Now, with your spatula, gently fold them together. Use a broad, sweeping motion, going around the bowl and through the center. Stop as soon as you no longer see large pockets of dry flour. The batter will be thick and lumpy—this is exactly what you want. Gently fold in the toasted walnuts.04
-
Preheat and Test the Pan. Place your skillet or griddle over medium heat. Let it get properly hot for a couple of minutes. To test, flick a few drops of water onto the surface; if they sizzle and evaporate quickly, you're ready. Lightly grease the surface with butter or a neutral oil.05
-
Cook the Pancakes. Using your 1/4-cup measure, pour batter onto the hot skillet, leaving space for them to spread. You'll notice bubbles forming on the surface and the edges starting to look set after about 2-3 minutes. Once the bubbles have popped and the edges are dry, it's time to flip. Slide your spatula underneath and flip with confidence. Cook for another 1-2 minutes on the second side, until golden brown and cooked through.06
-
Keep Them Warm. As you cook the batches, transfer the finished pancakes to a wire rack set on a baking sheet in a low-temperature oven (about 95°C/200°F). This keeps them warm and crispy. Stacking them on a plate will make the steam soften them, but the wire rack allows air to circulate.07