
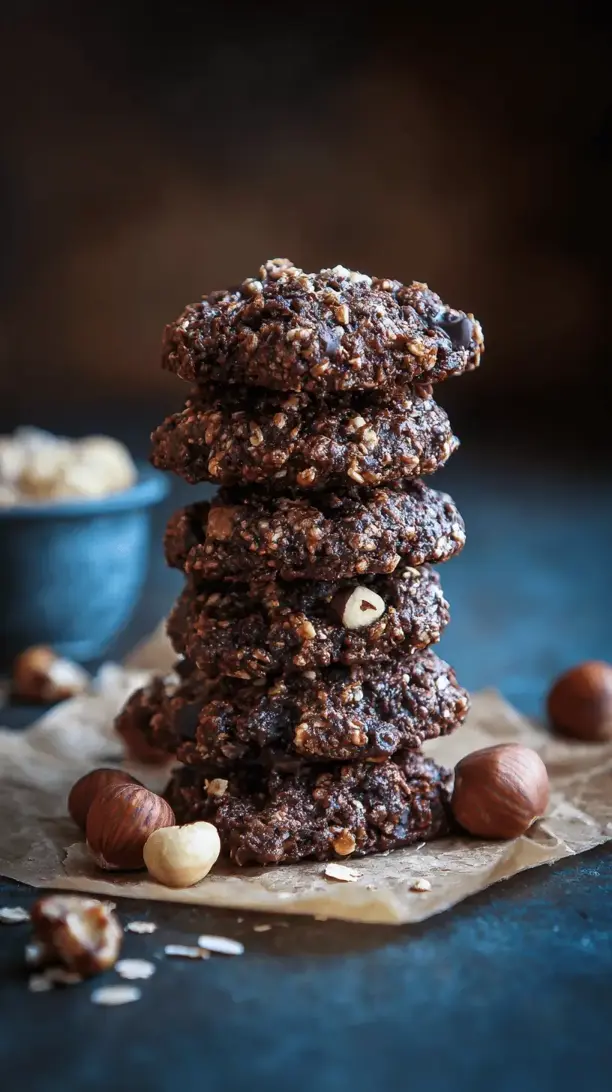
Why You’ll Love These Chocolate Hazelnut Oat Cookies
- They’re the perfect texture trifecta. You get the chewy base from the oats, little pockets of melty chocolate, and a fantastic crunch from the toasted hazelnuts. Every single bite is a delightful mix of sensations.
- They’re surprisingly forgiving. This isn’t a fussy, precise pastry dough. The ingredient list is straightforward, and the method is simple—perfect for bakers of any level. If you’re a little off on a measurement, the cookies will still turn out wonderfully.
- They have a deep, toasty flavour. By taking the extra minute to toast the hazelnuts, you unlock an incredible nutty aroma that permeates the entire cookie. It elevates them from simple to sublime.
- They’re a crowd-pleaser with a twist. Everyone loves an oatmeal cookie, and the chocolate-hazelnut combo is a classic for a reason. These feel familiar yet excitingly different, guaranteed to disappear quickly from any cookie tin.
Ingredients & Tools
- 115 g unsalted butter, softened
- 100 g light brown sugar
- 50 g granulated sugar
- 1 large egg, at room temperature
- 1 tsp vanilla extract
- 120 g all-purpose flour
- ½ tsp baking soda
- ½ tsp fine sea salt
- 120 g old-fashioned rolled oats
- 100 g hazelnuts, toasted and roughly chopped
- 150 g dark chocolate chips or chunks
Tools: A hand mixer or stand mixer, two baking sheets, parchment paper, a medium mixing bowl.
A quick note on the ingredients—using a mix of brown and white sugar is the secret to a cookie that’s both chewy and has a slight crispness at the edges. And please, don’t skip toasting the hazelnuts! It’s a simple step that makes a world of difference, bringing out their oils and making the flavour so much richer.
Serves: Makes about 18 cookies | Prep Time: 15 minutes | Cook Time: 10-12 minutes per batch | Total Time: About 45 minutes (including cooling)
Before You Start: Tips & Ingredient Notes
- Why toast the hazelnuts? Toasting isn’t just for colour; it’s for flavour. Raw hazelnuts can taste a bit bland and woody. A quick toast in a dry pan or the oven transforms them, releasing their natural oils and giving them that incredible, warm, nutty taste that defines these cookies.
- What’s the deal with softened butter? The texture of your butter is crucial. You want it soft enough that your finger leaves an indent, but not melted or greasy. This allows it to cream properly with the sugars, trapping air that helps the cookies rise and become tender.
- Can I use quick oats instead of old-fashioned? You can, but the texture will be different. Old-fashioned (rolled) oats give a heartier, chewier bite. Quick oats will result in a softer, more uniform texture. Both work, but I prefer the substance of rolled oats here.
- Room temperature egg, really? Yes, honestly! A cold egg can cause the creamed butter and sugar to seize up a little, leading to a less cohesive dough. Taking the egg out of the fridge 30 minutes beforehand makes for a smoother, more emulsified batter.
How to Make Chocolate Hazelnut Oat Cookies
Step 1: Toast and Prep the Hazelnuts. First, preheat your oven to 175°C (350°F). Spread the hazelnuts in a single layer on a baking sheet. Toast them for 8-10 minutes, until they’re fragrant and the skins are starting to crack. You’ll know they’re ready when you can smell that wonderful, nutty aroma. Let them cool for a few minutes, then place them in a clean kitchen towel and rub them together—most of the bitter skins will flake off. Don’t worry about getting every last bit; a little skin is fine. Roughly chop the nuts and set them aside.
Step 2: Cream the Butter and Sugars. In a large bowl, using a hand mixer or stand mixer fitted with the paddle attachment, beat the softened butter with both the brown and granulated sugars. You’ll want to beat them on medium speed for a good 2-3 minutes, until the mixture is pale, fluffy, and well combined. This step is where you build the foundation for a great texture, so don’t rush it. Scrape down the sides of the bowl with a spatula to make sure everything is incorporated.
Step 3: Incorporate the Wet Ingredients. Add the room-temperature egg and the vanilla extract to the creamed butter and sugar. Mix on medium speed until everything is fully blended and the mixture looks smooth. It might look a little curdled at first, but just keep mixing—it will come together into a cohesive, creamy mixture.
Step 4: Combine the Dry Ingredients. In a separate medium bowl, whisk together the flour, baking soda, and salt. This ensures the leavening agent is evenly distributed so your cookies bake uniformly. Add the rolled oats to the flour mixture and give it a quick stir to combine.
Step 5: Bring the Dough Together. With your mixer on low speed, gradually add the dry oat and flour mixture to the wet ingredients. Mix just until no streaks of flour remain—be careful not to overmix! Now, switch to a sturdy spatula or wooden spoon. Gently fold in the chopped, toasted hazelnuts and the chocolate chips. The dough will be quite thick and sturdy, which is exactly what you want.
Step 6: Portion and Chill (Briefly!). Line your baking sheets with parchment paper. Using a tablespoon or a small cookie scoop, drop rounded tablespoons of dough onto the sheets, spacing them about 5 cm (2 inches) apart. They will spread a little. You can chill the dough for 15-20 minutes at this point if you have time—this helps prevent overspreading and results in a slightly thicker cookie—but it’s not strictly necessary if you’re impatient for cookies, like I often am.
Step 7: Bake to Perfection. Bake one sheet at a time in the preheated oven for 10-12 minutes. The trick is to take them out when the edges are set and golden brown, but the centres still look a little soft and underdone. They will continue to set as they cool on the hot baking sheet. This is the secret to a perfectly chewy cookie. Let them cool on the baking sheet for at least 5 minutes before transferring them to a wire rack to cool completely.
Serving Suggestions
Complementary Dishes
- A simple fruit platter — The bright, fresh acidity of berries or orange slices cuts through the richness of the cookies beautifully, making the whole experience feel balanced.
- A sharp cheese board — A slice of aged cheddar or a crumbly blue cheese alongside these cookies is a surprisingly fantastic pairing. The salty, savoury notes contrast wonderfully with the sweet, nutty chocolate.
Drinks
- A strong cup of coffee — The bitterness of black coffee is the ultimate partner for the sweet, chocolatey depth of these cookies. It’s a classic for a reason.
- A glass of cold milk — You can’t go wrong with this timeless duo. The creaminess of the milk is the perfect complement to the chewy, textured cookie.
- A rooibos tea — The naturally sweet, slightly nutty flavour of rooibos tea echoes the notes in the cookie without any caffeine, making it a great afternoon choice.
Something Sweet
- A scoop of vanilla bean ice cream — Crumble a warm cookie over a scoop of high-quality vanilla ice cream for an instant, decadent dessert that feels incredibly special.
- A dollop of whipped cream and berries — For a lighter finish, serve the cookies with a cloud of lightly sweetened whipped cream and a handful of raspberries.
Top Mistakes to Avoid
- Mistake: Using melted butter. This is probably the biggest culprit for flat, greasy cookies. Melted butter doesn’t trap air during creaming, so the cookies spread too much and lack structure. Softened, but not melted, is the key.
- Mistake: Overmixing the dough after adding the flour. Once the flour is in, mix just until it disappears. Overmixing develops the gluten in the flour, which can lead to tough, cakey cookies instead of tender, chewy ones.
- Mistake: Overbaking. I’ve messed this up before too, thinking a gooey centre meant they weren’t done. But trust the process! They should look slightly underdone when you take them out. They’ll set up perfectly as they cool, giving you that ideal chewy texture.
- Mistake: Not spacing the dough enough. These cookies need room to spread. If you crowd the baking sheet, they’ll bake into one giant cookie blob. Giving them a couple of inches of space ensures they bake evenly and keep their beautiful round shape.
Expert Tips
- Tip: Weigh your ingredients. For truly consistent results every time, a kitchen scale is your best friend. Cup measurements can vary wildly, but grams are precise. It takes the guesswork out of baking and guarantees perfect cookies.
- Tip: Make a “flavour boost” batch. For an extra layer of complexity, add a pinch of flaky sea salt on top of the cookies right when they come out of the oven. The salty-sweet combination is absolutely irresistible.
- Tip: Freeze the dough for instant cookies. Portion the dough balls onto a tray, freeze them solid, then transfer to a zip-top bag. You can bake them straight from frozen, just adding a minute or two to the baking time. Fresh, warm cookies on demand!
- Tip: Experiment with your chocolate. While dark chocolate is classic, feel free to use milk chocolate chips for a sweeter cookie, or even chop up a bar of your favourite chocolate for irregular, melty chunks.
FAQs
Can I make these cookies gluten-free?
Absolutely! The recipe is very adaptable. Simply swap the all-purpose flour for your favourite 1:1 gluten-free flour blend. Make sure your oats are certified gluten-free, as oats are often processed in facilities that also handle wheat. The texture will be very similar—still wonderfully chewy and delicious.
How should I store these cookies, and how long will they keep?
Store the completely cooled cookies in an airtight container at room temperature. They’ll stay fresh and soft for about 4-5 days. If you want to keep them longer, you can freeze the baked cookies for up to 3 months. Just thaw them at room temperature when you’re ready to enjoy them again.
My cookies turned out flat. What happened?
Flat cookies are usually due to one of two things: your butter was too warm or melted, or your baking soda might be old. Baking soda loses its potency over time, so if yours has been in the cupboard for a while, it might not be providing the necessary lift. Always test your baking soda by adding a pinch to vinegar—if it doesn’t bubble vigorously, it’s time for a new box.
Can I use a different type of nut?
Of course! While hazelnuts are the star here, walnuts or pecans would be lovely substitutes. They’d bring a different but equally delicious flavour profile. Just make sure to toast whichever nut you choose to maximize its flavour.
Why is my dough so crumbly?
If your dough isn’t coming together and seems dry, it’s often because the flour was measured a little too heavily, or your egg was on the smaller side. You can fix this by adding a teaspoon of milk at a time, mixing gently, until the dough holds together when you press it between your fingers.
Chocolate Hazelnut Oat Cookies
Whip up the ultimate chewy Chocolate Hazelnut Oat Cookies! This easy recipe combines toasted nuts, rich chocolate & hearty oats for the perfect snack. Pure comfort baking!
Ingredients
Ingredients
-
115 g unsalted butter (softened)
-
100 g light brown sugar
-
50 g granulated sugar
-
1 large egg (at room temperature)
-
1 tsp vanilla extract
-
120 g all-purpose flour
-
½ tsp baking soda
-
½ tsp fine sea salt
-
120 g old-fashioned rolled oats
-
100 g hazelnuts (toasted and roughly chopped)
-
150 g dark chocolate chips or chunks
Instructions
-
Toast and Prep the Hazelnuts. First, preheat your oven to 175°C (350°F). Spread the hazelnuts in a single layer on a baking sheet. Toast them for 8-10 minutes, until they're fragrant and the skins are starting to crack. You'll know they're ready when you can smell that wonderful, nutty aroma. Let them cool for a few minutes, then place them in a clean kitchen towel and rub them together—most of the bitter skins will flake off. Don't worry about getting every last bit; a little skin is fine. Roughly chop the nuts and set them aside.01
-
Cream the Butter and Sugars. In a large bowl, using a hand mixer or stand mixer fitted with the paddle attachment, beat the softened butter with both the brown and granulated sugars. You'll want to beat them on medium speed for a good 2-3 minutes, until the mixture is pale, fluffy, and well combined. This step is where you build the foundation for a great texture, so don't rush it. Scrape down the sides of the bowl with a spatula to make sure everything is incorporated.02
-
Incorporate the Wet Ingredients. Add the room-temperature egg and the vanilla extract to the creamed butter and sugar. Mix on medium speed until everything is fully blended and the mixture looks smooth. It might look a little curdled at first, but just keep mixing—it will come together into a cohesive, creamy mixture.03
-
Combine the Dry Ingredients. In a separate medium bowl, whisk together the flour, baking soda, and salt. This ensures the leavening agent is evenly distributed so your cookies bake uniformly. Add the rolled oats to the flour mixture and give it a quick stir to combine.04
-
Bring the Dough Together. With your mixer on low speed, gradually add the dry oat and flour mixture to the wet ingredients. Mix just until no streaks of flour remain—be careful not to overmix! Now, switch to a sturdy spatula or wooden spoon. Gently fold in the chopped, toasted hazelnuts and the chocolate chips. The dough will be quite thick and sturdy, which is exactly what you want.05
-
Portion and Chill (Briefly!). Line your baking sheets with parchment paper. Using a tablespoon or a small cookie scoop, drop rounded tablespoons of dough onto the sheets, spacing them about 5 cm (2 inches) apart. They will spread a little. You can chill the dough for 15-20 minutes at this point if you have time—this helps prevent overspreading and results in a slightly thicker cookie—but it's not strictly necessary if you're impatient for cookies, like I often am.06
-
Bake to Perfection. Bake one sheet at a time in the preheated oven for 10-12 minutes. The trick is to take them out when the edges are set and golden brown, but the centres still look a little soft and underdone. They will continue to set as they cool on the hot baking sheet. This is the secret to a perfectly chewy cookie. Let them cool on the baking sheet for at least 5 minutes before transferring them to a wire rack to cool completely.07


