
Why You’ll Love This Dark Chocolate Coconut Clusters
- They’re unbelievably simple. Honestly, if you can melt chocolate and stir, you’ve got this. There’s no fancy equipment or complicated techniques involved, making it a wonderfully stress-free kitchen project.
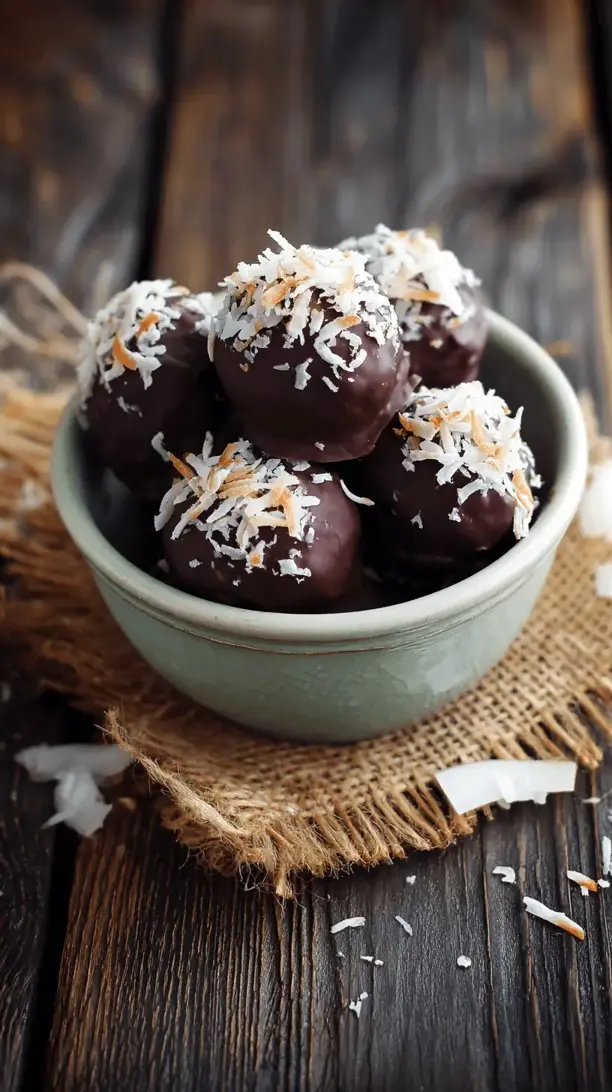
- The texture is pure magic. You get the crisp snap of the dark chocolate, the chewy, slightly toasted feel of the coconut, and that final flake of sea salt that just makes everything pop. It’s a symphony in your mouth.
- They’re endlessly customizable. Think of this recipe as a fantastic base camp. Feel like adding some chopped almonds or a dash of cinnamon? Go for it! This is your chocolate canvas.
- They make you look like a pastry pro. These clusters have a beautiful, artisanal look to them, with their irregular shapes and glossy chocolate coating. No one needs to know how little effort it actually took.
Ingredients & Tools
- 200 g high-quality dark chocolate (around 70% cocoa), chopped
- 120 g unsweetened shredded coconut
- 30 g unsweetened coconut flakes
- 1 tbsp coconut oil (unrefined for more flavour)
- 1/4 tsp fine sea salt, plus more for sprinkling
- 1/2 tsp pure vanilla extract (optional, but lovely)
Tools: A medium heatproof bowl, a saucepan for a double boiler (or a microwave-safe bowl), a baking sheet, and parchment paper.
The quality of your chocolate really is the star here, so choose one you enjoy eating on its own. Using a mix of shredded coconut and flakes gives a more interesting texture, and that little bit of coconut oil is the secret to a super glossy, snappy finish on the chocolate.
Serves: Makes about 12-15 clusters | Prep Time: 10 minutes | Cook Time: 5 minutes | Total Time: 45 minutes (includes chilling)
Before You Start: Tips & Ingredient Notes
- Chocolate Chopping. If you’re using a chocolate bar, chop it into small, relatively uniform pieces. This helps it melt evenly and prevents any lumps. Chocolate chips work in a pinch, but they often have stabilizers that can make melting trickier.
- To Toast or Not to Toast? Toasting the coconut beforehand adds a deep, nutty flavour that is absolutely incredible. I highly recommend it! Just spread the coconut on a baking sheet and toast at 175°C (350°F) for 5-7 minutes, watching closely so it doesn’t burn.
- The Coconut Oil Question. Why add fat to fat? The coconut oil tempers the chocolate slightly, making it more fluid for easy dipping and giving the finished clusters a beautiful sheen and a clean snap. A little goes a long way!
- Salt is Non-Negotiable. The flaky sea salt sprinkled on top isn’t just for looks. It cuts through the richness of the chocolate and enhances all the other flavours. Don’t skip it!
How to Make Dark Chocolate Coconut Clusters
Step 1: First, get your workstation ready. Line a standard baking sheet with parchment paper. This is crucial because it prevents sticking and makes cleanup a dream. If you’ve decided to toast your coconut, now is the time to do it. Just spread it on a separate pan and pop it in the oven until it’s fragrant and lightly golden—you’ll notice the colour change quickly, so don’t walk away!
Step 2: Now, let’s melt the chocolate. You can use a double boiler: place about an inch of water in a saucepan and bring it to a gentle simmer. Set your heatproof bowl on top, making sure the bottom of the bowl doesn’t touch the water. Add the chopped chocolate and coconut oil. Stir gently and continuously as it melts. The steam from the water provides a gentle, even heat that prevents the chocolate from seizing or burning. If you’re using a microwave, heat the chocolate and oil in 30-second bursts on medium power, stirring well after each interval until smooth.
Step 3: Once the chocolate is completely smooth and glossy, take the bowl off the heat. Stir in the fine sea salt and the vanilla extract, if you’re using it. Now, add all of your coconut—both the shredded and the flakes. Use a spatula to fold it in until every last bit of coconut is thoroughly coated in that luxurious dark chocolate. The mixture will be thick and chunky, which is exactly what you want.
Step 4: Here’s the fun, slightly messy part. Using two spoons or a small cookie scoop, drop tablespoon-sized mounds of the mixture onto your prepared baking sheet. Don’t worry about making them perfect circles—the rustic, uneven shapes are part of their charm. Leave a little space between each cluster so they don’t stick together. Now, while the chocolate is still wet, sprinkle a tiny pinch of flaky sea salt over the top of each cluster.
Step 5: The final step is all about patience. Carefully transfer the baking sheet to the refrigerator. You’ll need to let the clusters chill for at least 30 minutes, or until the chocolate is completely firm and set. You can test one by gently touching it—it should feel solid and make a satisfying snap when you break it. Once they’re set, they’re ready to enjoy!
Serving Suggestions
Complementary Dishes
- A Fresh Fruit Platter — The bright acidity of berries like raspberries or strawberries cuts through the richness of the chocolate beautifully, creating a balanced dessert spread.
- A Cheese Board — A sharp, aged cheddar or a creamy blue cheese alongside these clusters is a surprisingly fantastic sweet-and-savory combination that will impress any guest.
Drinks
- Black Coffee or a Strong Espresso — This is the classic pairing for a reason. The bitterness of the coffee highlights the deep cocoa notes and makes the whole experience feel sophisticated.
- A Glass of Full-Bodied Red Wine — If you’re feeling fancy, a Cabernet Sauvignon or a Zinfandel with dark fruit notes can stand up to the intensity of the dark chocolate.
Something Sweet
- Vanilla Bean Ice Cream — Crumble a cluster or two over a scoop of high-quality vanilla ice cream. The contrast between the cold, creamy ice cream and the crunchy, room-temperature chocolate is divine.
Top Mistakes to Avoid
- Mistake: Getting water in your melting chocolate. Even a single drop of water can cause the chocolate to “seize,” turning it into a grainy, stiff mess. Make sure all your equipment is completely dry. I’ve messed this up before too, and it’s a real heartbreaker.
- Mistake: Using sweetened coconut. The dark chocolate already provides plenty of sweetness. Sweetened coconut will make the final clusters cloyingly sweet and mask the nuanced flavour of the chocolate.
- Mistake: Rushing the chilling process. If you try to move or package the clusters before they are fully set, you’ll end up with smudged fingerprints and misshapen treats. Let the fridge do its work!
- Mistake: Skipping the salt sprinkle. It might seem like a small detail, but that salt is a flavour powerhouse. It elevates the clusters from a simple sweet to a complex gourmet treat.
Expert Tips
- Tip: Use a cookie scoop for uniformity. A small (1-tablespoon) spring-loaded cookie scoop isn’t just for cookies! It makes portioning the clusters incredibly easy, ensures they’re all about the same size for even setting, and keeps your hands relatively clean.
- Tip: Add a twist with mix-ins. Once you’ve mastered the basic recipe, try folding in a quarter cup of chopped nuts (pistachios are gorgeous), dried cranberries, or even a pinch of cayenne pepper or orange zest for a flavour adventure.
- Tip: For a super-shiny finish, temper your chocolate. If you want that professional, snappy gloss that doesn’t melt at room temperature, you can properly temper the chocolate. It’s a more advanced technique involving precise temperature control, but it’s a fun challenge for a chocolate enthusiast.
- Tip: Store them properly. Keep these clusters in an airtight container in the refrigerator for up to two weeks. They can also be frozen for up to three months—just separate layers with parchment paper so they don’t stick together.
FAQs
Can I use milk chocolate instead of dark chocolate?
Absolutely, you can! The recipe will work just fine with milk or even white chocolate. Just keep in mind that the result will be much sweeter. If you do switch, you might want to reduce or omit the coconut oil, as milk chocolate has a lower cocoa butter content and melts more easily. You may also find you don’t need the extra salt on top to balance the sweetness. It’s all about personal preference.
My chocolate became thick and grainy. What happened?
Ah, that sounds like seized chocolate. This happens when moisture—even steam—comes into contact with the melting chocolate. Unfortunately, it’s very difficult to fix. The best way to avoid it is to ensure your bowl, spoons, and all utensils are completely dry before you start. If it does happen, you can sometimes rescue it by stirring in a teaspoon of neutral oil (like vegetable oil) at a time until it smooths out again, but the texture might not be perfect.
Why didn’t my clusters get hard in the fridge?
This usually points to two possible issues. First, the chocolate may not have been heated enough to fully melt—there can be hidden lumps that keep the structure soft. Second, if you used chocolate chips, they contain stabilizers that prevent them from setting as firmly as pure baking chocolate. For the best snap, a good quality bar of dark chocolate is always your best bet.
Can I make these vegan?
Yes, and it’s wonderfully easy! Just ensure the dark chocolate you choose is certified vegan (some brands use milk solids). All the other ingredients—coconut, coconut oil, salt—are naturally plant-based. You’ll have a decadent vegan treat that everyone can enjoy.
How far in advance can I make these?
They are a fantastic make-ahead option. Stored properly in an airtight container in the fridge, they’ll keep their texture and flavour beautifully for up to two weeks. This makes them perfect for holiday gifting or for having a ready-to-go sweet treat whenever a craving strikes.
Dark Chocolate Coconut Clusters
Whip up irresistible Dark Chocolate Coconut Clusters in just 15 mins! My easy, no-bake recipe uses simple ingredients for a rich, crunchy & healthy-ish treat.
Ingredients
Ingredients
-
200 g high-quality dark chocolate (around 70% cocoa), chopped
-
120 g unsweetened shredded coconut
-
30 g unsweetened coconut flakes
-
1 tbsp coconut oil (unrefined for more flavour)
-
1/4 tsp fine sea salt (plus more for sprinkling)
-
1/2 tsp pure vanilla extract (optional, but lovely)
Instructions
-
First, get your workstation ready. Line a standard baking sheet with parchment paper. This is crucial because it prevents sticking and makes cleanup a dream. If you've decided to toast your coconut, now is the time to do it. Just spread it on a separate pan and pop it in the oven until it's fragrant and lightly golden—you'll notice the colour change quickly, so don't walk away!01
-
Now, let's melt the chocolate. You can use a double boiler: place about an inch of water in a saucepan and bring it to a gentle simmer. Set your heatproof bowl on top, making sure the bottom of the bowl doesn't touch the water. Add the chopped chocolate and coconut oil. Stir gently and continuously as it melts. The steam from the water provides a gentle, even heat that prevents the chocolate from seizing or burning. If you're using a microwave, heat the chocolate and oil in 30-second bursts on medium power, stirring well after each interval until smooth.02
-
Once the chocolate is completely smooth and glossy, take the bowl off the heat. Stir in the fine sea salt and the vanilla extract, if you're using it. Now, add all of your coconut—both the shredded and the flakes. Use a spatula to fold it in until every last bit of coconut is thoroughly coated in that luxurious dark chocolate. The mixture will be thick and chunky, which is exactly what you want.03
-
Here's the fun, slightly messy part. Using two spoons or a small cookie scoop, drop tablespoon-sized mounds of the mixture onto your prepared baking sheet. Don't worry about making them perfect circles—the rustic, uneven shapes are part of their charm. Leave a little space between each cluster so they don't stick together. Now, while the chocolate is still wet, sprinkle a tiny pinch of flaky sea salt over the top of each cluster.04
-
The final step is all about patience. Carefully transfer the baking sheet to the refrigerator. You'll need to let the clusters chill for at least 30 minutes, or until the chocolate is completely firm and set. You can test one by gently touching it—it should feel solid and make a satisfying snap when you break it. Once they're set, they're ready to enjoy!05


