
Why You’ll Love This Chia Seed Energy Bars
- They’re incredibly simple to make. Honestly, if you can stir ingredients in a bowl, you can make these bars. There’s no baking, no fancy equipment, and the whole process is wonderfully straightforward and satisfying.
- They’re packed with lasting energy. Thanks to the combination of complex carbs from the oats, healthy fats from the nuts and seeds, and a touch of natural sweetness, these bars provide a steady release of energy without the dreaded sugar crash.
- They’re endlessly customizable. Don’t like almonds? Use walnuts. Not a fan of dried cranberries? Swap in chopped apricots or even dark chocolate chips. This recipe is a fantastic base for your own creative twists.
- They make healthy eating convenient. Having a batch of these in the fridge means you always have a wholesome, grab-and-go snack ready. It’s a small act of meal prep that makes a huge difference to your week.
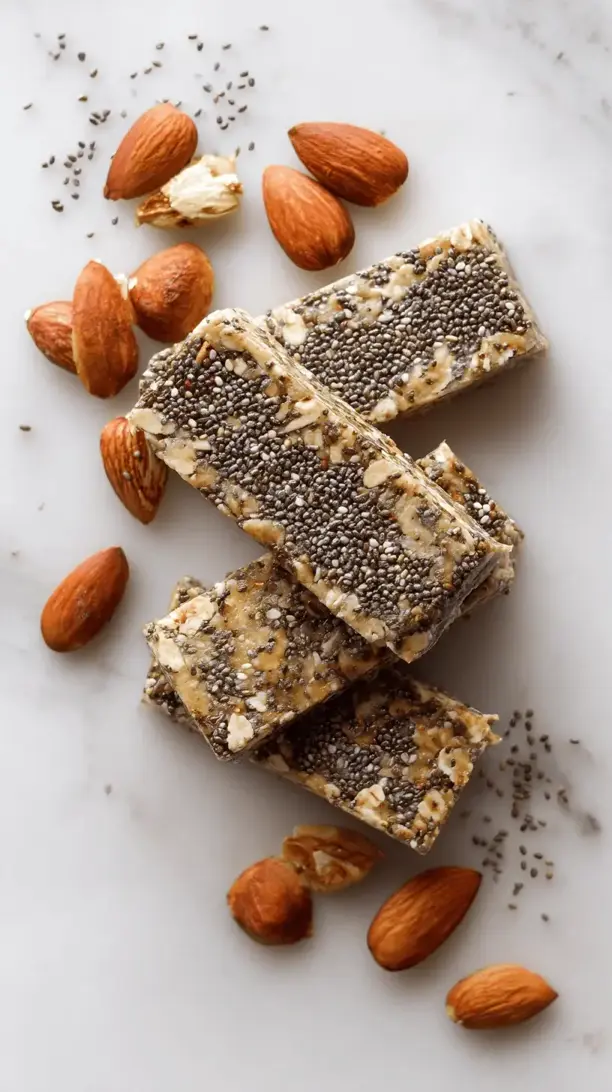
Ingredients & Tools
- 1 ½ cups old-fashioned rolled oats (certified gluten-free if needed)
- ½ cup chia seeds
- 1 cup raw almonds, roughly chopped
- ½ cup unsweetened shredded coconut
- ½ cup dried cranberries or chopped dates
- ½ tsp fine sea salt
- ½ cup creamy almond butter (or any nut/seed butter you love)
- ⅓ cup pure maple syrup or raw honey
- 1 tsp pure vanilla extract
- 2 tbsp coconut oil, melted
Tools: An 8×8 inch baking pan, parchment paper, a large mixing bowl, a spatula or wooden spoon, and a bit of muscle power for stirring!
The quality of your nut butter and sweetener really shines through here, so use ones you genuinely enjoy the taste of. The chia seeds are the star, of course—they not only add a nutritional boost but also help bind everything together beautifully as they gel up.
Serves: 9 bars | Prep Time: 15 minutes | Chill Time: 2 hours | Total Time: 2 hours 15 minutes
Before You Start: Tips & Ingredient Notes
- Why old-fashioned oats? They provide the best chewy texture. Quick oats can become a bit mushy, and steel-cut oats are too hard for a no-bake bar. The rolled oats give that perfect, substantial bite.
- The magic of chia seeds. Chia seeds are hydrophilic, meaning they absorb liquid and form a gel. This is the secret to binding these bars without eggs or flour. Giving them time to chill is non-negotiable for a bar that holds together.
- Is your nut butter too stiff? If your almond butter has been sitting in the fridge, give it a good stir and then warm it slightly in the microwave for 15-20 seconds. This makes it much easier to mix with the other wet ingredients and ensures a uniform texture.
- Sweetener flexibility. Both maple syrup and honey work wonderfully. Maple syrup keeps the bars vegan, while honey offers a slightly floral note. The amount is just right for a subtle sweetness that doesn’t overpower the other flavors.
How to Make Chia Seed Energy Bars
Step 1: Prepare Your Pan. This first step is crucial for easy removal later. Take your 8×8 inch pan and line it with parchment paper, leaving some overhang on two opposite sides. This creates “handles” that will allow you to lift the entire slab of bars out in one piece. Lightly grease the exposed sides of the pan to prevent any sticking—a quick swipe of coconut oil does the trick.
Step 2: Combine the Dry Ingredients. In your large mixing bowl, add the rolled oats, chia seeds, chopped almonds, shredded coconut, dried cranberries, and salt. Now, give this a really good stir with a spatula. You want to ensure everything is evenly distributed so that every single bar gets a bit of every ingredient. The mixture should look colorful and textured.
Step 3: Create the Wet Mixture. In a separate, medium-sized bowl, combine the almond butter, maple syrup, melted coconut oil, and vanilla extract. Whisk it all together until it’s completely smooth and glossy. You’ll notice the mixture will thicken slightly as you whisk—this is perfect. It should have a pourable, but still thick, consistency.
Step 4: Bring It All Together. Pour the wet mixture over the dry ingredients. Now, using your spatula or a wooden spoon, start folding everything together. It might seem a bit dry at first, but keep going! After a minute of vigorous stirring, you’ll see the magic happen. The oat and nut mixture will be thoroughly coated, and no dry spots should remain. The texture will be quite thick and sticky—exactly what you want.
Step 5: Press and Compact. Transfer the mixture into your prepared pan. Now, here’s the key to bars that don’t crumble: press, press, press! Use the back of a measuring cup or a flat-bottomed glass to press the mixture down firmly and evenly into every corner of the pan. Apply real pressure—this compacts the ingredients and helps them stick together during chilling.
Step 6: The Patient Chill. Cover the pan with plastic wrap or a lid and place it in the refrigerator for at least 2 hours, though overnight is even better. This resting time is when the chia seeds absorb moisture and the coconut oil solidifies, transforming the sticky mixture into firm, sliceable bars. Don’t rush this step!
Step 7: Slice and Serve. Once fully chilled and firm, use the parchment paper handles to lift the entire block out of the pan. Place it on a cutting board and, using a sharp knife, slice it into 9 even bars (or 12 smaller ones). For clean cuts, wipe the knife blade between slices. They’re ready to enjoy!
Serving Suggestions
Complementary Dishes
- A fresh fruit salad — The bright, juicy acidity of berries, oranges, or melon provides a lovely contrast to the dense, chewy texture of the bars.
- A simple green smoothie — Pair a bar with a spinach-and-banana smoothie for a complete, nutrient-packed breakfast or a very satisfying post-workout refuel.
- Greek yogurt or cottage cheese — The creamy, tangy profile of these proteins makes the bars feel like a more substantial meal, perfect for starting the day.
Drinks
- Cold brew coffee or black tea — The slight bitterness of coffee or a robust tea balances the natural sweetness of the bars beautifully for a morning pick-me-up.
- A glass of cold almond milk or oat milk — This is a classic, comforting combination that feels like a wholesome treat any time of day.
Something Sweet
- Dark chocolate-dipped strawberries — If you’re serving these as part of a brunch or healthy dessert spread, these elegant berries add a touch of indulgence without being overly heavy.
- A small bowl of mixed berries with a dollop of whipped coconut cream — This keeps the theme light and fresh while satisfying that after-dinner sweet tooth.
Top Mistakes to Avoid
- Mistake: Not pressing the mixture firmly enough into the pan. A gentle pat won’t do it. If the mixture isn’t compacted, the bars will be crumbly and fall apart when you try to eat them. Really lean into it!
- Mistake: Skipping or shortening the chilling time. I know, patience is hard, but this is a chemical process, not just a suggestion. The chia seeds and coconut oil need time to work their binding magic. Cutting into them too early will result in a delicious but messy granola-like mixture.
- Mistake: Using a nut butter that’s too oily or too dry. The consistency of your nut butter matters. If it’s swimming in oil, the bars might be greasy. If it’s rock-solid from the fridge and not warmed, it won’t mix in properly, leaving dry pockets.
- Mistake: Substituting quick oats 1:1 for old-fashioned oats. The texture will be completely different—much softer and potentially gummy. Stick with old-fashioned rolled oats for the right hearty chew.
Expert Tips
- Tip: Toast your oats and nuts for a deeper flavor. Spread the oats and chopped almonds on a baking sheet and toast at 350°F (175°C) for 8-10 minutes, until fragrant. Let them cool completely before using. This adds a wonderful nutty dimension to the bars.
- Tip: Get creative with mix-ins. Once you’ve mastered the base recipe, the world is your oyster. Try adding a tablespoon of cocoa powder to the dry ingredients, or mix in some orange zest, cinnamon, or even a pinch of espresso powder for a flavor twist.
- Tip: For perfectly uniform bars, score them before chilling. After pressing the mixture into the pan, use your knife to lightly score the surface into bars. After chilling, the bars will break apart perfectly along these pre-cut lines.
- Tip: Store them smartly for longevity. Place sheets of parchment paper between the bars when storing them in an airtight container. This prevents them from sticking together. They keep well in the fridge for up to 2 weeks, or you can freeze them for up to 3 months.
FAQs
Can I make these bars nut-free?
Absolutely! To make them nut-free, simply replace the almond butter with sunflower seed butter or tahini (sesame seed paste). Then, swap the chopped almonds for an equal amount of sunflower seeds or pumpkin seeds. The flavor will be different but equally delicious and totally school-safe.
My mixture seems too dry and isn’t sticking together. What should I do?
This can happen if your nut butter is particularly thick or you slightly over-measured the dry ingredients. Don’t worry! The fix is easy. Just add an extra tablespoon of maple syrup and/or melted coconut oil, one at a time, and mix thoroughly until the mixture becomes sticky and cohesive again.
Why are my bars too soft, even after chilling?
If your bars are still too soft, two things could be at play. First, they may just need more time—pop them back in the fridge for another hour or two. Second, the ratio of wet to dry ingredients might be off; perhaps your nut butter was on the oilier side. Next time, you can add an extra 2-3 tablespoons of oats to absorb the extra moisture.
Can I use a different sweetener, like agave or brown rice syrup?
Yes, both agave nectar and brown rice syrup are great options. Brown rice syrup is actually a fantastic binder and will yield a chewier, firmer bar. Just note that agave is sweeter than maple syrup, so you might want to reduce the amount slightly to taste.
How do I know if the bars have set properly?
The best test is the touch test. After the chilling time, press the top of the bar with your finger. It should feel firm and not give way easily. When you lift the slab out using the parchment paper, it should hold its shape without bending or cracking. If it bends, it needs more time.


