
Why You’ll Love This Baked Apple Chips
- They’re a truly wholesome snack. You control exactly what goes in—just apples and your favorite spices. No mystery ingredients, no added oils or sugars, just pure, simple goodness.
- The process is incredibly therapeutic. There’s a quiet rhythm to thinly slicing the apples and arranging them in neat rows. It’s a mindful kitchen task that feels productive and calming all at once.
- Your house will smell absolutely incredible. As these chips bake low and slow, they release the most wonderful, warm fragrance of sweet apples and cinnamon that will make your entire home feel cozy and inviting.
- They’re incredibly versatile. Once you master the basic recipe, you can get creative with different apple varieties and spice blends. Think ginger and nutmeg, a pinch of cardamom, or even a light dusting of chili powder for a sweet-and-spicy kick.
Ingredients & Tools
- 3-4 medium-sized firm apples (like Honeycrisp, Granny Smith, or Fuji)
- 1 teaspoon ground cinnamon (optional, but highly recommended)
- A tiny pinch of fine sea salt or table salt
- A squeeze of fresh lemon juice (optional, for color retention)
Tools: A sharp knife or mandoline slicer, two large baking sheets, parchment paper or silicone baking mats, a small bowl, and a cooling rack.
The beauty here is in the simplicity. The choice of apple is really the star of the show—a firmer variety will hold its shape better and yield a crisper chip. The lemon juice isn’t strictly necessary, but it does help prevent the slices from browning too much before they hit the oven, giving you a prettier final product.
Serves: 2-3 | Prep Time: 15 minutes | Cook Time: 1 hour 30 minutes – 2 hours | Total Time: About 2 hours (plus cooling)
Before You Start: Tips & Ingredient Notes
- Apple selection is key. You want firm, crisp apples. Soft apples like Red Delicious can become mushy instead of crisp. I love a mix of tart Granny Smith and sweet Honeycrisp for a balanced flavor.
- To core or not to core? Honestly, it’s up to you! Slicing with the core in gives you that classic star-pattern center, which looks lovely. If you prefer not to eat the seeds, you can core the apple first with an apple corer. The seeds are edible but can be slightly bitter.
- Embrace the mandoline for uniformity. If you have one, a mandoline slicer is your best friend here. It creates perfectly even, thin slices that will bake at the same rate. If using a knife, just take your time and aim for slices about 1/8-inch thick.
- Don’t skip the parchment paper. This is non-negotiable for easy removal. The apples release natural sugars that can stick fiercely to a bare pan. Silicone mats work wonderfully, too.
How to Make Baked Apple Chips
Step 1: Preheat and Prep. Start by preheating your oven to a low 200°F (95°C). This low temperature is the secret to drying the apples out without cooking them too quickly and burning the sugars. While the oven heats, line your two baking sheets with parchment paper. This little step saves so much frustration later!
Step 2: Slice the Apples. Wash and dry your apples thoroughly. If you’re coring them, do that now. Then, using a very sharp knife or a mandoline, slice the apples crosswise into rounds as evenly as you can, about 1/8-inch thick. You’ll notice that thinner slices will become crisper, while slightly thicker ones might have a bit of a chewy center—both are delicious, but consistency is key for even baking.
Step 3: Flavor and Arrange. If you’re using lemon juice to prevent browning, give the apple slices a very quick toss or spritz. In a small bowl, mix your cinnamon (if using) with the tiny pinch of salt. Lay the apple slices in a single layer on the prepared baking sheets—they shouldn’t be touching or overlapping. Now, sprinkle the cinnamon-salt mixture evenly over the slices. A little goes a long way here; you just want a light, even dusting.
Step 4: The Long Bake. Place both baking sheets in the preheated oven. Now, the waiting game begins. They will need to bake for about 1 hour and 30 minutes to 2 hours. The trick is to check them at the 90-minute mark. You’re looking for the edges to curl up slightly and the centers to look dry, not moist. They will still feel a bit soft when hot but will crisp up magnificently as they cool.
Step 5: The Flip (Optional but Recommended). About halfway through the baking time, around the 45-minute to 1-hour mark, you can flip the slices over. This helps them dry evenly on both sides, but if you’re short on time or patience, you can often skip this step—just know they might take a few minutes longer to crisp up completely.
Step 6: The Crucial Cool Down. Once the apples look dry and the edges are curled, turn off the oven. You can even prop the oven door open slightly with a wooden spoon and let them cool down inside the oven for an hour or so. This gradual cooling helps them achieve that perfect, light snap. Transfer them to a cooling rack to finish cooling completely before storing.
Serving Suggestions
Complementary Dishes
- A sharp cheddar cheese plate — The classic pairing of apple and cheese is taken to a new level. The crisp, sweet chips are a fantastic textural contrast to rich, creamy cheese.
- A bowl of creamy butternut squash soup — Crumble a few chips over the top for a delightful crunch that cuts through the soup’s velvety texture.
- Your morning yogurt or oatmeal — Instead of sugary granola, break these chips up for a natural sweetness and a satisfying crunch that makes breakfast feel special.
Drinks
- A hot cup of chai tea — The warm spices in the tea mirror the cinnamon on the chips, creating a wonderfully cohesive and cozy flavor experience.
- A crisp, cold glass of apple cider — It’s a match made in heaven! Sipping cider while munching on these chips doubles down on the fresh apple flavor in the most delightful way.
- A light-bodied white wine like a Pinot Grigio — The wine’s acidity and citrus notes provide a lovely, refreshing counterpoint to the sweet, baked apple flavor.
Something Sweet
- A simple scoop of vanilla bean ice cream — Use the apple chips as edible spoons or crumble them over the top for an incredible mix of temperatures and textures: hot, cold, creamy, and crisp.
- A dollop of cinnamon-spiked whipped cream — It’s like deconstructing an apple pie. Dip the chips right in for a quick, elegant, and guilt-free dessert.
- Dark chocolate fondue — For a real treat, dip the crispy chips halfway into melted dark chocolate. The bitter chocolate and sweet apple are an unforgettable combination.
Top Mistakes to Avoid
- Mistake: Slicing the apples too thick. If the slices are thicker than 1/8-inch, they’re much more likely to become chewy or leathery instead of crisp. They’ll take forever to dry out and might burn on the edges before the center is done.
- Mistake: Baking at too high a temperature. I’ve messed this up before, thinking I could speed up the process. A hot oven will burn the natural sugars on the outside long before the inside moisture has evaporated, leaving you with bitter, blackened edges.
- Mistake: Overcrowding the baking sheet. If the slices are touching or overlapping, they’ll steam each other instead of bake. This trapped moisture is the enemy of crispiness and will result in soft, sad chips.
- Mistake: Storing them before they’re completely cool. Any residual warmth will create steam in your storage container, which will instantly make your perfectly crisp chips soft and chewy. Patience is everything here.
Expert Tips
- Tip: Mix and match apple varieties. Try using one sweet apple and one tart apple in the same batch. You’ll get a more complex flavor profile, and it’s fun to guess which chip you’re picking up next.
- Tip: Add spices beyond cinnamon. A pinch of nutmeg, ginger, or even a tiny bit of cayenne pepper can transform the flavor. Experiment with pumpkin pie spice for a real autumn vibe.
- Tip: For extra-dehydrated chips, use your oven’s convection setting. If your oven has a fan, turn it on. The circulating air helps dry the chips out more evenly and can sometimes shave a little time off the baking process.
- Tip: Don’t throw out slightly chewy chips! If some chips from the center of the pan are still a bit flexible after cooling, they haven’t fully dehydrated. Just pop them back into a low oven for another 15-20 minutes to finish them off.
FAQs
Why are my apple chips chewy and not crispy?
This is almost always due to one of three things: the oven temperature was too high, the slices were too thick, or they were stored before being completely cool. The low-and-slow method is crucial for driving out all the moisture. If they’re chewy, you can often salvage them by returning them to the 200°F oven for another 20-30 minutes to continue drying out.
Can I make these without any sugar or sweetener?
Absolutely! This recipe doesn’t call for any added sugar at all. The apples caramelize and sweeten naturally as they bake. The pinch of salt and cinnamon actually enhances this natural sweetness, making you perceive it more without needing to add a thing.
How should I store baked apple chips, and how long do they last?
Storage is key to keeping them crisp. Once they are completely cooled, transfer them to an airtight container. A glass jar with a tight-sealing lid is perfect. Store them in a cool, dry place. They should stay crisp for about a week. If they lose their crunch, you can briefly re-crisp them in a 250°F oven for 5-10 minutes.
Can I use a food dehydrator instead of an oven?
Yes, a dehydrator is actually the ideal tool for this job! Follow your dehydrator’s instructions for fruit, which usually means arranging the slices on the trays and dehydrating at around 135°F (57°C) for 6-8 hours, or until crisp. The result is very similar, but the oven method is more accessible for most home cooks.
Do I need to peel the apples first?
That’s entirely a personal preference. The peel adds fiber, color, and a slightly more robust texture. I almost always leave it on because it’s easier and adds to the rustic charm. If you prefer a smoother chip or are making these for very young children, feel free to peel them first.
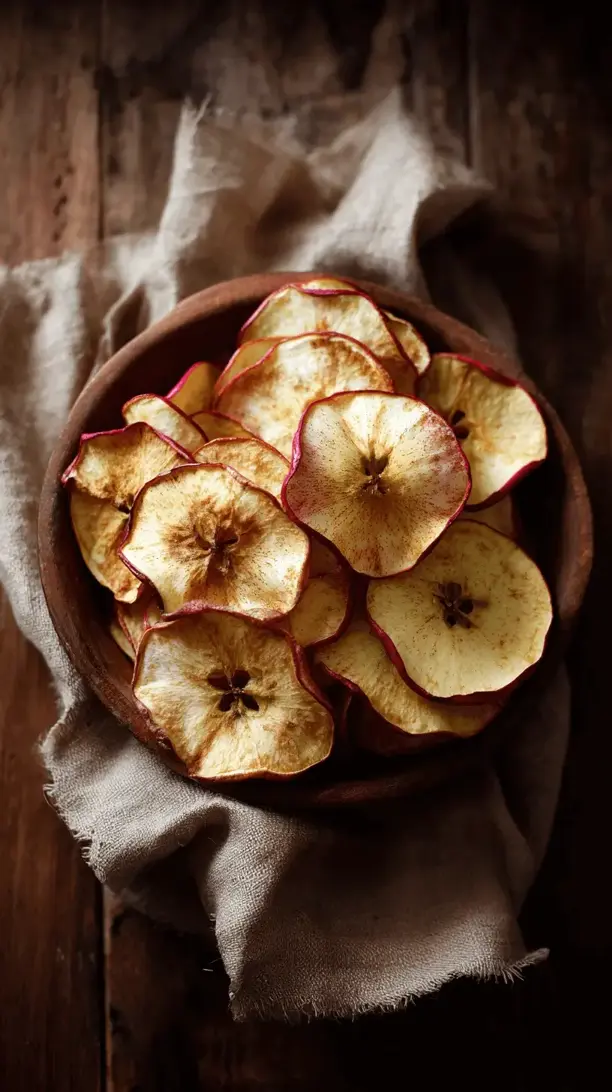
Baked Apple Chips
Learn how to make crispy baked apple chips at home! This simple recipe requires just apples & cinnamon for a healthy, wholesome snack. Your kitchen will smell amazing!
Ingredients
Ingredients
-
3-4 medium-sized firm apples (like Honeycrisp, Granny Smith, or Fuji)
-
1 teaspoon ground cinnamon (optional, but highly recommended)
-
A tiny pinch fine sea salt or table salt
-
A squeeze fresh lemon juice (optional, for color retention)
Instructions
-
Preheat and Prep. Start by preheating your oven to a low 200°F (95°C). This low temperature is the secret to drying the apples out without cooking them too quickly and burning the sugars. While the oven heats, line your two baking sheets with parchment paper. This little step saves so much frustration later!01
-
Slice the Apples. Wash and dry your apples thoroughly. If you're coring them, do that now. Then, using a very sharp knife or a mandoline, slice the apples crosswise into rounds as evenly as you can, about 1/8-inch thick. You'll notice that thinner slices will become crisper, while slightly thicker ones might have a bit of a chewy center—both are delicious, but consistency is key for even baking.02
-
Flavor and Arrange. If you're using lemon juice to prevent browning, give the apple slices a very quick toss or spritz. In a small bowl, mix your cinnamon (if using) with the tiny pinch of salt. Lay the apple slices in a single layer on the prepared baking sheets—they shouldn't be touching or overlapping. Now, sprinkle the cinnamon-salt mixture evenly over the slices. A little goes a long way here; you just want a light, even dusting.03
-
The Long Bake. Place both baking sheets in the preheated oven. Now, the waiting game begins. They will need to bake for about 1 hour and 30 minutes to 2 hours. The trick is to check them at the 90-minute mark. You're looking for the edges to curl up slightly and the centers to look dry, not moist. They will still feel a bit soft when hot but will crisp up magnificently as they cool.04
-
The Flip (Optional but Recommended). About halfway through the baking time, around the 45-minute to 1-hour mark, you can flip the slices over. This helps them dry evenly on both sides, but if you're short on time or patience, you can often skip this step—just know they might take a few minutes longer to crisp up completely.05
-
The Crucial Cool Down. Once the apples look dry and the edges are curled, turn off the oven. You can even prop the oven door open slightly with a wooden spoon and let them cool down inside the oven for an hour or so. This gradual cooling helps them achieve that perfect, light snap. Transfer them to a cooling rack to finish cooling completely before storing.06


