
Why You’ll Love This Almond Butter Coconut Protein Balls
- Seriously simple. You literally just mix everything in one bowl, roll, and chill. There’s no baking, no fancy equipment, and the cleanup is a dream.
- Perfect texture every time. We’re aiming for a chewy, fudgy bite that holds together beautifully, thanks to the magical combo of almond butter and maple syrup.
- Endlessly customizable. Think of this recipe as a blueprint. Don’t have chia seeds? Use flax. Want a chocolate hit? Add cacao nibs. It’s your canvas.
- They actually keep you full. With a good balance of protein, healthy fats, and fiber, these balls are designed to give you sustained energy, not a sugar spike and crash.
Ingredients & Tools
- 1 cup creamy, unsweetened almond butter
- 1/3 cup pure maple syrup (or runny honey)
- 1 tsp pure vanilla extract
- 1/4 tsp fine sea salt
- 1/2 cup vanilla or unflavored protein powder (plant-based or whey)
- 1/4 cup ground flaxseed or chia seeds
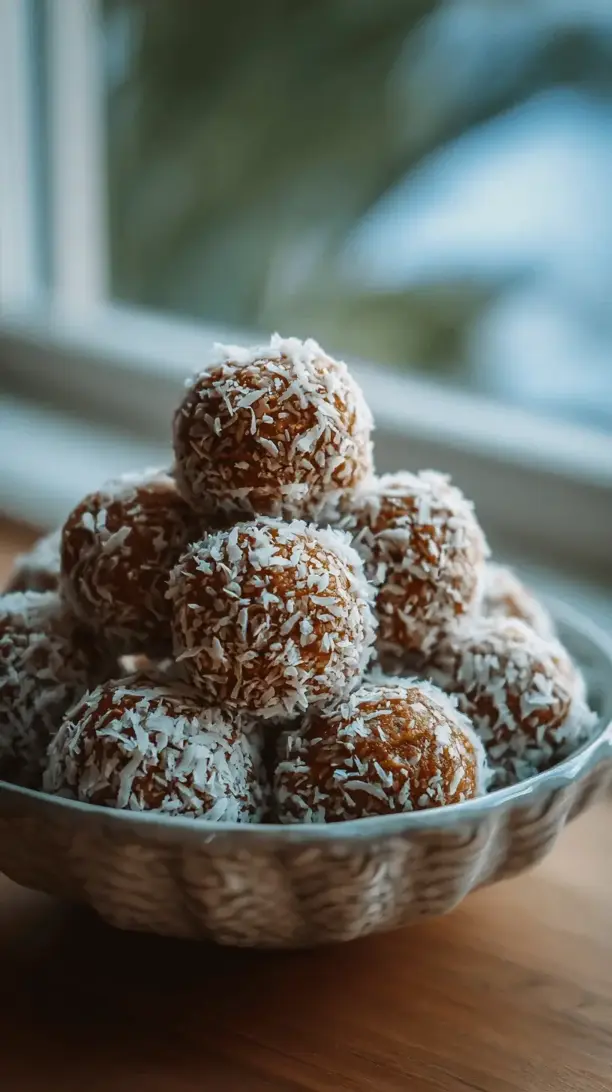
- 1/2 cup unsweetened shredded coconut, plus more for rolling
- 2-3 tbsp oat flour or almond flour, if needed
Tools: A medium mixing bowl, a spatula or spoon, a small cookie scoop (optional but helpful), and an airtight container for storage.
The quality of your almond butter really is key here—look for one where the only ingredient is almonds (maybe a little salt). It makes all the difference in flavor and helps the mixture bind together perfectly.
Serves: 12-14 balls | Prep Time: 10 minutes | Chill Time: 30 minutes | Total Time: 40 minutes
Before You Start: Tips & Ingredient Notes
- Check your almond butter’s consistency. If it’s super oily and runny, you might need a touch less maple syrup. If it’s super thick and dry (especially from the bottom of the jar), you might need a splash more syrup or a teaspoon of water.
- Why the salt? Honestly, don’t skip it! Even a tiny bit of salt makes the sweet and nutty flavors pop and balances everything out beautifully.
- Protein powder power. The type of protein powder you use can affect the texture. Plant-based powders (like pea or brown rice) tend to be a bit more absorbent than whey. This is why we have the optional flour on standby.
- Toasting your coconut. This is a completely optional but highly recommended step! Toasting the shredded coconut in a dry pan for a few minutes until golden brings out an incredible, nutty aroma that takes these balls to the next level.
How to Make Almond Butter Coconut Protein Balls
Step 1: Combine your wet ingredients. In your mixing bowl, add the almond butter, maple syrup, and vanilla extract. Give it a really good stir until it’s completely smooth and well-combined. You’ll notice the mixture should be glossy and relatively loose at this stage. This is your base, and getting it evenly mixed is crucial for the next steps.
Step 2: Add the dry ingredients. Sprinkle in the protein powder, ground flaxseed (or chia seeds), shredded coconut, and salt. Now, switch to a spatula and start folding everything together. At first, it might seem a bit dry and crumbly—that’s normal! Keep folding and pressing. The mixture will eventually come together into a thick, slightly sticky “dough.”
Step 3: Check the texture. This is the most important step! Grab a small piece of the dough and try to roll it between your palms. If it holds together easily without cracking, you’re golden. If it’s too sticky and clings to your hands, mix in a tablespoon of oat or almond flour. If it’s too dry and crumbly, add another teaspoon of maple syrup or a few drops of water. The perfect consistency is like Play-Doh—moldable but not messy.
Step 4: Roll the balls. Once your dough is perfect, it’s time to roll. I like using a small cookie scoop (about 1 tablespoon) for uniformity, but a spoon works just fine. Roll each portion firmly between your palms to form a smooth, compact ball. If you’re adding the extra coconut coating, spread some shredded coconut on a plate and roll each ball in it until lightly covered.
Step 5: Chill to set. Place all your finished balls on a plate or baking sheet lined with parchment paper. Pop them into the fridge for at least 30 minutes. This chilling time is non-negotiable—it allows the ingredients to fully hydrate and firm up, giving you that perfect, firm-yet-chewy texture we’re after.
Step 6: Store and enjoy! After chilling, transfer your Almond Butter Coconut Protein Balls to an airtight container. They’ll keep happily in the fridge for up to two weeks, or you can freeze them for up to three months for a ready-to-go stash.
Serving Suggestions
Complementary Dishes
- A fresh fruit platter — The bright, juicy acidity of berries or apple slices cuts through the richness of the balls beautifully, creating a lovely balance.
- A simple green smoothie — Pair a couple of balls with a spinach-and-banana smoothie for a complete, nutrient-dense breakfast that feels light but is incredibly sustaining.
Drinks
- Cold brew coffee or iced latte — The bitter notes of coffee are a classic match for the sweet, nutty flavors, making this the ultimate afternoon combo.
- A glass of unsweetened almond milk — Sometimes simple is best. A cool glass of milk turns these into a comforting, almost cereal-like treat.
Something Sweet
- Dark chocolate-dipped strawberries — If you’re serving these as part of a dessert spread, the elegance of chocolate and strawberry alongside the humble protein ball is a delightful contrast.
- A small bowl of mixed berries with a dollop of coconut cream — This keeps the coconut theme going and adds a fresh, creamy element that feels indulgent but is still light.
Top Mistakes to Avoid
- Mistake: Using the wrong almond butter. Avoid almond butters that are loaded with added sugars or hydrogenated oils. They can make the mixture too sweet or prevent it from setting properly. A natural, drippy-style almond butter is your best bet.
- Mistake: Skipping the chill time. I know, it’s tempting to eat one right away! But if you don’t let them firm up in the fridge, they’ll be soft, messy, and might fall apart. Patience is a virtue here.
- Mistake: Not adjusting for texture. Every brand of almond butter and protein powder is different. If you just follow the measurements blindly without checking the dough consistency, you might end up with a mixture that’s too wet or too dry. The “squeeze test” in Step 3 is your best friend.
- Mistake: Over-rolling the coconut coating. If you want that pretty coconut exterior, just give the ball a light roll. Pressing the coconut in too hard can make the coating dense and less appealing.
Expert Tips
- Tip: Warm your almond butter slightly. If your almond butter is straight from the pantry and super thick, pop the jar (without the lid) in the microwave for 15-20 seconds, or place it in a bowl of warm water. This makes it much easier to mix and helps create a smoother dough.
- Tip: Get creative with add-ins. Once you’ve mastered the base recipe, the world is your oyster! Try folding in 2-3 tablespoons of mini dark chocolate chips, cacao nibs for a crunch, or even a pinch of cinnamon or cardamom for a warm spice note.
- Tip: Make a double batch for the freezer. These balls freeze exceptionally well. Place them on a parchment-lined sheet to freeze solid, then transfer to a freezer bag. Grab one or two in the morning, and they’ll be thawed and ready by your mid-morning snack time.
- Tip: For uniform balls, use a scoop. A small cookie scoop (about 1 tablespoon size) isn’t just for cookies! It ensures all your balls are the same size, which means they’ll set evenly and look professionally made.
FAQs
Can I use a different nut butter?
Absolutely! Creamy peanut butter is a fantastic and classic substitute. Cashew butter would be milder and sweeter, while sunflower seed butter works well for a nut-free version. Just make sure it’s the natural, stir-able kind. The consistency might vary slightly, so be prepared to adjust with a bit more protein powder or a splash more syrup to get the right dough texture.
My mixture is too dry and crumbly. How can I fix it?
This happens to the best of us, usually if the almond butter was particularly thick. Don’t worry! Simply add more liquid a tiny bit at a time. Start with an extra teaspoon of maple syrup or a few drops of water. Mix it in thoroughly and test again. Repeat until the dough holds together when pressed. Go slowly—you can always add more, but you can’t take it out!
Can I make these without protein powder?
You can, but the texture and nutritional profile will change. The protein powder acts as a key dry ingredient for structure. To replace it, I’d suggest using an additional 1/4 cup of oat flour or almond flour and maybe an extra tablespoon of ground flaxseed. They’ll still be delicious, just more like a traditional energy bite.
How long do they last, and how should I store them?
Stored in an airtight container in the refrigerator, they’ll stay fresh and maintain their perfect texture for up to two weeks. They are also freezer-friendly for up to three months. I actually prefer them cold straight from the fridge—they have a fantastic fudgy consistency.
Are these okay for kids?
Most kids love them! They taste like a treat but are packed with good-for-you ingredients. It’s a great way to get some healthy fats and protein into their diet. If you’re making them for very young children, you could even roll them into smaller, bite-sized pieces. Just be mindful of any nut allergies if they’re being shared.


