
Why You’ll Love This Peanut Butter Chocolate Oat Bars
- Seriously, No Baking Required. This is a stovetop-and-fridge situation, which is a lifesaver when it’s hot outside or you just can’t be bothered with preheating an oven. The “cooking” part is just melting a few ingredients together—it’s almost impossible to mess up.
- The Perfect Texture Trio. You get the firm, chewy base from the oats, the creamy richness from the peanut butter layer, and that satisfying snap from the chocolate top. Every single bite has a little bit of everything, and honestly, it’s textural heaven.
- Incredibly Adaptable. Not a fan of dark chocolate? Use milk chocolate. Want to add a crunch? Throw in some chopped peanuts or a sprinkle of sea salt on top. These bars are a wonderful blank canvas for your pantry experiments.
- They Feel Indulgent But Aren’t Over the Top. With wholesome oats and natural peanut butter, these bars feel like a treat you can enjoy without guilt. They’re satisfying and rich, so a small square is often all you need to curb a craving.
Ingredients & Tools
- 1 cup creamy peanut butter (see note below!)
- 1/2 cup honey or maple syrup
- 1/4 cup coconut oil, divided
- 1 teaspoon pure vanilla extract
- Pinch of fine sea salt
- 2 cups old-fashioned rolled oats (not quick oats)
- 1 1/4 cups dark chocolate chips
Tools: 8×8 inch baking pan, parchment paper, medium saucepan, spatula, mixing bowl
A quick note on the peanut butter—the kind you use really matters here. For the best texture that sets firmly, you want to use a standard, no-stir peanut butter. The natural, oil-separating kinds can make the base a bit too greasy and soft. And for the chocolate, a good quality chocolate chip will melt smoothly and taste fantastic, but honestly, even the basic store brand works wonderfully.
Serves: 16 bars | Prep Time: 15 minutes | Chill Time: 1 hour | Total Time: 1 hour 15 minutes
Before You Start: Tips & Ingredient Notes
- Why old-fashioned oats? Quick oats will turn the base into a bit of a mushy paste because they absorb liquid differently. The sturdier old-fashioned oats give you that perfect, distinct chewiness that makes these bars so good.
- Can I use a different nut butter? Absolutely! Almond butter or sunflower seed butter are great alternatives. Just be aware that the flavor will change, and if your alternative butter is very runny, the bars might be a little softer.
- Line that pan properly. This is my biggest tip for easy removal. Leave a little overhang of parchment paper on two opposite sides—it acts like a sling to lift the whole block of bars out in one piece for super clean cutting.
- Timing is everything with the chocolate. You want to pour the melted chocolate onto the base after the base has had a few minutes in the fridge to set up, but not so long that it’s rock hard. This helps the layers bond just a little.
How to Make Peanut Butter Chocolate Oat Bars
Step 1: First, get your pan ready. Line your 8×8 inch baking pan with parchment paper, making sure there’s some overhang on two sides. This little trick is a game-changer for cleanly removing the bars later. Give the parchment a very light spritz with cooking spray or a tiny rub of oil—this just ensures nothing sticks, even the chocolate.
Step 2: Now, for the oat base. In a medium saucepan over low heat, combine the peanut butter, honey (or maple syrup), and 2 tablespoons of the coconut oil. Warm this gently, stirring constantly with a spatula, until everything is melted, smooth, and combined. It should look glossy and pourable. Take it off the heat and stir in the vanilla extract and that pinch of salt. You’ll notice the aroma change instantly—it becomes wonderfully fragrant.
Step 3: Pour the warm peanut butter mixture over the rolled oats in a mixing bowl. Stir everything together until every single oat is thoroughly coated. It should look like a sticky, uniform mixture. If it seems a bit dry, you can add another tablespoon of peanut butter, but this ratio is usually spot on.
Step 4: Transfer the oat mixture into your prepared pan. Use your spatula, and then the back of a spoon or your clean fingers, to press it down firmly and evenly. You want to compact it really well—this is what gives the bars their structure. Get it into all the corners. Once it’s pressed, pop the pan into the refrigerator for about 10-15 minutes. This brief chill helps the base set so the chocolate layer goes on smoothly.
Step 5: While the base is chilling, make the chocolate topping. Use the same saucepan (no need to wash it!) and combine the dark chocolate chips with the remaining 2 tablespoons of coconut oil. Melt this over very low heat, stirring constantly, until it’s completely smooth and silky. Using a low heat is key here to avoid seizing the chocolate. Alternatively, you can melt this in a heatproof bowl set over a pot of simmering water (a double boiler).
Step 6: Take the pan from the fridge. Pour the melted chocolate over the chilled oat base. Tilt the pan gently to spread the chocolate into an even layer that reaches all the edges. If you’re feeling fancy, this is the moment to sprinkle on a little flaky sea salt or some chopped peanuts for extra flair.
Step 7: The final step is patience! Return the pan to the refrigerator for at least 1 hour, or until the chocolate top is completely firm and set. You can speed this up slightly by using the freezer for about 30 minutes, but the fridge is best for a perfect texture.
Step 8: Time to slice! Use the parchment paper sling to lift the entire block out of the pan onto a cutting board. Using a sharp knife, cut it into 16 squares (or larger rectangles if you prefer). For super clean cuts, you can warm the knife under hot water and wipe it dry between slices. And there you have it—your perfect, homemade Peanut Butter Chocolate Oat Bars!
Serving Suggestions
Complementary Dishes
- A bowl of fresh berries — The bright, tart acidity of raspberries or strawberries cuts through the richness of the bars beautifully, making the whole experience feel a bit more balanced.
- A scoop of vanilla bean ice cream — For the ultimate dessert, place a slightly softened bar on a plate and top it with a scoop of high-quality vanilla ice cream. The warm-cold, soft-crunchy contrast is incredible.
Drinks
- A glass of cold whole milk — It’s a classic pairing for a reason. The creaminess of the milk is the perfect companion to the peanut butter and chocolate, creating a truly nostalgic treat.
- A strong cup of black coffee — The bitterness of a good brew highlights the deep notes in the dark chocolate and makes the sweetness of the bar pop without being overwhelming.
Something Sweet
- A simple fruit sorbet — If you’re serving these as part of a dessert spread, a light mango or lemon sorbet offers a refreshing, palate-cleansing option that complements rather than competes with the bars.
Top Mistakes to Avoid
- Mistake: Using the wrong peanut butter. As mentioned, natural peanut butter that separates can make the base oily and too soft. The bars might not hold their shape well. Stick with a conventional, stabilized peanut butter for the best results.
- Mistake: Not pressing the base firmly enough. If you just dollop the oat mixture in the pan and spread it loosely, the bars will be crumbly and fall apart. Really take a minute to press it down firmly and evenly—it makes all the difference.
- Mistake: Overheating the chocolate. If you melt the chocolate on too high a heat, it can become grainy, clumpy, or “seize.” Low and slow is the way to go, stirring constantly until just melted.
- Mistake: Skipping the first chill. Pouring warm chocolate onto a warm, soft base is a recipe for a swirly, messy layer. That initial 10-15 minute chill for the base is crucial for getting two distinct, clean layers.
Expert Tips
- Tip: Toast your oats. For a next-level flavor, spread the rolled oats on a baking sheet and toast them in a 350°F (175°C) oven for 8-10 minutes until fragrant and lightly golden. Let them cool completely before using. This adds a wonderful nutty depth to the base.
- Tip: Add a secret ingredient. Stirring a tablespoon of chia seeds or ground flaxseed into the oat mixture is an easy way to add a bit of extra fiber and nutrients without changing the taste or texture noticeably.
- Tip: Customize your toppings. Before the chocolate sets, get creative! A sprinkle of flaky sea salt is my go-to, but you could also add crushed pretzels for salty crunch, or even a drizzle of extra peanut butter over the chocolate.
- Tip: For perfect squares, score the chocolate. After you pour the chocolate layer, let it set for just 2-3 minutes until it’s no longer liquid. Then, use a sharp knife to lightly score the cutting lines into the chocolate. When it’s fully set, it will break cleanly along those lines.
FAQs
Can I make these bars vegan?
Absolutely! It’s very simple. Just use maple syrup instead of honey, and ensure your dark chocolate chips are dairy-free (many high-quality dark chocolates are naturally vegan). With those two swaps, you’ve got a completely plant-based treat that’s just as delicious.
How should I store these, and how long do they last?
Because of the chocolate topping, these bars need to be stored in the refrigerator in an airtight container. They will keep beautifully for up to 2 weeks. You can also freeze them for up to 3 months. Just layer them between parchment paper in a freezer-safe container. Thaw in the fridge for a few hours before serving.
My chocolate layer cracked when I cut the bars. What happened?
This usually happens if the chocolate layer got too cold and hard, or if the bar was frozen solid when you cut it. Let the whole block sit on the counter for 5-10 minutes to take the extreme chill off before slicing. Using a sharp, warm knife also helps immensely to get a clean cut through the firm chocolate.
Can I use quick oats instead of old-fashioned rolled oats?
I really don’t recommend it. Quick oats are cut smaller and absorb moisture much more readily, which will result in a denser, mushier base that lacks the pleasant chewy texture. The old-fashioned oats provide the necessary structure and bite.
The bars are too hard straight from the fridge. What can I do?
This is totally normal! The coconut oil and chocolate firm up significantly when cold. For the best texture and flavor, I suggest letting the bars sit at room temperature for about 5-10 minutes before serving. This allows them to soften slightly, making the base chewy and the chocolate just a little less brittle, which is much more enjoyable to eat.
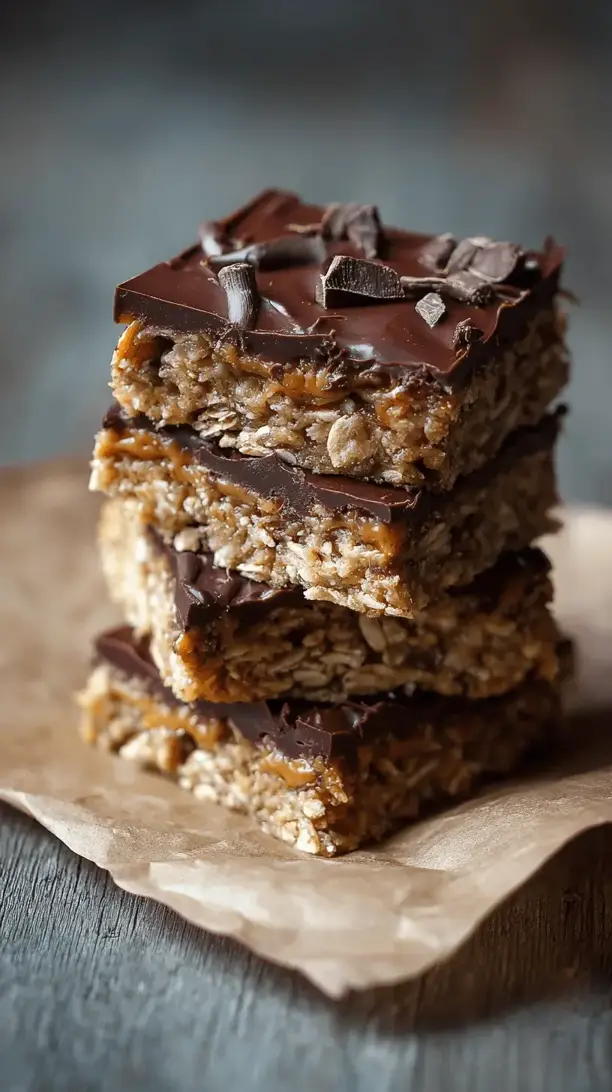
Peanut Butter Chocolate Oat Bars
Whip up these irresistible no-bake Peanut Butter Chocolate Oat Bars! A simple, chewy & chocolatey treat made with pantry staples. Perfect for snacks & lunchboxes.
Ingredients
Ingredients
-
1 cup creamy peanut butter (see note below!)
-
1/2 cup honey or maple syrup
-
1/4 cup coconut oil (divided)
-
1 teaspoon pure vanilla extract
-
Pinch fine sea salt
-
2 cups old-fashioned rolled oats (not quick oats)
-
1 1/4 cups dark chocolate chips
Instructions
-
First, get your pan ready. Line your 8x8 inch baking pan with parchment paper, making sure there's some overhang on two sides. This little trick is a game-changer for cleanly removing the bars later. Give the parchment a very light spritz with cooking spray or a tiny rub of oil—this just ensures nothing sticks, even the chocolate.01
-
Now, for the oat base. In a medium saucepan over low heat, combine the peanut butter, honey (or maple syrup), and 2 tablespoons of the coconut oil. Warm this gently, stirring constantly with a spatula, until everything is melted, smooth, and combined. It should look glossy and pourable. Take it off the heat and stir in the vanilla extract and that pinch of salt. You'll notice the aroma change instantly—it becomes wonderfully fragrant.02
-
Pour the warm peanut butter mixture over the rolled oats in a mixing bowl. Stir everything together until every single oat is thoroughly coated. It should look like a sticky, uniform mixture. If it seems a bit dry, you can add another tablespoon of peanut butter, but this ratio is usually spot on.03
-
Transfer the oat mixture into your prepared pan. Use your spatula, and then the back of a spoon or your clean fingers, to press it down firmly and evenly. You want to compact it really well—this is what gives the bars their structure. Get it into all the corners. Once it's pressed, pop the pan into the refrigerator for about 10-15 minutes. This brief chill helps the base set so the chocolate layer goes on smoothly.04
-
While the base is chilling, make the chocolate topping. Use the same saucepan (no need to wash it!) and combine the dark chocolate chips with the remaining 2 tablespoons of coconut oil. Melt this over very low heat, stirring constantly, until it's completely smooth and silky. Using a low heat is key here to avoid seizing the chocolate. Alternatively, you can melt this in a heatproof bowl set over a pot of simmering water (a double boiler).05
-
Take the pan from the fridge. Pour the melted chocolate over the chilled oat base. Tilt the pan gently to spread the chocolate into an even layer that reaches all the edges. If you're feeling fancy, this is the moment to sprinkle on a little flaky sea salt or some chopped peanuts for extra flair.06
-
The final step is patience! Return the pan to the refrigerator for at least 1 hour, or until the chocolate top is completely firm and set. You can speed this up slightly by using the freezer for about 30 minutes, but the fridge is best for a perfect texture.07
-
Time to slice! Use the parchment paper sling to lift the entire block out of the pan onto a cutting board. Using a sharp knife, cut it into 16 squares (or larger rectangles if you prefer). For super clean cuts, you can warm the knife under hot water and wipe it dry between slices. And there you have it—your perfect, homemade Peanut Butter Chocolate Oat Bars!08


