
Why You’ll Love This Healthy Blueberry Cheesecake Cups
- Incredibly Easy & No-Bake. Seriously, if you can blend ingredients and spoon them into a jar, you can make this dessert. There’s no fussing with a water bath or worrying about cracks—just straightforward, satisfying assembly.
- Perfectly Portioned for Guilt-Free Indulgence. Having individual servings ready to go helps so much with portion control. You get your complete cheesecake experience in a perfectly sized cup, which honestly makes enjoying dessert feel mindful rather than overwhelming.
- A Lighter Take That Doesn’t Skimp on Flavour. By using Greek yogurt and a touch of maple syrup, we create a filling that’s protein-packed and less sweet, but still luxuriously creamy and satisfying. You won’t feel that heavy, sluggish feeling afterwards.
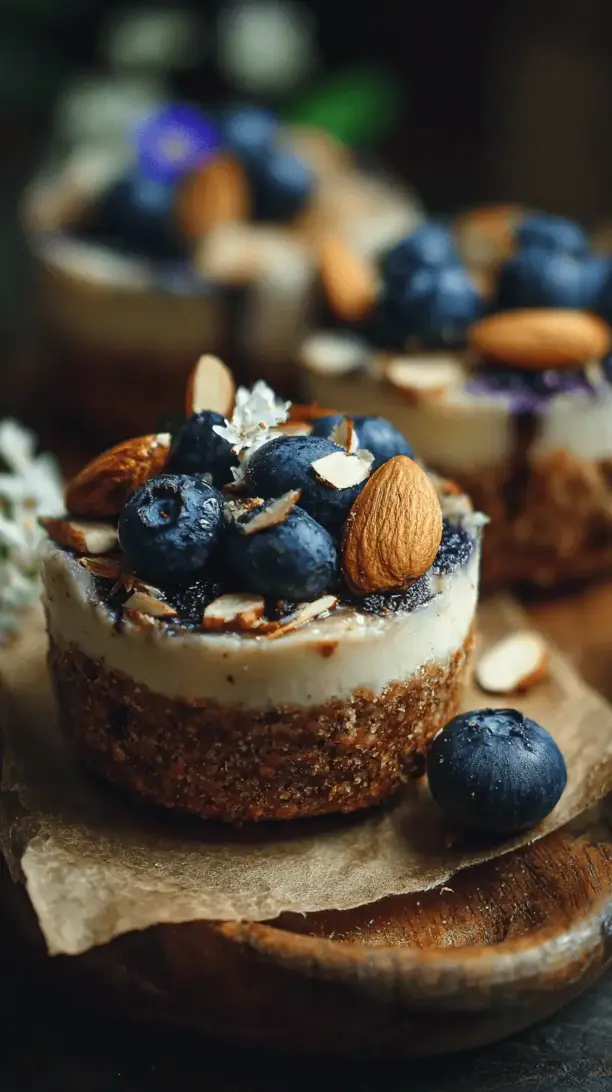
- They Look Absolutely Stunning. Layered desserts in clear glasses are just… pretty. The contrast between the crunchy base, the pale creamy filling, and the deep purple-blue topping is a real showstopper. Instant Instagram fame, right there.
Ingredients & Tools
- For the Base:
- 100 g medjool dates, pitted
- 80 g raw almonds (or walnuts)
- 1 tbsp melted coconut oil
- Pinch of sea salt
- For the Cheesecake Filling:
- 250 g cream cheese, at room temperature
- 250 g thick Greek yogurt (full-fat works best)
- 3 tbsp pure maple syrup (or honey)
- 1 tsp pure vanilla extract
- Juice of 1/2 a small lemon
- For the Blueberry Topping:
- 200 g fresh or frozen blueberries
- 1 tbsp maple syrup
- 1 tsp fresh lemon juice
- 1 tsp cornflour mixed with 1 tbsp water (optional, for thickening)
Tools: A food processor or high-speed blender, 4-6 small glasses or jars, a mixing bowl, a spatula, and a small saucepan.
The quality of your ingredients really shines here. Using full-fat cream cheese and Greek yogurt ensures a rich, non-watery texture, and pure maple syrup adds a lovely depth of flavour compared to refined sugar. Don’t skip the pinch of salt in the base—it makes all the difference!
Serves: 4-6 | Prep Time: 25 minutes | Chill Time: 2+ hours | Total Time: 2 hours 25 minutes (plus chilling)
Before You Start: Tips & Ingredient Notes
- Room Temperature is Key! Take your cream cheese out of the fridge at least an hour before you start. If it’s too cold, it won’t blend smoothly with the other ingredients, and you might end up with little lumps in your filling.
- The Power of Pitted Dates. Medjool dates are naturally super sweet and sticky, which is why they bind the base together so well. If your dates are a little dry, you can soak them in warm water for 10 minutes before using, then drain them well.
- Why Full-Fat Dairy? I know it sounds counterintuitive for a “healthy” recipe, but full-fat cream cheese and Greek yogurt have less water and more stability. This means your cheesecake cups will set firmer and have a much creamier, more luxurious mouthfeel than their low-fat counterparts.
- Fresh vs. Frozen Berries. You can absolutely use frozen blueberries for the topping—it’s often more economical! There’s no need to thaw them first; just add a couple of extra minutes to the cooking time. The compote might be a slightly deeper colour, which is actually beautiful.
How to Make Healthy Blueberry Cheesecake Cups
Step 1: Create the Crunchy Base. First, grab your food processor. Add the pitted dates, almonds, melted coconut oil, and that all-important pinch of salt. Pulse everything until the mixture looks like coarse, sticky sand. You want the almonds to be finely chopped, but not so much that they start turning into almond butter—a little texture is lovely. The mixture should hold together easily when you pinch it between your fingers.
Step 2: Prepare Your Glasses. Get your serving glasses or jars ready. Divide the base mixture evenly among them. Now, here’s a pro move: use the back of a spoon or a small tamper to press the mixture down firmly and evenly into the bottom of each glass. A compact base will give you a solid foundation that won’t crumble when you dig in with a spoon later.
Step 3: Whip Up the Dreamy Filling. In a mixing bowl, add the room-temperature cream cheese, Greek yogurt, maple syrup, vanilla extract, and lemon juice. Using a hand mixer (or a whisk and some serious elbow grease), beat everything together until it’s completely smooth, pale, and slightly fluffy. This should only take a couple of minutes. You’ll notice the mixture thicken up a bit as you whisk—that’s exactly what you want. Taste it! Adjust the sweetness with a touch more maple syrup if you like.
Step 4: Layer the Cheesecake. Carefully spoon or pipe the creamy filling over the pressed base in each glass. Gently tap the glasses on the counter a few times to settle the filling and remove any air bubbles. Aim for a nice, even layer. Using a spatula to smooth the tops gives a really professional finish.
Step 5: Make the Vibrant Blueberry Topping. While the cups are setting, make the topping. In a small saucepan, combine the blueberries, maple syrup, and lemon juice. Cook over medium heat for 5-8 minutes, stirring occasionally, until the blueberries burst and release their juices. If you prefer a thicker sauce, stir in the cornflour slurry and simmer for another minute until it glossy and thickened. Let this cool completely before the next step—a hot topping will melt your beautiful creamy layer!
Step 6: The Finale and The Chill. Once the blueberry compote is at room temperature, spoon it over the top of the cheesecake filling. Now, for the hardest part: patience. Cover the cups with cling film and refrigerate them for at least 2 hours, but ideally 4 hours or overnight. This chilling time is non-negotiable—it allows the flavours to meld and the texture to become perfectly firm and sliceable.
Serving Suggestions
Complementary Dishes
- A simple green salad with a citrus vinaigrette — The bright, acidic notes of the salad are a fantastic palate-cleanser that makes the cheesecake taste even more decadent by contrast, perfect for a summer lunch.
- Grilled peaches or pineapple — The slight smokiness and caramelised sweetness of grilled fruit complements the creamy, tangy cheesecake filling beautifully, adding a warm element to the cool dessert.
Drinks
- A crisp glass of Prosecco or Champagne — The bubbles and acidity cut through the richness of the cheesecake brilliantly, making each bite feel like a celebration. A non-alcoholic sparkling elderflower cordial works just as well.
- Earl Grey tea, served chilled — The bergamot flavour in Earl Grey has a natural affinity with blueberries and citrus, creating a really sophisticated and refreshing pairing that enhances the dessert’s complexity.
Something Sweet
- Dark chocolate-covered espresso beans — Just a few on the side provide a bitter, crunchy counterpoint that highlights the sweetness of the blueberries and the richness of the filling without being another heavy dessert.
- A small, chewy ginger biscuit — The warm spice of ginger is a classic friend to blueberries and adds a different kind of texture and flavour that makes the whole experience feel more complete.
Top Mistakes to Avoid
- Mistake: Using cold cream cheese. This is the number one reason for a lumpy filling. Cold cream cheese simply won’t incorporate smoothly. I’ve messed this up before too, and you end up having to over-mix, which can make the filling runny. Plan ahead!
- Mistake: Not pressing the base down firmly. A loosely packed base will crumble into the filling as soon as you take your first spoonful. Taking that extra 30 seconds to really tamp it down ensures you get a perfect bite with every layer.
- Mistake: Adding the blueberry topping while it’s hot. The heat will cause the delicate cheesecake layer to soften and potentially weep, ruining those beautiful, clean layers. Let it cool completely—patience is a virtue here.
- Mistake: Skipping the full chilling time. I know it’s tempting to dig in early, but the fridge time is what transforms the mixture from a soft cream into a proper, sliceable cheesecake texture. It’s worth the wait.
Expert Tips
- Tip: Toast your nuts for the base. If you have an extra five minutes, spread the almonds on a baking tray and toast them in a 180°C oven for 5-7 minutes until fragrant. Let them cool completely before processing. This adds a incredible depth of nutty flavour to the base.
- Tip: Use a piping bag for neat layers. For absolutely pristine, restaurant-quality layers, spoon your cheesecake filling into a piping bag (or a zip-top bag with a corner snipped off). You can pipe it in evenly without disturbing the base.
- Tip: Get creative with the topping. While blueberries are classic, this recipe is a fantastic canvas. Try a raspberry compote, a swirl of passionfruit pulp, or even a simple drizzle of melted dark chocolate for a different twist.
- Tip: Make them ahead for a stress-free dessert. These cups are truly better the next day. Making them the day before you need them means the flavours have more time to develop and the texture is at its absolute best.
FAQs
Can I make these vegan?
Absolutely! For a vegan version, use a plant-based cream cheese (look for one that’s firm and not too soft). Swap the Greek yogurt for a thick, unsweetened coconut yogurt. Make sure your maple syrup is vegan-friendly. The base is naturally vegan as long as your dates and nuts are. The texture will be very similar, and just as delicious.
How long will these keep in the fridge?
They’ll keep beautifully for up to 3-4 days when stored in an airtight container or well-covered with cling film in the fridge. The base might soften slightly over time, but they’ll still taste fantastic. I don’t recommend freezing them, as the texture of the creamy layer can become grainy upon thawing.
My filling is a bit runny. What happened?
This usually happens for one of two reasons: either the cream cheese was too warm/over-whipped, introducing too much air, or the yogurt used had a high water content. Using full-fat, strained Greek yogurt is crucial. If it’s a little soft, don’t worry—just ensure you chill it for the full recommended time, which will help it firm up significantly.
Can I use a different fruit for the topping?
Of course! This method works with so many fruits. Raspberries, blackberries, or chopped strawberries would be wonderful. For fruits like mango or peach, you might want to cook them down with a little water until they soften into a saucy consistency. Feel free to experiment—it’s hard to go wrong.
I don’t have a food processor. Can I still make the base?
You can! If you have a high-powered blender, you can try pulsing the ingredients, but be very careful not to over-blend. Alternatively, you can buy pre-ground almonds (almond meal) and very finely chop the dates with a knife. Mix them together with the coconut oil and salt in a bowl. It might not be quite as uniform, but it will still work perfectly well.
Healthy Blueberry Cheesecake Cups
Whip up my no-bake Healthy Blueberry Cheesecake Cups! A lighter, single-serving dessert with a crunchy base, creamy filling & fresh berry topping. Easy, delicious & perfect for any day.
Ingredients
Ingredients
-
100 g medjool dates, pitted
-
80 g raw almonds (or walnuts)
-
1 tbsp coconut oil (melted)
-
Pinch sea salt
-
250 g cream cheese (at room temperature)
-
250 g thick Greek yogurt (full-fat works best)
-
3 tbsp pure maple syrup (or honey)
-
1 tsp pure vanilla extract
-
1/2 lemon (juice of a small lemon)
-
200 g blueberries (fresh or frozen)
-
1 tbsp maple syrup
-
1 tsp fresh lemon juice
-
1 tsp cornflour (mixed with 1 tbsp water (optional, for thickening))
Instructions
-
Create the Crunchy Base. First, grab your food processor. Add the pitted dates, almonds, melted coconut oil, and that all-important pinch of salt. Pulse everything until the mixture looks like coarse, sticky sand. You want the almonds to be finely chopped, but not so much that they start turning into almond butter—a little texture is lovely. The mixture should hold together easily when you pinch it between your fingers.01
-
Prepare Your Glasses. Get your serving glasses or jars ready. Divide the base mixture evenly among them. Now, here's a pro move: use the back of a spoon or a small tamper to press the mixture down firmly and evenly into the bottom of each glass. A compact base will give you a solid foundation that won't crumble when you dig in with a spoon later.02
-
Whip Up the Dreamy Filling. In a mixing bowl, add the room-temperature cream cheese, Greek yogurt, maple syrup, vanilla extract, and lemon juice. Using a hand mixer (or a whisk and some serious elbow grease), beat everything together until it's completely smooth, pale, and slightly fluffy. This should only take a couple of minutes. You'll notice the mixture thicken up a bit as you whisk—that's exactly what you want. Taste it! Adjust the sweetness with a touch more maple syrup if you like.03
-
Layer the Cheesecake. Carefully spoon or pipe the creamy filling over the pressed base in each glass. Gently tap the glasses on the counter a few times to settle the filling and remove any air bubbles. Aim for a nice, even layer. Using a spatula to smooth the tops gives a really professional finish.04
-
Make the Vibrant Blueberry Topping. While the cups are setting, make the topping. In a small saucepan, combine the blueberries, maple syrup, and lemon juice. Cook over medium heat for 5-8 minutes, stirring occasionally, until the blueberries burst and release their juices. If you prefer a thicker sauce, stir in the cornflour slurry and simmer for another minute until it glossy and thickened. Let this cool completely before the next step—a hot topping will melt your beautiful creamy layer!05
-
The Finale and The Chill. Once the blueberry compote is at room temperature, spoon it over the top of the cheesecake filling. Now, for the hardest part: patience. Cover the cups with cling film and refrigerate them for at least 2 hours, but ideally 4 hours or overnight. This chilling time is non-negotiable—it allows the flavours to meld and the texture to become perfectly firm and sliceable.06


