Why You’ll Love This Chocolate Banana Protein Bars
- They taste like dessert, but act like fuel. Seriously, the combination of ripe banana and dark chocolate is a classic for a reason—it’s downright delicious. You won’t feel like you’re sacrificing flavor for function here.
- The texture is perfectly chewy and satisfying. No dry, crumbly protein bars allowed! These have a dense, almost fudgy texture that really makes you feel like you’re eating something substantial, thanks to the dates and nut butter.
- They are incredibly versatile and forgiving. Don’t have almond butter? Use peanut butter. Not a fan of walnuts? Throw in some pecans or just skip them. This recipe is a fantastic template for your own creations.
- You have complete control over the ingredients. By making them at home, you know exactly what’s going in—no unpronounceable preservatives or hidden sugars. It’s just real, whole food that makes you feel great.
Ingredients & Tools
- 2 cups old-fashioned rolled oats (certified gluten-free if needed)
- 1 scoop (about 30g) chocolate or vanilla protein powder
- 3 very ripe, spotty bananas (about 1 cup mashed)
- 1/2 cup smooth almond butter or peanut butter
- 1/2 cup pitted Medjool dates (soaked in hot water for 10 minutes if not super soft)
- 1/4 cup unsweetened cocoa powder
- 1/4 cup maple syrup or honey
- 1 tsp vanilla extract
- 1/2 tsp sea salt
- 1/3 cup dark chocolate chips, plus more for topping
- 1/4 cup chopped walnuts or pecans (optional)
Tools: 8×8 inch baking pan, food processor, parchment paper, mixing bowl.
A quick note on the bananas—the riper they are, the sweeter your bars will be naturally. And don’t skip soaking the dates if they’re even a little firm; it makes them blend into a smooth, sticky paste that holds everything together beautifully.
Serves: 9 bars | Prep Time: 15 minutes | Chill Time: 2 hours | Total Time: 2 hours 15 minutes
Before You Start: Tips & Ingredient Notes
- How ripe is “very ripe” for the bananas? We’re talking brown spots, people. The skin should be heavily speckled or even mostly brown. This isn’t just for sweetness; super ripe bananas mash easier and incorporate more smoothly into the mixture.
- What kind of protein powder works best? I’ve had the best results with a whey-casein blend or a plant-based blend like pea and rice protein. They tend to create a better texture. Steer clear of 100% whey isolate if you can, as it can sometimes make the bars a bit gummy.
- Can I use a different nut butter? Absolutely! Creamy peanut butter is a fantastic, classic substitute. Sunflower seed butter works well for a nut-free version—just know it might give the bars a slight greenish tint over time (it’s harmless, I promise!). The key is to use a natural, drippy butter without added sugars or oils.
- Why soak the dates? This step is a game-changer for texture. Soaking plumps them up and turns them into a sticky, sweet paste that acts as a brilliant natural binder, replacing the need for excessive honey or syrups. If your dates are already super soft and sticky, you can skip it.
How to Make Chocolate Banana Protein Bars
Step 1: Prep Your Pan and Ingredients. First things first, line your 8×8 inch baking pan with parchment paper, leaving some overhang on two opposite sides. This will create little “handles” that make it super easy to lift the whole slab of bars out later. Go ahead and pit your dates if you haven’t bought them pre-pitted, and give them a soak in hot water for about 10 minutes while you get everything else ready. You’ll notice this little bit of prep makes the whole process flow so smoothly.
Step 2: Process the Oats. Add the rolled oats to your food processor. Pulse them until they break down into a coarse flour. You don’t want a super fine powder—just a rough, sandy texture. This helps the bars hold together better and gives them a more uniform consistency. Once processed, pour the oat flour into a separate mixing bowl. This prevents over-processing when we add the wet ingredients later.
Step 3: Create the Wet Mixture Base. Drain the soaked dates well and add them to the now-empty food processor along with the peeled ripe bananas, almond butter, maple syrup, and vanilla extract. Blend this on high until it becomes a completely smooth, almost pudding-like consistency. Scrape down the sides once or twice to make sure everything is incorporated. The aroma at this point is just incredible—sweet and nutty.
Step 4: Combine Dry and Wet Ingredients. Now, add the oat flour back into the food processor along with the protein powder, cocoa powder, and sea salt. Pulse the mixture just until everything is combined. Be careful not to overmix! You want to stop as soon as you no longer see dry streaks of powder. The mixture will be very thick and sticky—that’s exactly what you want.
Step 5: Fold in the Goodies. Transfer the thick batter back to your mixing bowl. This gives you more control for the next step. Now, fold in the dark chocolate chips and the chopped walnuts (if using) with a spatula. The trick is to be gentle so you don’t break the chips, but thorough enough to distribute them evenly. You’ll get little pockets of melted chocolate in every single bite.
Step 6: Press and Top. Scoop the mixture into your prepared pan. Now, get your hands slightly wet—this is the best tip to prevent sticking—and press the mixture down firmly and evenly into every corner. You really want to compact it well; this is the secret to bars that don’t fall apart. For a fancy finish, sprinkle a few extra chocolate chips over the top and gently press them in so they adhere.
Step 7: Chill Until Firm. This is the hardest part: waiting. Cover the pan with plastic wrap or a lid and place it in the refrigerator for at least 2 hours, or ideally overnight. This chilling time is non-negotiable as it allows the ingredients to set and the flavors to meld together perfectly. The bars will transform from a soft batter to a firm, sliceable consistency.
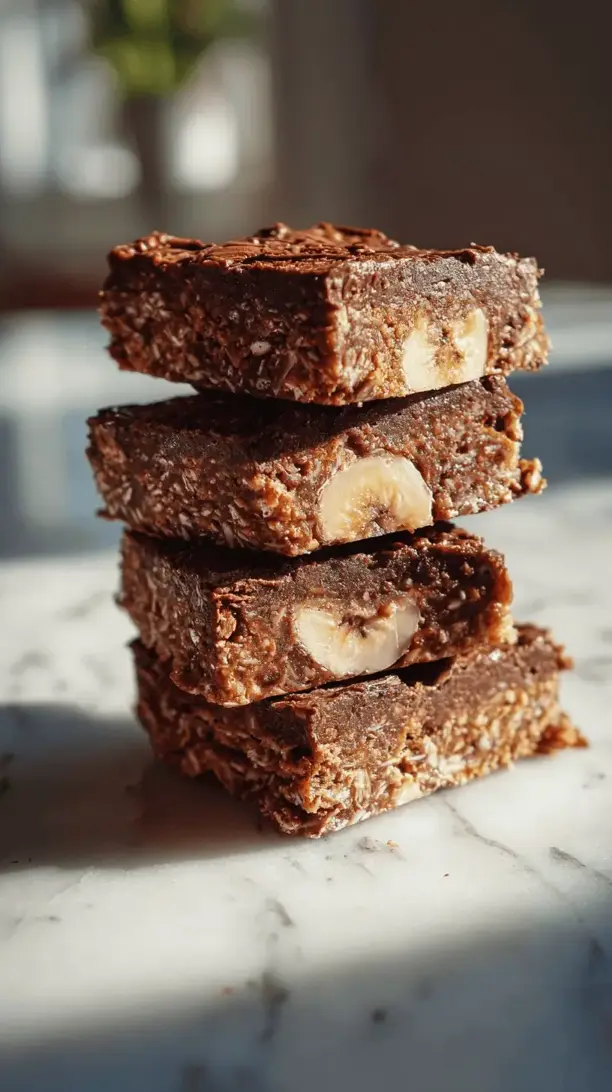
Step 8: Slice and Serve. Once fully firm, use the parchment paper handles to lift the entire slab onto a cutting board. Using a sharp knife, slice it into 9 even bars. For super clean cuts, you can wipe the knife blade clean between slices. They’re ready to eat immediately, or you can store them for later!
Serving Suggestions
Complementary Dishes
- A small bowl of Greek yogurt with berries — The tanginess of the yogurt provides a lovely contrast to the sweet, rich bars, making it feel like a complete, balanced breakfast.
- A warm cup of oatmeal — Enjoy half a bar crumbled on top of your morning oats for a double dose of cozy banana and chocolate flavor and an extra protein kick.
- A simple green smoothie — Pair a bar with a smoothie made with spinach, mango, and coconut water for a light yet energizing meal that doesn’t weigh you down.
Drinks
- Cold brew coffee or iced latte — The bitterness of the coffee is a match made in heaven with the chocolate and cuts through the sweetness perfectly, especially in the morning.
- A glass of cold almond milk — Sometimes simple is best. The creamy, nutty milk complements the flavors in the bar and makes for a super satisfying snack.
- Peppermint tea — If you’re enjoying this as an afternoon treat, a hot cup of peppermint tea makes the chocolate notes sing and is wonderfully soothing.
Something Sweet
- A few fresh raspberries or strawberries — The bright, slightly tart burst of a fresh berry alongside a rich bite of the bar is an elegant and simple way to end a meal.
- A small scoop of vanilla bean ice cream — For a real indulgence, gently warm a bar for a few seconds and serve it à la mode. It’s a healthy-ish dessert dream come true.
- A square of dark orange chocolate — If you’re a fan of the chocolate-orange combo, a little piece of this alongside your bar elevates the entire experience.
Top Mistakes to Avoid
- Mistake: Using under-ripe bananas. This is the number one reason bars might turn out bland or not sweet enough. The ripe bananas are a primary sweetener and flavor agent, so don’t rush it!
- Mistake: Not pressing the mixture firmly into the pan. I’ve messed this up before too, leading to crumbly bars. You really need to use some muscle and press down evenly and firmly to compact all the ingredients together.
- Mistake: Skipping the chill time. Impatience is the enemy here! If you try to slice the bars before they are fully set, they will be a sticky, messy disaster. The fridge time is crucial for the structure.
- Mistake: Over-processing the mixture after adding the dry ingredients. Pulsing just until combined is key. If you blend too long, the oats can become gummy, and the protein powder can start to develop a weird texture.
Expert Tips
- Tip: For a nut-free version, use sunflower seed butter and omit the walnuts. It works like a charm and gives you a equally delicious, allergy-friendly bar that everyone can enjoy.
- Tip: Customize your mix-ins! Think of this recipe as a canvas. Swap the walnuts for dried cherries, shredded coconut, or even a sprinkle of cinnamon for a whole new flavor profile each time you make them.
- Tip: Make a double batch and freeze them. These bars freeze exceptionally well. Individually wrap them in parchment paper and store in a freezer bag for up to 3 months. Grab one in the morning, and it’ll be thawed and ready to eat by your mid-morning snack time.
- Tip: For cleaner slices, run your knife under hot water. Wiping the blade clean and using a hot knife will glide through the sticky dates and chocolate chips, giving you picture-perfect bars every single time.
FAQs
How should I store these protein bars?
The best way to store them is in an airtight container in the refrigerator. They will keep beautifully for up to a week. Because of the fresh banana, I don’t recommend storing them at room temperature for more than a few hours, especially if your kitchen is warm. They also freeze wonderfully for up to 3 months—just wrap them individually first.
Can I make these without a food processor?
You can, but it requires a bit more elbow grease. You’ll need to mash the bananas and dates together by hand until as smooth as possible—a potato masher helps. Then, you’d need to mix in the other wet ingredients, followed by the dry ingredients. The texture might be a bit more rustic, but it will still work. A high-powered blender can also work in a pinch.
My bars are a little soft. What did I do wrong?
This usually happens for one of two reasons. First, your bananas might have been larger than average, adding more moisture. Second, you might not have pressed the mixture firmly enough into the pan. Don’t worry, they’re still delicious! Just keep them chilled until right before you eat them. Next time, you can add an extra 2-3 tablespoons of oat flour to compensate.
Can I use quick oats instead of old-fashioned rolled oats?
I wouldn’t recommend it. Quick oats are pre-cooked and cut much smaller, so they absorb moisture differently and can make the bars have a gummy or pasty texture. Old-fashioned rolled oats give the best chewy, substantial result. If it’s an emergency, you can use them, but the texture will be noticeably different.
Are these bars suitable for a post-workout snack?
Absolutely! With a balance of carbohydrates from the bananas, oats, and dates, and protein from the powder and nut butter, they provide a great combination for replenishing energy stores and supporting muscle recovery after exercise. I often have one within 30-60 minutes after a workout, and it keeps me full until my next proper meal.