
Why You’ll Love This Chia Jam Thumbprint Cookies
- They’re a two-for-one delight. You get the satisfaction of making a quick, healthy jam from scratch and a batch of delicious, wholesome cookies all in one recipe. It feels like a mini baking project with a huge payoff.
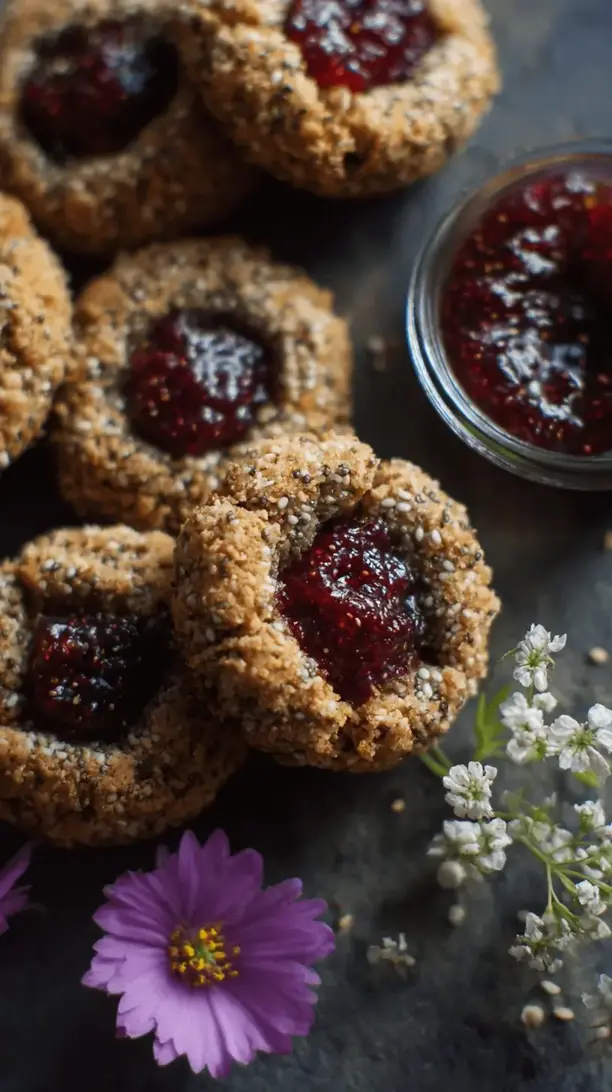
- The texture is absolutely divine. The cookie base is tender and melts in your mouth, while the chia jam offers a lovely, gel-like texture with little pops of berry seeds. It’s a fantastic contrast that keeps every bite interesting.
- They’re naturally sweetened and customizable. Using maple syrup and the natural sweetness of the fruit means you can control the sugar level. Plus, you can use any berry you love—raspberries, strawberries, blueberries, or a mix!
- They’re secretly quite wholesome. With whole oats, chia seeds packed with fiber, and fruit at their core, these cookies are a treat you can enjoy without a hint of guilt. They’re a brilliant way to satisfy a sweet tooth the smart way.
Ingredients & Tools
- For the Chia Jam:
- 2 cups fresh or frozen berries (like strawberries, raspberries, or a mix)
- 2 tbsp pure maple syrup, or more to taste
- 1 tbsp fresh lemon juice
- 2 tbsp chia seeds
- For the Cookie Dough:
- 1 ½ cups old-fashioned rolled oats
- 1 cup almond flour
- ½ tsp baking soda
- ¼ tsp fine sea salt
- ⅓ cup coconut oil, melted and slightly cooled
- ⅓ cup pure maple syrup
- 1 tsp pure vanilla extract
Tools: Medium saucepan, mixing bowls, whisk, baking sheet, parchment paper, a small spoon or measuring spoon for creating the thumbprints.
Honestly, the beauty of this recipe is in its simplicity. Using almond flour and oats gives the cookies a lovely, nutty flavor and a tender crumb that’s just perfect. And for the jam—don’t skip the lemon juice! It really brightens up the berry flavor and makes the whole thing sing.
Serves: 12 cookies | Prep Time: 25 minutes (plus jam setting time) | Cook Time: 12-14 minutes | Total Time: about 45 minutes
Before You Start: Tips & Ingredient Notes
- Make the jam first. Seriously, do this. It needs a good 15-20 minutes in the fridge to thicken up properly. If you try to fill the cookies with warm, runny jam, it’ll just seep into the dough. Letting it set is the secret to a perfect, distinct jam layer.
- Don’t have a “thumb”? No problem! The back of a rounded ½ teaspoon measure is actually the perfect tool for creating neat, uniform wells in the cookies. It gives you more control than your actual thumb and prevents the cookies from cracking.
- Let your coconut oil cool. After you melt the coconut oil, let it sit for a few minutes so it’s warm, not hot. If it’s too hot, it can start to cook the other ingredients when you mix them, which we definitely don’t want.
- Berry flexibility is key. Frozen berries work beautifully here and are often more affordable. You don’t even need to thaw them—just toss them straight into the saucepan. They’ll break down even more easily than fresh ones.
How to Make Chia Jam Thumbprint Cookies
Step 1: Create the Chia Jam. In a medium saucepan, combine your berries, maple syrup, and lemon juice. Cook over medium heat, stirring occasionally, for about 5-7 minutes. The berries will start to break down and release their juices. You can help them along by mashing them with the back of a spoon or a potato masher. Once the mixture is bubbling and saucy, remove it from the heat and stir in the chia seeds. Let it sit for a minute, then give it another good stir. You’ll notice it start to thicken already. Pour the jam into a bowl and pop it in the refrigerator to set while you make the cookie dough.
Step 2: Prep the Oat Flour. This is a fun little hack! Place the rolled oats into a blender or food processor and pulse until they resemble a coarse flour. You don’t need it to be superfine—a little texture is nice. This step is what gives the cookies their wonderful structure and chewy bite. If you have store-bought oat flour, you can use 1 ¼ cups of that instead.
Step 3: Combine the Dry Ingredients. In a medium mixing bowl, whisk together your freshly ground oat flour, almond flour, baking soda, and salt. Whisking ensures the baking soda and salt are evenly distributed, which is key for a consistent rise and flavor in every single cookie.
Step 4: Mix the Wet Ingredients. In a separate, larger bowl, whisk together the slightly cooled, melted coconut oil, maple syrup, and vanilla extract. It might look a little separated at first, but just keep whisking until it’s smooth and emulsified. This is the base of your delicious, sweet dough.
Step 5: Bring the Dough Together. Pour the dry ingredients into the wet ingredients and stir with a spatula until just combined. The dough will be soft and a bit sticky—that’s exactly what you want. Avoid overmixing, as this can make the cookies tough. Let the dough sit for about 5 minutes; the oats will absorb some of the moisture, making it easier to handle.
Step 6: Shape the Cookies. Preheat your oven to 350°F (175°C) and line a baking sheet with parchment paper. Scoop out about 1 ½ tablespoons of dough for each cookie, rolling them into smooth balls between your palms. Place them on the prepared baking sheet, spacing them about 2 inches apart as they will spread a little.
Step 7: Create the Thumbprints. Now for the signature move! Using the back of a ½ teaspoon measure (or your thumb, if you’re feeling traditional), gently press into the center of each dough ball to create an indentation. Don’t press all the way to the baking sheet—just deep enough to hold a generous amount of jam. If the dough cracks a little at the edges, you can gently smooth it back together with your fingers.
Step 8: Fill and Bake. By now, your chia jam should be nicely thickened. Spoon about a teaspoon of jam into each well. You want to fill them up, but try not to overfill and spill onto the cookie base. Bake for 12-14 minutes, or until the edges of the cookies are lightly golden brown. The centers will still look soft, which is perfect.
Step 9: Cool Completely. This is the hardest part—waiting! Let the cookies cool on the baking sheet for at least 10 minutes before transferring them to a wire rack to cool completely. The cookies are very fragile when warm, and the jam will be extremely hot. They’ll firm up beautifully as they cool, achieving that perfect tender-yet-sturdy texture.
Serving Suggestions
Complementary Dishes
- A simple fruit platter — The freshness of sliced apples, grapes, or orange segments provides a lovely, light contrast to the rich, buttery cookies, making a well-rounded snack or dessert spread.
- A scoop of coconut whipped cream — For a truly decadent treat, serve a cookie alongside a dollop of lightly sweetened coconut whipped cream. The creaminess is a dream with the jam and the crumbly cookie.
- A sharp cheese board — Believe it or not, the sweetness of these cookies pairs wonderfully with a slice of sharp cheddar or manchego cheese. It’s a sophisticated sweet-and-salty combination that’s always a hit.
Drinks
- A cold glass of oat milk — The creamy, neutral flavor of oat milk is the perfect companion to these cookies, especially if you’re enjoying them as an afternoon pick-me-up.
- A hot cup of Earl Grey tea — The bergamot in the tea complements the berry jam beautifully, creating a classic and utterly comforting pairing that feels like a warm hug.
- Iced coffee or cold brew — The deep, roasted notes of coffee cut through the sweetness of the cookie and provide a fantastic bitter contrast that really highlights the berry flavor.
Something Sweet
- Dark chocolate-dipped strawberries — Continue the berry theme with an elegant and simple dessert that doesn’t overpower the cookies but instead extends the fruity, chocolatey joy.
- A small bowl of lemon sorbet — The bright, zingy flavor of lemon sorbet acts as a palate cleanser and contrasts wonderfully with the rich, jammy cookies for a light yet satisfying end to a meal.
- Dairy-free vanilla ice cream — Sandwich a small scoop between two cookies for an incredible ice cream sandwich experience. The vanilla enhances the cookie’s flavor without stealing the show.
Top Mistakes to Avoid
- Mistake: Using hot jam. If you fill the thumbprints with jam that hasn’t cooled and set, it will sink into the cookie dough as it bakes, resulting in a soggy bottom and no distinct jam layer. Patience is key here!
- Mistake: Overbaking the cookies. These cookies are done when the edges are just golden. They will continue to firm up as they cool on the baking sheet. Overbaking will make them dry and crumbly instead of tender and soft.
- Mistake: Not letting the dough rest. That 5-minute rest after mixing allows the oats to hydrate. Skipping it means the dough will be too sticky to shape neatly, and you might end up with misshapen cookies.
- Mistake: Pressing the thumbprint too hard. If you press all the way down to the baking sheet, the jam can leak out the bottom and stick. A gentle, confident press is all you need to create a perfect well.
Expert Tips
- Tip: Toast your oats for deeper flavor. Before grinding them into flour, spread the rolled oats on a baking sheet and toast them in a 350°F oven for 5-7 minutes until fragrant. Let them cool completely before proceeding. This adds a wonderful nutty depth to the cookies.
- Tip: Add a hint of spice. Stir a quarter teaspoon of cinnamon or a pinch of cardamom into the dry ingredients. It adds a warm, cozy note that pairs incredibly well with the berry jam.
- Tip: Make a double batch of jam. The chia jam is fantastic on toast, swirled into yogurt, or spooned over pancakes. It keeps well in the fridge for up to two weeks, so making extra is always a good idea.
- Tip: Freeze the dough balls for future cookies. After shaping the dough into balls (but before adding the thumbprint), freeze them solid on a baking sheet, then transfer to a freezer bag. When a cookie craving strikes, just bake from frozen, adding a minute or two to the baking time.
FAQs
Can I use a different type of flour instead of almond flour?
You can try, but almond flour gives these cookies their signature tender, melt-in-your-mouth texture. A gluten-free 1:1 baking flour might work, but the results will be denser. I wouldn’t recommend using all oat flour, as the cookies would be too crumbly. If you need a nut-free option, sunflower seed flour is your best bet—just note it can give baked goods a green tint over time due to a reaction with baking soda, which is harmless but looks a little funny!
My jam didn’t thicken enough. What happened?
This usually means it needed more time to cook or set. The chia seeds need a few minutes to absorb the liquid and work their gelling magic. If it’s still runny after 20 minutes in the fridge, you can stir in an extra half tablespoon of chia seeds and give it another 10 minutes. Also, make sure you’re cooking the berries long enough for them to really break down and release their natural pectin.
How should I store these cookies, and how long do they keep?
Store them in an airtight container at room temperature for up to 3 days. The jam can make the cookies soften over time. For longer storage, I recommend keeping them in the fridge for up to a week. You can also freeze the baked and cooled cookies in a single layer, then transfer to a freezer bag for up to 3 months. Just thaw at room temperature when you’re ready to enjoy.
Can I use store-bought jam to save time?
Absolutely! If you’re in a pinch, your favorite store-bought jam will work just fine. Look for one with lower sugar if you can, to keep with the wholesome vibe of the recipe. Just note that runny jams might seep more than our thicker chia jam, so try to find a thicker variety or even a fruit spread.
Why did my cookies spread too much or not enough?
If they spread too much, your dough might have been too warm, or your baking soda could be old (check the expiration date!). If they didn’t spread enough, the dough was likely too dry or over-mixed. The 5-minute rest for the dough is crucial for getting the hydration just right. Also, make sure your coconut oil is measured correctly—if you pack it into the cup when solid, you’ll use too much, which can lead to spreading.
Chia Jam Thumbprint Cookies
Whip up wholesome Chia Jam Thumbprint Cookies! A healthy twist on a classic with an easy homemade chia seed jam & an oat-almond flour dough. Naturally sweetened & utterly delicious.
Ingredients
Ingredients
-
2 cups fresh or frozen berries (like strawberries, raspberries, or a mix)
-
2 tbsp pure maple syrup (or more to taste)
-
1 tbsp fresh lemon juice
-
2 tbsp chia seeds
-
1.5 cups old-fashioned rolled oats
-
1 cup almond flour
-
0.5 tsp baking soda
-
0.25 tsp fine sea salt
-
0.33 cup coconut oil (melted and slightly cooled)
-
0.33 cup pure maple syrup
-
1 tsp pure vanilla extract
Instructions
-
Create the Chia Jam. In a medium saucepan, combine your berries, maple syrup, and lemon juice. Cook over medium heat, stirring occasionally, for about 5-7 minutes. The berries will start to break down and release their juices. You can help them along by mashing them with the back of a spoon or a potato masher. Once the mixture is bubbling and saucy, remove it from the heat and stir in the chia seeds. Let it sit for a minute, then give it another good stir. You'll notice it start to thicken already. Pour the jam into a bowl and pop it in the refrigerator to set while you make the cookie dough.01
-
Prep the Oat Flour. Place the rolled oats into a blender or food processor and pulse until they resemble a coarse flour. You don't need it to be superfine—a little texture is nice. This step is what gives the cookies their wonderful structure and chewy bite. If you have store-bought oat flour, you can use 1 ¼ cups of that instead.02
-
Combine the Dry Ingredients. In a medium mixing bowl, whisk together your freshly ground oat flour, almond flour, baking soda, and salt. Whisking ensures the baking soda and salt are evenly distributed, which is key for a consistent rise and flavor in every single cookie.03
-
Mix the Wet Ingredients. In a separate, larger bowl, whisk together the slightly cooled, melted coconut oil, maple syrup, and vanilla extract. It might look a little separated at first, but just keep whisking until it's smooth and emulsified. This is the base of your delicious, sweet dough.04
-
Bring the Dough Together. Pour the dry ingredients into the wet ingredients and stir with a spatula until just combined. The dough will be soft and a bit sticky—that's exactly what you want. Avoid overmixing, as this can make the cookies tough. Let the dough sit for about 5 minutes; the oats will absorb some of the moisture, making it easier to handle.05
-
Shape the Cookies. Preheat your oven to 350°F (175°C) and line a baking sheet with parchment paper. Scoop out about 1 ½ tablespoons of dough for each cookie, rolling them into smooth balls between your palms. Place them on the prepared baking sheet, spacing them about 2 inches apart as they will spread a little.06
-
Create the Thumbprints. Using the back of a ½ teaspoon measure (or your thumb, if you're feeling traditional), gently press into the center of each dough ball to create an indentation. Don't press all the way to the baking sheet—just deep enough to hold a generous amount of jam. If the dough cracks a little at the edges, you can gently smooth it back together with your fingers.07
-
Fill and Bake. By now, your chia jam should be nicely thickened. Spoon about a teaspoon of jam into each well. You want to fill them up, but try not to overfill and spill onto the cookie base. Bake for 12-14 minutes, or until the edges of the cookies are lightly golden brown. The centers will still look soft, which is perfect.08
-
Cool Completely. Let the cookies cool on the baking sheet for at least 10 minutes before transferring them to a wire rack to cool completely. The cookies are very fragile when warm, and the jam will be extremely hot. They'll firm up beautifully as they cool, achieving that perfect tender-yet-sturdy texture.09


