
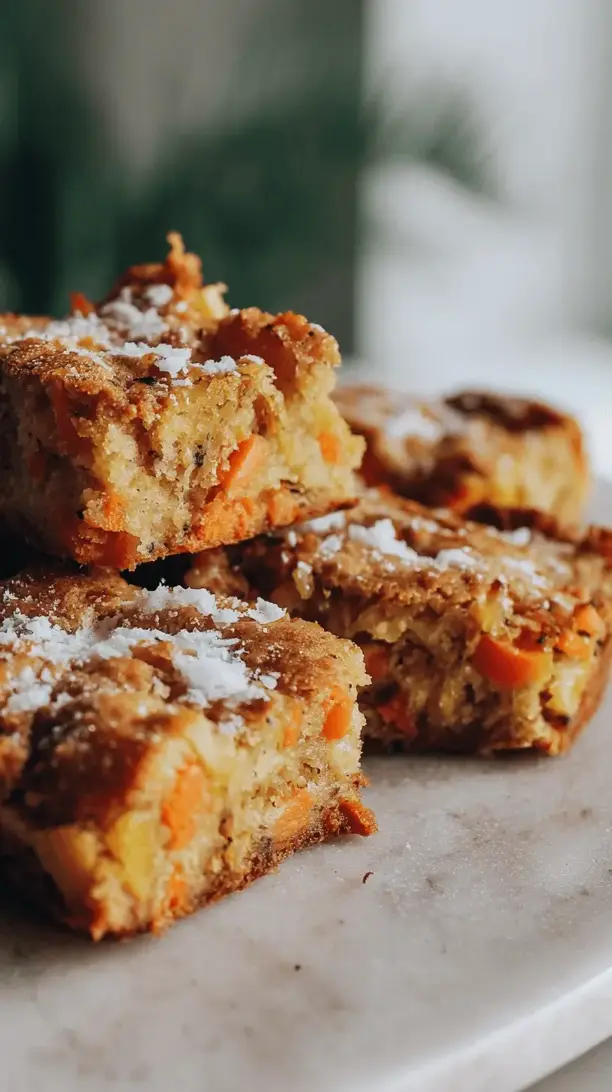
Why You’ll Love This Carrot Pineapple Muffin Bars
- Unbelievably moist and tender. The crushed pineapple does all the heavy lifting here, ensuring every single bite is soft and never, ever dry. It’s a game-changer for bar recipes that can sometimes turn out a bit crumbly.
- Perfectly portable for busy days. Forget about delicate cupcakes! These bars are sturdy enough to toss in a lunchbox or take on a road trip, but they still feel like a proper, homemade treat.
- A fantastic way to use up pantry staples. You probably have most of these ingredients in your cupboard right now. It’s a brilliant recipe for when you find a lone can of pineapple hiding in the back of the pantry.
- The flavor just gets better with time. Honestly, I think they taste even better on day two. The spices have more time to mingle, and the moisture from the pineapple and carrots distributes even more beautifully throughout the bars.
Ingredients & Tools
- 2 cups all-purpose flour
- 2 tsp baking powder
- 1 tsp baking soda
- 1 ½ tsp ground cinnamon
- ½ tsp ground nutmeg
- ½ tsp salt
- ¾ cup granulated sugar
- ¾ cup light brown sugar, packed
- ¾ cup neutral oil (like avocado or canola)
- 3 large eggs, at room temperature
- 2 tsp pure vanilla extract
- 2 cups finely grated carrots (from about 3-4 medium carrots)
- 1 cup crushed pineapple, well-drained (keep the juice for something else!)
- ½ cup chopped walnuts or pecans (optional, but recommended)
Tools: A 9×13 inch baking pan, parchment paper, a large mixing bowl, a medium mixing bowl, a whisk, a rubber spatula, and a box grater.
You’ll notice I call for two types of sugar—the brown sugar adds a lovely molasses depth that pairs perfectly with the warm spices. And don’t skip the step of really draining that pineapple; a little extra moisture is great, but we don’t want a soggy bottom!
Serves: 12 bars | Prep Time: 20 minutes | Cook Time: 30-35 minutes | Total Time: 55 minutes
Before You Start: Tips & Ingredient Notes
- Grate those carrots finely. You want them to almost melt into the batter, providing moisture without large, crunchy pieces. The small holes on your box grater are your best friend here.
- Room temperature eggs are non-negotiable. Seriously, it makes a huge difference in how the batter emulsifies and rises. If you forgot to take them out, just place the whole eggs in a bowl of warm water for 5-10 minutes before cracking.
- How to drain pineapple properly. Don’t just pour it out of the can. Spoon the crushed pineapple into a fine-mesh strainer and press down gently with the back of the spoon to release as much liquid as possible. We want the flavor and fiber, not the extra juice.
- Why a neutral oil? Using a flavorless oil like avocado or canola lets the flavors of the carrot, pineapple, and spices really shine through. A strong olive oil would compete in a way we don’t want here.
How to Make Carrot Pineapple Muffin Bars
Step 1: First, get your oven preheating to 350°F (175°C). This is key for an even bake from the start. Then, line your 9×13 inch baking pan with parchment paper, leaving a little overhang on two opposite sides. This little trick is a lifesaver—it creates a sling that makes lifting the entire batch of bars out of the pan for clean cutting an absolute breeze. Lightly grease any exposed parts of the pan.
Step 2: In your medium bowl, we’ll whisk together all the dry ingredients. That’s the flour, baking powder, baking soda, cinnamon, nutmeg, and salt. Whisk them for a good 30 seconds to make sure the leavening agents and spices are evenly distributed throughout the flour. This ensures every bar gets a perfect rise and consistent flavor. Set this bowl aside for a moment.
Step 3: Now, in your large mixing bowl, combine the sugars and oil. Whisk them together until they look well combined—it might be a bit grainy, and that’s perfectly fine. Next, add the room-temperature eggs one at a time, whisking well after each addition until the mixture is smooth and slightly pale. Then, whisk in the vanilla extract. You’ll notice the batter should look thick and cohesive.
Step 4: Here’s where we bring it all together. Add the dry flour mixture to the wet sugar and egg mixture. Use your rubber spatula to gently fold everything together. The trick is to stop folding the moment you no longer see streaks of dry flour. A few small lumps are okay! Overmixing is the enemy of tender bars.
Step 5: Now for the stars of the show! Fold in the finely grated carrots, the well-drained crushed pineapple, and the chopped nuts if you’re using them. Fold gently until everything is just evenly distributed. The batter will be thick and packed with goodies.
Step 6: Scrape the batter into your prepared pan and use the spatula to spread it into an even layer, making sure to get it into all the corners. A little patting motion helps to even it out. The surface might look a bit rough, and that’s exactly what we want.
Step 7: Pop the pan into the preheated oven and bake for 30-35 minutes. You’re looking for a beautifully golden brown top, and the edges will just be starting to pull away from the sides of the pan. The real test is a toothpick inserted into the center—it should come out with a few moist crumbs attached, but not wet batter.
Step 8: This is the hardest part… let the bars cool completely in the pan on a wire rack. I know it’s tempting, but cutting into them while they’re warm will make them fall apart. The structure needs time to set. Once cool, use the parchment paper sling to lift the whole slab onto a cutting board before slicing.
Serving Suggestions
Complementary Dishes
- A simple fruit salad with mint — The fresh, bright flavors cut through the sweetness of the bars beautifully and make a brunch spread feel complete.
- A sharp cheddar cheese plate — The classic pairing of carrot cake and cheese works wonderfully here too. A few slices of aged cheddar on the side is a surprisingly delicious contrast.
Drinks
- Hot coffee or black tea — The bitterness is the perfect counterpart to the sweet, spiced bars. It’s my absolute favorite way to enjoy them in the morning.
- A glass of cold milk — Honestly, you can’t go wrong. It’s a timeless combination for a reason, especially if you’re serving these as an after-school snack.
Something Sweet
- A dollop of vanilla Greek yogurt — For a slightly indulgent but protein-packed twist, a spoonful of creamy yogurt on top adds a lovely tang.
- A small scoop of vanilla bean ice cream — If you serve these slightly warmed, this turns them into a fantastic, easy dessert. The warm bar and cold ice cream are a match made in heaven.
Top Mistakes to Avoid
- Mistake: Not draining the pineapple enough. This is the number one reason bars can turn out gummy or underbaked in the center. That extra liquid throws off the liquid-to-dry-ingredient ratio.
- Mistake: Overmixing the batter. Once you add the flour, a gentle hand is crucial. Overmixing develops the gluten in the flour, leading to tough, dense bars instead of the soft, tender crumb we’re after.
- Mistake: Grating the carrots too coarsely. Large shreds of carrot won’t soften properly during the relatively short baking time and can create pockets of moisture, making the texture uneven.
- Mistake: Skipping the cooling step. I’ve messed this up before too, but cutting into warm bars is a recipe for crumbles. They need time to set up so they hold their shape when sliced.
Expert Tips
- Tip: Toast your nuts. If you’re adding walnuts or pecans, spread them on a baking sheet and toast them at 350°F for 5-7 minutes before chopping. It deepens their flavor immensely and adds a wonderful crunch.
- Tip: Use a scale for flour. For the most consistent results, weigh your flour. If you’re using cups, fluff the flour in the bag first, then spoon it into the measuring cup and level it off. Never pack it down!
- Tip: Add a zest boost. The zest of one orange mixed in with the wet ingredients adds a fantastic, bright citrus note that complements the pineapple and carrot beautifully.
- Tip: For a pretty finish, reserve a tablespoon of the chopped nuts and sprinkle them over the batter right before baking. It gives the tops a lovely, professional look.
FAQs
Can I make these gluten-free?
Absolutely! You can substitute the all-purpose flour with a 1:1 gluten-free baking blend. I’ve had great success with brands like Bob’s Red Mill. The texture might be a tad more crumbly, but they’ll still be delicious. Just ensure your blend contains a binder like xanthan gum.
How should I store these bars, and how long do they last?
Once completely cool, store them in an airtight container at room temperature for up to 3 days. For longer storage, they freeze beautifully! Wrap individual bars tightly in plastic wrap and then place them in a freezer bag for up to 3 months. Thaw at room temperature whenever a craving strikes.
Can I use pineapple chunks instead of crushed?
You can, but you’ll need to chop them very finely—almost to a crushed consistency. Larger pieces will create uneven pockets of moisture and can make the bars harder to slice neatly. Crushed pineapple from a can is just so much easier.
My bars are browning too quickly on top but aren’t cooked in the middle. What do I do?
This happens! If you notice the top getting dark before the center is set, simply lay a loose piece of aluminum foil over the top of the pan for the remainder of the baking time. This will shield it from direct heat and allow the center to catch up without burning the top.
Can I add raisins or other dried fruit?
Of course! About a half-cup of raisins or dried cranberries would be a lovely addition. To prevent them from sinking to the bottom and burning, toss them in a teaspoon of the measured flour before folding them into the batter. The light coating helps them stay suspended.
Carrot Pineapple Muffin Bars
Whip up incredibly moist Carrot Pineapple Muffin Bars! This easy recipe combines spiced carrot cake flavor with sunny pineapple for a perfect grab-and-go breakfast or snack.
Ingredients
Ingredients
-
2 cups all-purpose flour
-
2 tsp baking powder
-
1 tsp baking soda
-
1 ½ tsp ground cinnamon
-
½ tsp ground nutmeg
-
½ tsp salt
-
¾ cup granulated sugar
-
¾ cup light brown sugar (packed)
-
¾ cup neutral oil (like avocado or canola)
-
3 large eggs (at room temperature)
-
2 tsp pure vanilla extract
-
2 cups finely grated carrots (from about 3-4 medium carrots)
-
1 cup crushed pineapple (well-drained)
-
½ cup chopped walnuts or pecans (optional, but recommended)
Instructions
-
First, get your oven preheating to 350°F (175°C). This is key for an even bake from the start. Then, line your 9x13 inch baking pan with parchment paper, leaving a little overhang on two opposite sides. This little trick is a lifesaver—it creates a sling that makes lifting the entire batch of bars out of the pan for clean cutting an absolute breeze. Lightly grease any exposed parts of the pan.01
-
In your medium bowl, we'll whisk together all the dry ingredients. That's the flour, baking powder, baking soda, cinnamon, nutmeg, and salt. Whisk them for a good 30 seconds to make sure the leavening agents and spices are evenly distributed throughout the flour. This ensures every bar gets a perfect rise and consistent flavor. Set this bowl aside for a moment.02
-
Now, in your large mixing bowl, combine the sugars and oil. Whisk them together until they look well combined—it might be a bit grainy, and that's perfectly fine. Next, add the room-temperature eggs one at a time, whisking well after each addition until the mixture is smooth and slightly pale. Then, whisk in the vanilla extract. You'll notice the batter should look thick and cohesive.03
-
Here's where we bring it all together. Add the dry flour mixture to the wet sugar and egg mixture. Use your rubber spatula to gently fold everything together. The trick is to stop folding the moment you no longer see streaks of dry flour. A few small lumps are okay! Overmixing is the enemy of tender bars.04
-
Now for the stars of the show! Fold in the finely grated carrots, the well-drained crushed pineapple, and the chopped nuts if you're using them. Fold gently until everything is just evenly distributed. The batter will be thick and packed with goodies.05
-
Scrape the batter into your prepared pan and use the spatula to spread it into an even layer, making sure to get it into all the corners. A little patting motion helps to even it out. The surface might look a bit rough, and that's exactly what we want.06
-
Pop the pan into the preheated oven and bake for 30-35 minutes. You're looking for a beautifully golden brown top, and the edges will just be starting to pull away from the sides of the pan. The real test is a toothpick inserted into the center—it should come out with a few moist crumbs attached, but not wet batter.07
-
This is the hardest part… let the bars cool completely in the pan on a wire rack. I know it's tempting, but cutting into them while they're warm will make them fall apart. The structure needs time to set. Once cool, use the parchment paper sling to lift the whole slab onto a cutting board before slicing.08


