Why You’ll Love This Quinoa Black Bean Burger
- It actually holds together. No more burger disintegration! The combination of mashed black beans and cooked quinoa creates a perfect, sturdy base that won’t crumble on the grill or in the pan.
- Packed with flavor and texture. We’re not just mashing beans and calling it a day. With sautéed onions, garlic, a blend of spices like cumin and smoked paprika, and a bit of texture from breadcrumbs, every bite is interesting and deeply satisfying.
- Meal-prep friendly. You can make a big batch of these patties, cook them or not, and freeze them for later. Having a homemade veggie burger ready in minutes on a busy weeknight is an absolute lifesaver.
- Incredibly versatile. While it’s a star on a bun with all the classic fixings, this patty is also fantastic crumbled over a salad, served alongside some roasted veggies, or even as a high-protein breakfast patty with a fried egg on top.
Ingredients & Tools
- 1 can (15 oz) black beans, rinsed and drained
- 1 cup cooked quinoa, cooled
- 1/2 cup panko breadcrumbs (or regular)
- 1 large egg
- 1/2 yellow onion, finely diced
- 2 cloves garlic, minced
- 1 tbsp olive oil, plus more for cooking
- 1 tsp ground cumin
- 1 tsp smoked paprika
- 1/2 tsp chili powder
- 1 tbsp Worcestershire sauce (use a vegan brand if needed)
- 1/4 cup fresh cilantro or parsley, chopped
- 1/2 tsp salt, plus more to taste
- 1/4 tsp black pepper
Tools: A large mixing bowl, a fork or potato masher, a skillet, a baking sheet (if baking)
The real heroes here are the black beans and quinoa—they form the structural and textural foundation. Using cooked and cooled quinoa is key, as it’s less sticky and helps bind everything together. And don’t skip sautéing the onion and garlic; that quick step adds a layer of sweetness and aroma that raw aromatics just can’t provide.
Serves: 4 | Prep Time: 20 minutes | Cook Time: 10 minutes | Total Time: 30 minutes
Before You Start: Tips & Ingredient Notes
- Dry those beans! After rinsing your canned black beans, spread them on a paper towel and pat them thoroughly dry. Excess moisture is the enemy of a firm veggie burger patty. A little effort here makes a huge difference.
- Quinoa consistency matters. Make sure your quinoa is cooked but not mushy, and that it’s completely cooled before you mix it in. Warm quinoa can make the mixture too soft and difficult to shape.
- Don’t over-mash the beans. You want a combination of textures. Mash about two-thirds of the beans well to create a paste, but leave the rest whole or slightly broken. This gives the burger a much more interesting, meaty mouthfeel.
- Taste your mixture! Before you form the patties, cook a tiny spoonful of the mixture in your skillet for a minute. This is your chance to adjust the seasoning—add more salt, pepper, or spice without committing to a whole batch.
How to Make Quinoa Black Bean Burger
Step 1: Sauté the Aromatics. Heat the tablespoon of olive oil in a skillet over medium heat. Add the diced onion and cook for about 4-5 minutes, until it becomes soft and translucent. Then, add the minced garlic and cook for just another minute, until fragrant. You’ll notice the kitchen starts to smell amazing. Remove the skillet from the heat and let this mixture cool slightly.
Step 2: Prepare the Bean Base. In your large mixing bowl, add the rinsed and dried black beans. Using a fork or potato masher, mash them up—but remember, not into a uniform paste! You’re aiming for a texture where some beans are completely broken down and others are still somewhat whole. This is the secret to a great texture.
Step 3: Combine Everything. To the mashed beans, add the cooled quinoa, the sautéed onion and garlic, panko breadcrumbs, egg, Worcestershire sauce, cumin, smoked paprika, chili powder, salt, pepper, and fresh herbs. Now, use your hands or a spatula to mix everything together until it’s fully combined. The mixture should be moist but hold its shape when you press it together. If it feels too wet, add another tablespoon of breadcrumbs.
Step 4: Form the Patties. Divide the mixture into four equal portions. Shape each portion into a firm, compact patty about ¾-inch thick. A little trick is to make the patties slightly smaller in diameter than your burger buns, as they will firm up a bit when cooked. If the mixture is sticky, lightly wet your hands with water while shaping.
Step 5: Cook to Perfection. You have two great options here. For pan-frying: Heat a thin layer of olive oil in a skillet over medium heat. Cook the patties for about 4-5 minutes per side, until a deep golden-brown crust forms. For baking: Preheat your oven to 375°F (190°C), place the patties on a parchment-lined baking sheet, lightly brush with oil, and bake for 20-25 minutes, flipping halfway through. Either way, the burger should feel firm to the touch.
Step 6: Rest and Serve. This is a crucial but often skipped step! Let the cooked patties rest on a cutting board or plate for about 5 minutes before serving. This allows them to set fully, making them much less likely to fall apart when you take that first glorious bite.
Serving Suggestions
Complementary Dishes
- Classic Sweet Potato Fries — The natural sweetness of the fries is a perfect counterpoint to the smoky, savory flavors of the burger. They bake up crispy and are just… meant to be.
- A Simple Avocado & Corn Salad — Creamy avocado and sweet, crisp corn tossed with lime juice and cilantro adds a fresh, bright element that cuts through the richness of the burger beautifully.
- Tangy Coleslaw — A vinegar-based slaw, rather than a mayo-heavy one, provides a fantastic crunch and acidity that really lifts the whole meal.
Drinks
- A Crisp Lager or Pale Ale — The carbonation and slight bitterness of a cold beer are a classic pairing for a reason. It cleanses the palate and complements the burger’s hearty character.
- Sparkling Water with Lime — For a non-alcoholic option, the bubbles and citrus zing are incredibly refreshing and help balance the spices.
- Iced Hibiscus Tea — Its tart, fruity flavor profile is a surprisingly great match, adding a lovely floral note that plays well with the smokiness.
Something Sweet
- Grilled Pineapple Slices — A few minutes on the grill caramelizes the sugars, creating a warm, juicy dessert that echoes the smoky notes from the paprika in the burger.
- Dark Chocolate-Dipped Strawberries — Simple, elegant, and not too heavy. The bittersweet chocolate and ripe berries are a light yet satisfying way to end the meal.
- Mango Sorbet — Bright, fruity, and dairy-free, it’s like a palate-cleansing burst of sunshine that feels just right after a savory, satisfying burger.
Top Mistakes to Avoid
- Mistake: Using wet ingredients. If your beans aren’t dried or your quinoa is still warm and steamy, the burger mixture will be too wet and sticky. This is the number one reason patties fall apart. I’ve messed this up before too, and it’s a frustrating lesson!
- Mistake: Skipping the taste test. Seasonings can vary in potency. That quick cook-off of a tiny bit of mixture is your safety net. It ensures your final burgers are perfectly seasoned, not bland or overly salty.
- Mistake: Flipping the patties too soon. If you try to flip the burger before a crust has formed, it will stick to the pan and break. Be patient—wait until the edges look cooked and it releases easily when you gently nudge it with a spatula.
- Mistake: Making the patties too thick. A patty thicker than an inch will be difficult to cook through without burning the outside. Aim for that ¾-inch thickness for the ideal balance of a crispy exterior and a fully cooked, warm center.
Expert Tips
- Tip: Chill the patties before cooking. If you have a little extra time, place the shaped patties on a plate and refrigerate them for 30 minutes. This firms them up even more, guaranteeing they’ll hold their shape perfectly during cooking.
- Tip: Get creative with binders. If you don’t have an egg or want to make it vegan, a “flax egg” (1 tbsp ground flaxseed mixed with 3 tbsp water, left to thicken for 5 minutes) works wonderfully as a binding agent.
- Tip: Customize your spices. This recipe is a fantastic template. Love heat? Add some diced jalapeño or a pinch of cayenne. Prefer an Italian twist? Swap the cumin and paprika for dried oregano and basil. Make it your own!
- Tip: Freeze like a pro. To freeze, place the uncooked, shaped patties on a parchment-lined baking sheet and freeze until solid. Then, transfer them to a freezer bag. They’ll last for up to 3 months. Cook from frozen, adding a few extra minutes to the cooking time.
FAQs
Can I make these burgers gluten-free?
Absolutely! This recipe is very easy to adapt. Simply ensure your Worcestershire sauce is a gluten-free brand (most traditional ones are not), and swap the panko breadcrumbs for an equal amount of certified gluten-free oats that you’ve pulsed a few times in a food processor, or use a gluten-free breadcrumb alternative. The texture will be just as good.
Can I bake these instead of pan-frying?
Yes, baking is a great, hands-off option that yields a slightly firmer texture overall. Preheat your oven to 375°F (190°C). Place the patties on a parchment-lined baking sheet, lightly brush or spray them with oil, and bake for about 20-25 minutes, flipping them halfway through. They won’t have the same deep sear as pan-frying, but they’ll be deliciously golden and hold together perfectly.
Why did my burgers turn out mushy on the inside?
This usually points to one of two issues: too much moisture in the mixture (remember to dry those beans!) or not cooking them long enough. Make sure you’re cooking over medium heat so the inside has time to heat through and set before the outside burns. Letting them rest after cooking also allows the internal starches to firm up.
What’s the best way to reheat leftover cooked burgers?
To maintain the best texture, avoid the microwave, which can make them soft. Instead, reheat them gently in a skillet over medium-low heat for a few minutes per side, or in a 350°F (175°C) oven for about 10-12 minutes, until warmed through. This will help re-crisp the exterior.
Can I use a different type of bean?
You can experiment, but black beans are ideal because of their firm texture and mild flavor. Kidney beans or pinto beans could work, but they tend to be softer, so you might need to adjust the amount of breadcrumbs to achieve the right consistency. Chickpeas would create a very different, falafel-like burger, which is also tasty but not quite the same.
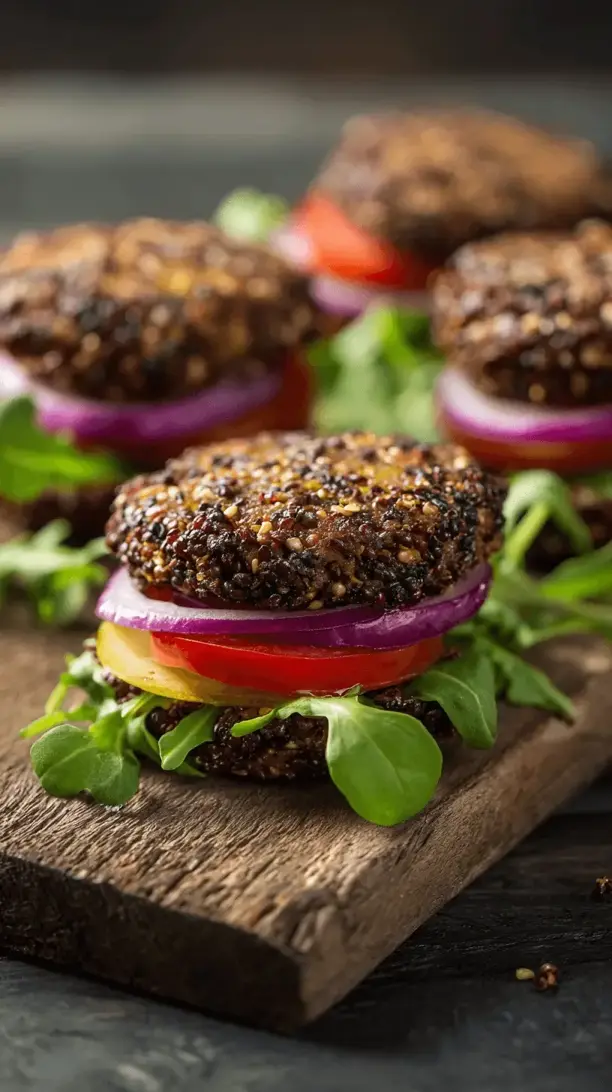
Quinoa Black Bean Burger
My foolproof Quinoa Black Bean Burger recipe! No more crumbly patties. This veggie burger holds together perfectly & is packed with smoky flavor. Easy, freezer-friendly & a total game-changer.
Ingredients
Ingredients
-
15 oz black beans (canned, rinsed and drained)
-
1 cup cooked quinoa (cooled)
-
1/2 cup panko breadcrumbs (or regular)
-
1 egg (large)
-
1/2 yellow onion (finely diced)
-
2 cloves garlic (minced)
-
1 tbsp olive oil (plus more for cooking)
-
1 tsp ground cumin
-
1 tsp smoked paprika
-
1/2 tsp chili powder
-
1 tbsp Worcestershire sauce (use a vegan brand if needed)
-
1/4 cup fresh cilantro or parsley (chopped)
-
1/2 tsp salt (plus more to taste)
-
1/4 tsp black pepper
Instructions
-
Sauté the Aromatics. Heat the tablespoon of olive oil in a skillet over medium heat. Add the diced onion and cook for about 4-5 minutes, until it becomes soft and translucent. Then, add the minced garlic and cook for just another minute, until fragrant. You'll notice the kitchen starts to smell amazing. Remove the skillet from the heat and let this mixture cool slightly.01
-
Prepare the Bean Base. In your large mixing bowl, add the rinsed and dried black beans. Using a fork or potato masher, mash them up—but remember, not into a uniform paste! You're aiming for a texture where some beans are completely broken down and others are still somewhat whole. This is the secret to a great texture.02
-
Combine Everything. To the mashed beans, add the cooled quinoa, the sautéed onion and garlic, panko breadcrumbs, egg, Worcestershire sauce, cumin, smoked paprika, chili powder, salt, pepper, and fresh herbs. Now, use your hands or a spatula to mix everything together until it's fully combined. The mixture should be moist but hold its shape when you press it together. If it feels too wet, add another tablespoon of breadcrumbs.03
-
Form the Patties. Divide the mixture into four equal portions. Shape each portion into a firm, compact patty about ¾-inch thick. A little trick is to make the patties slightly smaller in diameter than your burger buns, as they will firm up a bit when cooked. If the mixture is sticky, lightly wet your hands with water while shaping.04
-
Cook to Perfection. You have two great options here. For pan-frying: Heat a thin layer of olive oil in a skillet over medium heat. Cook the patties for about 4-5 minutes per side, until a deep golden-brown crust forms. For baking: Preheat your oven to 375°F (190°C), place the patties on a parchment-lined baking sheet, lightly brush with oil, and bake for 20-25 minutes, flipping halfway through. Either way, the burger should feel firm to the touch.05
-
Rest and Serve. This is a crucial but often skipped step! Let the cooked patties rest on a cutting board or plate for about 5 minutes before serving. This allows them to set fully, making them much less likely to fall apart when you take that first glorious bite.06