
Why You’ll Love This Frozen Yogurt Berry Bark
- It’s unbelievably easy. Seriously, if you can stir and pour, you can make this. There’s no baking, no churning, and minimal cleanup. It’s the perfect recipe to make with kids or for when you’re short on time but want a homemade treat.
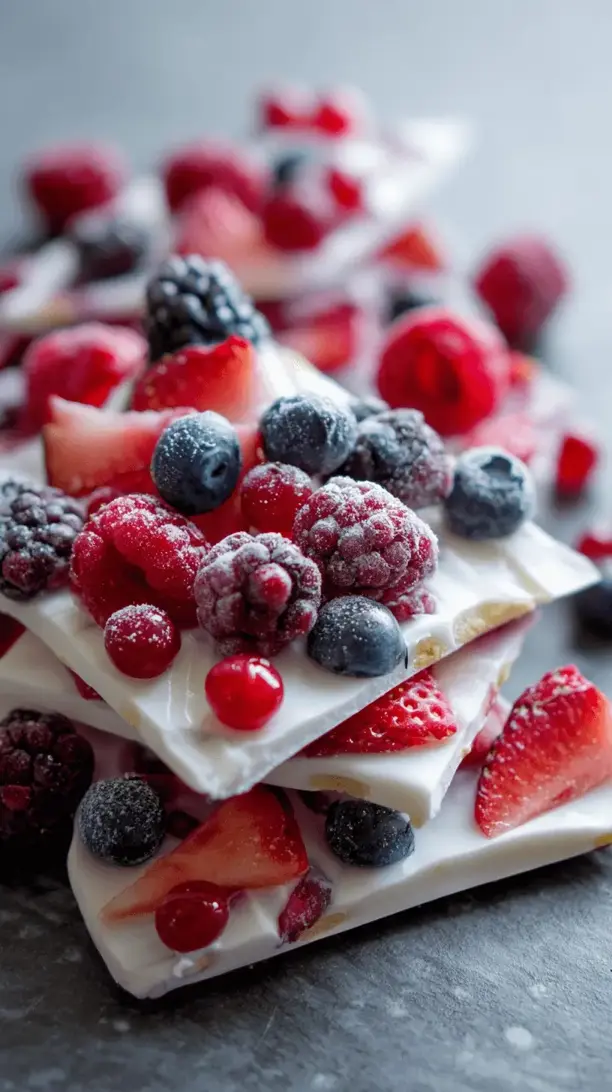
- The texture is a dream. You get the firm, satisfying snap of frozen yogurt that melts creamily on your tongue, contrasted with the juicy burst of berries and the occasional crunch from a seed or nut. It’s a way more interesting experience than a scoop of plain ice cream.
- You control the sweetness. This isn’t an overly sugary dessert. The natural sweetness comes from the ripe berries and just enough honey or maple syrup to balance the tang of the yogurt. You can easily adjust it to your taste, making it as subtle or as pronounced as you like.
- It’s a blank canvas for creativity. Once you master the basic formula, a world of variations opens up. Think tropical with mango and coconut, or decadent with dark chocolate chips and a swirl of peanut butter. It never has to be the same twice.
Ingredients & Tools
- 500 g (about 2 cups) plain Greek yogurt
- 3-4 tablespoons honey or maple syrup
- 1 teaspoon pure vanilla extract
- A pinch of fine sea salt
- 150 g (1 cup) mixed fresh berries (strawberries, blueberries, raspberries)
- 2 tablespoons chopped nuts or seeds (like pistachios, almonds, or pumpkin seeds), optional
Tools: A medium mixing bowl, a whisk or spatula, a rimmed baking sheet (approx. 9×13 inch / 23×33 cm), and parchment paper.
The quality of your yogurt really is the star here, so go for a good, thick, full-fat Greek yogurt if you can—it creates the creamiest base. And don’t skip the pinch of salt; it might seem tiny, but it works magic to elevate all the other flavors and cut through the sweetness.
Serves: 4-6 | Prep Time: 10 minutes | Freeze Time: 4 hours | Total Time: 4 hours 10 minutes
Before You Start: Tips & Ingredient Notes
- Why Greek yogurt? Its thick, strained nature is key. Regular yogurt has more whey, which means your bark will be icier and less creamy once frozen. Greek yogurt gives you that rich, almost cheesecake-like frozen texture we’re after.
- To chop or not to chop the berries? For smaller berries like blueberries and raspberries, you can leave them whole. But definitely slice larger strawberries—you’ll get a more even distribution and it’s easier to break the bark later. If using frozen berries, do not thaw them; just toss them in frozen to prevent a pink, watery swirl.
- What’s the deal with the sweetener? Honey can solidify when very cold, which is fine, but if you’re concerned, you can gently warm it before mixing to make it easier to incorporate. Maple syrup stays liquid, so it’s another great option. Taste your mixture before freezing! Yogurt tartness varies, so adjust the sweetness to your liking.
- Parchment paper is non-negotiable. Seriously, don’t try to grease the pan or use wax paper. Parchment paper ensures your beautiful bark will release in one piece (or in satisfying shards) without any frustrating sticking.
How to Make Frozen Yogurt Berry Bark
Step 1: Prepare Your Pan. This is the most important step for easy removal. Line your rimmed baking sheet with a large piece of parchment paper, pressing it down so it adheres to the corners. You don’t want any yogurt sneaking underneath! Having a little overhang on the sides can also be helpful for lifting later.
Step 2: Create the Yogurt Base. In your mixing bowl, combine the Greek yogurt, honey (or maple syrup), vanilla extract, and that all-important pinch of salt. Whisk it all together until it’s completely smooth and well-blended. You’ll notice the mixture should be thick but pourable—like a very thick pancake batter. If it seems too thick, you can add a teaspoon of milk to loosen it, but this is rarely necessary with a good yogurt.
Step 3: Spread and Swirl. Pour the yogurt mixture onto your prepared parchment-lined baking sheet. Use a spatula or the back of a spoon to spread it into an even layer, about 1/4 to 1/2 inch thick. Don’t stress about it being perfect, but try to avoid any super thin spots at the edges, as they’ll freeze rock-hard and be difficult to break.
Step 4: Add Your Toppings. Now for the fun, artistic part! Scatter your prepared berries and any optional nuts or seeds evenly over the entire surface. Gently press them down just slightly into the yogurt so they stick. The trick is to get good coverage so every piece of bark gets a bit of everything. You can even create patterns or sections if you’re feeling fancy.
Step 5: The Big Freeze. Carefully transfer the baking sheet to a flat, level spot in your freezer. Let it freeze, completely undisturbed, for at least 4 hours, or ideally overnight. You’ll know it’s ready when the surface is completely firm to the touch and doesn’t give when you press it.
Step 6: Break and Serve. Take the pan out of the freezer. Grab the edges of the parchment paper and lift the entire frozen sheet of bark out of the pan. Place it on a cutting board. You can break it into rustic, irregular pieces with your hands for a fun, casual feel, or use a large knife to score and snap it into neater rectangles. Serve immediately!
Serving Suggestions
Complementary Dishes
- A simple fruit salad — The fresh, juicy contrast of room-temperature fruit like melon or pineapple alongside the frozen bark is a delightful play on temperatures and textures.
- A warm, spiced muffin — Imagine a bite of a barely-warm banana or zucchini muffin followed by a cool piece of bark. The combination is surprisingly cozy and satisfying.
Drinks
- Sparkling water with a citrus twist — The effervescence cleanses the palate between bites, and the citrus notes highlight the berries in the bark beautifully.
- A light, herbal iced tea — Think mint or chamomile. The subtle, sweet tea doesn’t compete with the dessert but rather acts as a soothing, complementary sip.
Something Sweet
- A small square of dark chocolate — Let a piece of high-quality dark chocolate (70% or higher) melt slowly on your tongue after a bite of the tangy bark. It’s a sophisticated, two-part dessert experience.
- A drizzle of warm nut butter — Right before serving, warm a tablespoon of almond or peanut butter and drizzle it over the broken bark pieces. It adds a touch of decadence and a wonderful nutty aroma.
Top Mistakes to Avoid
- Mistake: Using runny or regular yogurt. This is the number one reason for icy, disappointing bark. The extra whey in non-Greek yogurt freezes into unpleasant ice crystals. Stick with thick, strained yogurt for the best texture.
- Mistake: Spreading the layer too thin. If the yogurt layer is paper-thin, it becomes brittle and difficult to handle. Aim for a substantial, even thickness so it has a satisfying snap and creamy mouthfeel.
- Mistake: Not using parchment paper. I’ve tried to skip this step before, thinking a well-greased pan would work. It doesn’t. You’ll end up chiseling your bark off the pan. Parchment is your best friend here.
- Mistake: Freezing for too short a time. If it’s not fully frozen solid, it will be soft, bendy, and messy to break. Patience is key—give it the full four hours, or even longer if your freezer is packed.
Expert Tips
- Tip: Swirl in some flavor. Before adding toppings, you can dollop a tablespoon of fruit jam or nut butter onto the yogurt base and use a knife to swirl it gently for a marbled effect. It looks gorgeous and adds pockets of intense flavor.
- Tip: Grate a little zest. A bit of lemon or orange zest mixed into the yogurt base can really make the berry flavors pop. It adds a bright, aromatic note that cuts through the richness.
- Tip: Pre-score for neat portions. After about 30 minutes in the freezer, when the bark is semi-frozen but not solid, you can take it out and use a pizza cutter or knife to lightly score lines where you want to break it later. This guarantees perfectly even pieces.
- Tip: Layer for a parfait effect. For a real showstopper, you can create two-toned bark. Spread half the plain yogurt, freeze for 30 minutes, then top with a layer mixed with a bit of berry powder or cocoa, and then add your toppings. It’s a stunning cross-section!
FAQs
Can I use frozen berries instead of fresh?
Absolutely! It’s a great way to make this year-round. The key is to use them straight from the freezer—do not thaw them. If they thaw, they’ll release a lot of water into your yogurt base, creating icy patches and a pinkish tint. Toss them in frozen, and they’ll work perfectly.
How long does this keep in the freezer?
Stored correctly in an airtight container or a heavy-duty freezer bag with layers separated by parchment paper, the bark will keep well for up to 2 months. After that, it might start to develop freezer burn or lose its optimal texture, but it’s so delicious it rarely lasts that long!
My bark is too hard to break. What did I do wrong?
This usually happens if the layer was too thin or it was over-frozen in a very cold freezer. Let it sit on the counter for 3-5 minutes to temper slightly. It should become easier to snap. Alternatively, you can place the parchment-covered bark in a large plastic bag and whack it gently on the counter—it’s a fun, therapeutic way to break it up!
Can I make this dairy-free or vegan?
Yes, you can! Use a thick, plain, unsweetened coconut yogurt or a high-protein plant-based yogurt. For the sweetener, maple syrup is your best vegan bet. Just be aware that different yogurts may freeze with slightly different textures, but the principle remains the same.
The honey got really hard in the freezer. Is that normal?
It can be, especially if you live in a cold climate or your freezer is extra frosty. Honey solidifies at low temperatures. It will still taste delicious, but if you want to avoid the hard honey bits, using maple syrup is a good solution as it has a lower freezing point and stays softer.
Frozen Yogurt Berry Bark
Whip up this easy Frozen Yogurt Berry Bark in 10 minutes! A healthy, no-bake treat with Greek yogurt & fresh berries. Perfect for snacks & beating the heat. So simple & delicious!
Ingredients
Ingredients
-
500 g plain Greek yogurt (about 2 cups)
-
3-4 tablespoons honey or maple syrup
-
1 teaspoon pure vanilla extract
-
A pinch fine sea salt
-
150 g mixed fresh berries (strawberries, blueberries, raspberries; 1 cup)
-
2 tablespoons chopped nuts or seeds (like pistachios, almonds, or pumpkin seeds; optional)
Instructions
-
Prepare Your Pan. This is the most important step for easy removal. Line your rimmed baking sheet with a large piece of parchment paper, pressing it down so it adheres to the corners. You don’t want any yogurt sneaking underneath! Having a little overhang on the sides can also be helpful for lifting later.01
-
Create the Yogurt Base. In your mixing bowl, combine the Greek yogurt, honey (or maple syrup), vanilla extract, and that all-important pinch of salt. Whisk it all together until it’s completely smooth and well-blended. You’ll notice the mixture should be thick but pourable—like a very thick pancake batter. If it seems too thick, you can add a teaspoon of milk to loosen it, but this is rarely necessary with a good yogurt.02
-
Spread and Swirl. Pour the yogurt mixture onto your prepared parchment-lined baking sheet. Use a spatula or the back of a spoon to spread it into an even layer, about 1/4 to 1/2 inch thick. Don’t stress about it being perfect, but try to avoid any super thin spots at the edges, as they’ll freeze rock-hard and be difficult to break.03
-
Add Your Toppings. Now for the fun, artistic part! Scatter your prepared berries and any optional nuts or seeds evenly over the entire surface. Gently press them down just slightly into the yogurt so they stick. The trick is to get good coverage so every piece of bark gets a bit of everything. You can even create patterns or sections if you’re feeling fancy.04
-
The Big Freeze. Carefully transfer the baking sheet to a flat, level spot in your freezer. Let it freeze, completely undisturbed, for at least 4 hours, or ideally overnight. You’ll know it’s ready when the surface is completely firm to the touch and doesn’t give when you press it.05
-
Break and Serve. Take the pan out of the freezer. Grab the edges of the parchment paper and lift the entire frozen sheet of bark out of the pan. Place it on a cutting board. You can break it into rustic, irregular pieces with your hands for a fun, casual feel, or use a large knife to score and snap it into neater rectangles. Serve immediately!06


