
Why You’ll Love This Chia Jam Thumbprint Cookies
- Homemade jam that’s actually good for you. Forget the store-bought stuff loaded with extra sugar. Our three-ingredient chia jam is bursting with real fruit flavor and gets its lovely, glossy thickness naturally from the chia seeds. It’s a little kitchen magic that feels incredibly rewarding.
- The most satisfying texture contrast. You get the melt-in-your-mouth, slightly nutty crumble of the oat and almond flour cookie base, and then that delightful, soft, fruity burst from the jam center. It’s a textural party in every single bite.
- Surprisingly simple and fun to make. This is a fantastic recipe to make with kids or for when you just want a baking project that doesn’t require fancy skills. The thumbprint part is oddly therapeutic, and the whole process is straightforward from start to finish.
- They feel like a special treat without the guilt. With wholesome ingredients like oats, almond flour, and a naturally sweetened jam, these cookies are a treat you can genuinely feel good about enjoying with your afternoon tea or coffee.
Ingredients & Tools
- For the Chia Jam:
- 300 g fresh or frozen mixed berries (like strawberries, raspberries, blueberries)
- 2 tbsp pure maple syrup or honey
- 1.5 tbsp chia seeds
- 1 tsp fresh lemon juice
- For the Cookie Dough:
- 120 g rolled oats (gluten-free if needed)
- 150 g almond flour
- 60 g coconut flour
- 1/2 tsp baking soda
- 1/4 tsp fine sea salt
- 80 g coconut oil, melted and slightly cooled
- 80 g pure maple syrup
- 1 large egg, at room temperature
- 1 tsp vanilla extract
Tools: Medium saucepan, mixing bowls, whisk, baking sheet, parchment paper, a fork or potato masher, a small spoon or teaspoon measure.
The quality of your ingredients really shines here. Using a good, flavorful maple syrup and a nice, fine-batch almond flour will make a noticeable difference in the final cookie. Don’t skip the lemon juice in the jam—it’s the secret weapon that makes all the fruit flavors pop!
Serves: 12 cookies | Prep Time: 25 minutes | Cook Time: 12-14 minutes | Total Time: 50 minutes (plus cooling)
Before You Start: Tips & Ingredient Notes
- Why almond and coconut flour? This combo creates a wonderfully tender and crumbly cookie that’s naturally gluten-free. Almond flour adds moisture and richness, while coconut flour is super absorbent and gives a lovely, delicate texture. You really can’t substitute one for the other here—they work as a team.
- Let your jam cool completely. I know, the waiting is the hardest part! But if your jam is even slightly warm when you spoon it into the cookie thumbprints, it can make the dough soggy and cause the cookies to spread. Letting it cool (or even making it ahead) ensures a perfect, set jam center.
- The magic of room temperature ingredients. This is especially important for the egg. If it’s too cold, it can cause the melted coconut oil to solidify into little lumps when you mix it in. Taking five minutes to let the egg sit on the counter makes for a much smoother, easier-to-work-with dough.
- Don’t have a food processor? No problem! You can make the oat flour by simply pulsing the rolled oats in a high-speed blender until they reach a fine, powdery consistency. Just be careful not to over-blend, or you’ll start making oat butter!
How to Make Chia Jam Thumbprint Cookies
Step 1: Make the Chia Jam. In a medium saucepan, combine your berries and maple syrup. Cook over medium heat for about 5-7 minutes, stirring occasionally, until the berries break down and release their juices. You can help them along by mashing them with a fork. Once it’s nice and saucy, remove the pan from the heat and stir in the chia seeds and lemon juice. Let it sit for at least 15-20 minutes, stirring once or twice, until it thickens to a jam-like consistency. Then, transfer it to a bowl to cool completely.
Step 2: Prep the Oat Flour. While the jam is cooling, preheat your oven to 350°F (175°C) and line a baking sheet with parchment paper. Place the rolled oats in a food processor or high-speed blender and pulse until they form a fine powder. You’ll know it’s ready when it looks like coarse flour. This is what gives our cookies their lovely, hearty texture.
Step 3: Combine the Dry Ingredients. In a large mixing bowl, whisk together your freshly made oat flour, almond flour, coconut flour, baking soda, and salt. Whisk it really well to ensure the baking soda is evenly distributed—this is key for a little lift and a perfect texture. You’ll notice the mixture is light and airy.
Step 4: Mix the Wet Ingredients. In a separate, medium bowl, whisk together the slightly cooled, melted coconut oil, maple syrup, room temperature egg, and vanilla extract. Whisk until it’s completely smooth and emulsified; it should look glossy and uniform.
Step 5: Bring the Dough Together. Pour the wet ingredients into the dry ingredients. Use a spatula or a wooden spoon to mix until a soft, slightly sticky dough forms. It might seem a bit dry at first, but keep mixing—it will come together. The trick is not to overmix; just stir until no dry spots remain.
Step 6: Form the Cookies. Scoop the dough using a tablespoon or a small cookie scoop. Roll each portion into a smooth ball between your palms. Place the balls on the prepared baking sheet, spacing them about 2 inches apart. Now, for the fun part: use your thumb or the back of a small teaspoon to press a deep, clear indentation into the center of each dough ball.
Step 7: Fill and Bake. Once your chia jam is completely cool, spoon about a teaspoonful into each thumbprint. Don’t be shy—fill them right up! Bake for 12-14 minutes, or until the edges of the cookies are just starting to turn a light golden brown. The centers will still look soft, and that’s perfect.
Step 8: Cool Completely. This is the most important step for the perfect texture! Let the cookies cool on the baking sheet for at least 10 minutes before you even think about moving them. They are very fragile when hot. Then, transfer them to a wire rack to cool completely. The jam will set, and the cookies will firm up beautifully.
Serving Suggestions
Complementary Dishes
- A simple fruit platter — The fresh, bright acidity of sliced oranges, apples, or grapes provides a lovely, clean contrast to the sweet, rich cookies, making the whole spread feel balanced and elegant.
- A sharp cheese board — Serve these cookies alongside a selection of aged cheddar, manchego, and a creamy goat cheese. The sweet and savory combination is unexpectedly fantastic and perfect for a gathering.
Drinks
- Hot Earl Grey tea — The bergamot in the tea cuts through the sweetness of the jam and complements the nutty cookie base beautifully, creating a truly classic and comforting pairing.
- A glass of cold almond milk — For a truly wholesome snack, a glass of creamy, unsweetened almond milk is the perfect partner, highlighting the almond flour in the cookies.
Something Sweet
- Dark chocolate-dipped strawberries — If you’re going all out, these continue the berry theme in a more decadent way, offering a rich, chocolatey finish that doesn’t overpower the delicate cookies.
- A small scoop of vanilla bean coconut ice cream — For an incredible dessert, place a warm cookie (gently reheated) next to a scoop of cool, creamy ice cream. The contrast in temperatures and textures is pure bliss.
Top Mistakes to Avoid
- Mistake: Using warm jam. I’ve messed this up before too, in a hurry. Warm jam will seep into the dough, making it greasy and preventing the cookie from holding its shape. It’s worth the wait for it to cool completely—I promise!
- Mistake: Not making a deep enough thumbprint. Be assertive! Press your thumb in deep enough that you create a good-sized well for the jam. If the indentation is too shallow, the jam can bubble over the sides during baking.
- Mistake: Overbaking the cookies. You want the edges to be just golden, but the centers should still look a little soft and underdone when you take them out. They continue to cook on the hot baking sheet. Overbaking will make them dry and crumbly.
- Mistake: Moving the cookies too soon. These cookies are delicate straight out of the oven. If you try to move them immediately, they’ll likely fall apart. Let them set on the pan—it’s like a little power nap that makes them strong enough to handle.
Expert Tips
- Tip: Make the jam a day ahead. This is my favorite pro-hack. Whip up the chia jam the night before and let it chill in the fridge. Not only does it save time, but the flavor deepens and it sets up perfectly, making the cookie assembly a breeze.
- Tip: Wet your thumb or spoon. If you find the dough is sticking to your thumb when making the indentations, lightly dip your thumb or the back of the spoon in a little water. This prevents sticking and gives you a perfectly clean well every time.
- Tip: Customize your jam! This recipe is a canvas. Use all strawberries for a classic flavor, or try peaches with a hint of cinnamon in the fall. The chia jam method works with almost any soft fruit, so get creative.
- Tip: For extra crunch, toast your oats. Before turning them into flour, spread the rolled oats on a baking sheet and toast them in a 350°F oven for 5-7 minutes until fragrant. Let them cool completely before processing. This adds a wonderful, nutty depth to the cookie base.
FAQs
Can I make these cookies vegan?
Absolutely! The only non-vegan ingredient is the egg. For a great vegan substitute, you can use a “flax egg.” Simply mix 1 tablespoon of ground flaxseed with 3 tablespoons of water and let it sit for 5 minutes until it becomes gelatinous. Use this in place of the egg. The texture will be slightly more delicate, so be extra careful when cooling.
How should I store these cookies, and how long do they last?
Store these cookies in an airtight container at room temperature for up to 3 days. If you need to keep them longer, I recommend storing them in the fridge for up to a week, as the fresh jam has no preservatives. The coconut oil in the dough can make them firm when cold, so let them come to room temperature for the best texture before serving.
My dough is too crumbly and won’t hold together. What did I do wrong?
This usually happens if the coconut oil was too cool and started to solidify, or if the flours were packed into the measuring cup. The fix is easy! Just use your clean hands to knead the dough gently for a few seconds. The warmth from your hands will soften the oil and help the dough bind. If it’s still too dry, add a teaspoon of cold water at a time until it comes together.
Can I use store-bought jam instead?
You can, of course, for a shortcut. But honestly, the homemade chia jam is such a star of this recipe—it’s less sweet and has a fresher flavor. If you do use store-bought, opt for a high-quality, low-sugar variety to mimic the vibe of the homemade version. And make sure it’s a thick jam, not a runny jelly.
Can I freeze these cookies?
Yes, they freeze beautifully! Make sure the cookies are completely cooled. Place them in a single layer on a baking sheet to freeze solid first (this is called “flash freezing”), then transfer them to a freezer-safe bag or container. They’ll keep for up to 3 months. Thaw at room temperature when you’re ready for a treat.
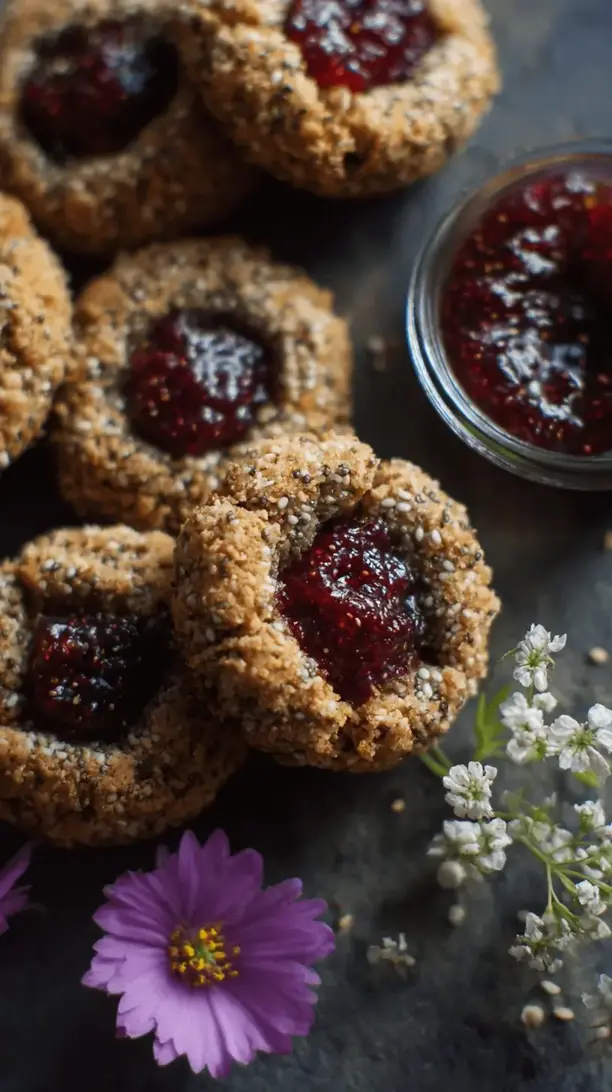
Chia Jam Thumbprint Cookies
Whip up these wholesome Chia Jam Thumbprint Cookies! A fun, easy recipe with a healthy homemade jam & a buttery, gluten-free oat cookie base. Perfect for a cozy baking project.
Ingredients
Ingredients
-
300 g fresh or frozen mixed berries (like strawberries, raspberries, blueberries)
-
2 tbsp pure maple syrup or honey
-
1.5 tbsp chia seeds
-
1 tsp fresh lemon juice
-
120 g rolled oats (gluten-free if needed)
-
150 g almond flour
-
60 g coconut flour
-
0.5 tsp baking soda
-
0.25 tsp fine sea salt
-
80 g coconut oil (melted and slightly cooled)
-
80 g pure maple syrup
-
1 large egg (at room temperature)
-
1 tsp vanilla extract
Instructions
-
Make the Chia Jam. In a medium saucepan, combine your berries and maple syrup. Cook over medium heat for about 5-7 minutes, stirring occasionally, until the berries break down and release their juices. You can help them along by mashing them with a fork. Once it's nice and saucy, remove the pan from the heat and stir in the chia seeds and lemon juice. Let it sit for at least 15-20 minutes, stirring once or twice, until it thickens to a jam-like consistency. Then, transfer it to a bowl to cool completely.01
-
Prep the Oat Flour. While the jam is cooling, preheat your oven to 350°F (175°C) and line a baking sheet with parchment paper. Place the rolled oats in a food processor or high-speed blender and pulse until they form a fine powder. You'll know it's ready when it looks like coarse flour. This is what gives our cookies their lovely, hearty texture.02
-
Combine the Dry Ingredients. In a large mixing bowl, whisk together your freshly made oat flour, almond flour, coconut flour, baking soda, and salt. Whisk it really well to ensure the baking soda is evenly distributed—this is key for a little lift and a perfect texture. You'll notice the mixture is light and airy.03
-
Mix the Wet Ingredients. In a separate, medium bowl, whisk together the slightly cooled, melted coconut oil, maple syrup, room temperature egg, and vanilla extract. Whisk until it's completely smooth and emulsified; it should look glossy and uniform.04
-
Bring the Dough Together. Pour the wet ingredients into the dry ingredients. Use a spatula or a wooden spoon to mix until a soft, slightly sticky dough forms. It might seem a bit dry at first, but keep mixing—it will come together. The trick is not to overmix; just stir until no dry spots remain.05
-
Form the Cookies. Scoop the dough using a tablespoon or a small cookie scoop. Roll each portion into a smooth ball between your palms. Place the balls on the prepared baking sheet, spacing them about 2 inches apart. Now, for the fun part: use your thumb or the back of a small teaspoon to press a deep, clear indentation into the center of each dough ball.06
-
Fill and Bake. Once your chia jam is completely cool, spoon about a teaspoonful into each thumbprint. Don't be shy—fill them right up! Bake for 12-14 minutes, or until the edges of the cookies are just starting to turn a light golden brown. The centers will still look soft, and that's perfect.07
-
Cool Completely. This is the most important step for the perfect texture! Let the cookies cool on the baking sheet for at least 10 minutes before you even think about moving them. They are very fragile when hot. Then, transfer them to a wire rack to cool completely. The jam will set, and the cookies will firm up beautifully.08


