
Why You’ll Love This Banana Nut Healthy Bread
- It’s genuinely satisfying. Thanks to the whole wheat flour and walnuts, each slice has a lovely heft and texture that keeps you full and happy, without that sugary crash an hour later.
- It’s a brilliant way to reduce food waste. Those bananas turning brown and spotty on your counter? They’re not past their prime—they’re the secret to the deepest, sweetest banana flavor. This recipe turns kitchen casualties into a triumph.
- The flavor is deep and complex. By using maple syrup and a touch of cinnamon, we get a warmth and richness that’s far more interesting than a one-note sugary blast. You’ll notice the layers with every bite.
- It’s incredibly versatile. Enjoy it warm from the oven, toasted with a smear of almond butter, or even frozen for a future craving. It’s a true kitchen staple that adapts to your day.
Ingredients & Tools
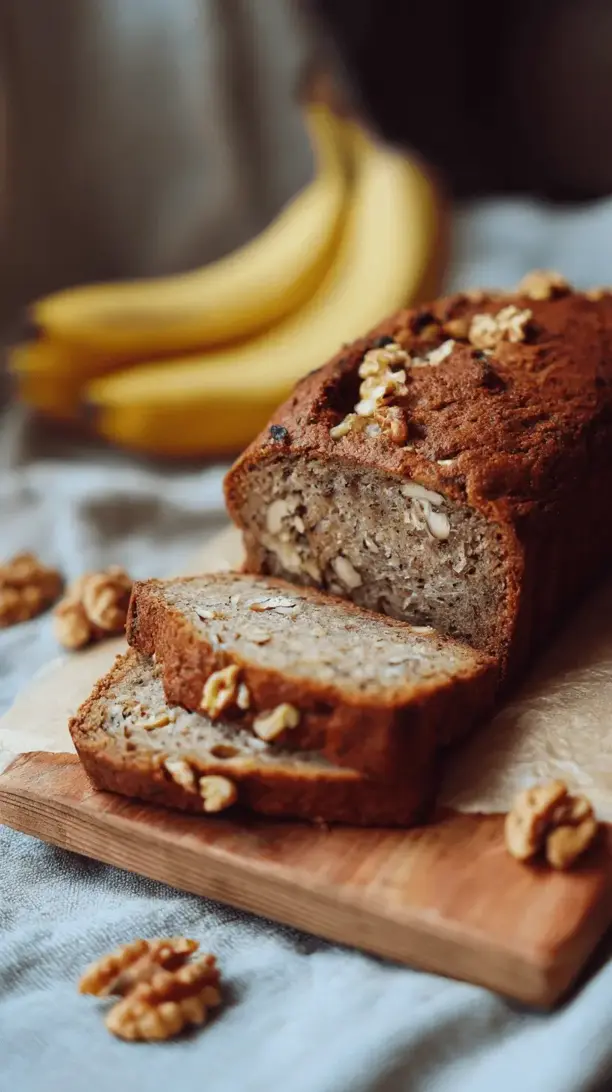
- 3 large, very ripe bananas (the blacker, the better!)
- ⅓ cup melted coconut oil or avocado oil
- ½ cup pure maple syrup (or honey)
- 2 large eggs, at room temperature
- 1 tsp pure vanilla extract
- 1 ¾ cups whole wheat pastry flour (or white whole wheat flour)
- 1 tsp baking soda
- ½ tsp fine sea salt
- 1 tsp ground cinnamon
- ¾ cup chopped walnuts, plus more for topping
Tools: 1 large mixing bowl, 1 medium bowl, a whisk or fork, a rubber spatula, and a standard 9×5-inch loaf pan.
Honestly, the quality of your bananas is the star here. The ripeness directly translates to sweetness, meaning we can use less added sugar. And don’t skip toasting the walnuts—it’s a tiny step that makes a world of difference, unlocking a nutty, almost buttery depth.
Serves: 10 | Prep Time: 15 minutes | Cook Time: 50-60 minutes | Total Time: about 1 hour 15 minutes
Before You Start: Tips & Ingredient Notes
- Banana Ripeness is Non-Negotiable. You want bananas that are heavily speckled or even mostly brown. They should mash easily and smell intensely sweet. This is your primary sweetener, so don’t rush it!
- Why Whole Wheat Pastry Flour? It has a lighter texture than regular whole wheat flour, giving you the nutritional benefits of whole grains without a dense, heavy result. All-purpose flour works, but the texture will be more cake-like.
- Toasting Nuts is a Game Changer. Just pop them in a dry skillet over medium heat for 3-5 minutes, shaking the pan, until they’re fragrant. It deepens their flavor immensely and prevents a raw, bitter taste.
- Don’t Overmix the Batter. This is the golden rule of quick breads. Once you add the dry ingredients, stir just until the flour disappears. A few lumps are perfectly fine! Overmixing leads to a tough, rubbery texture.
How to Make Banana Nut Healthy Bread
Step 1: Preheat and Prepare. Start by preheating your oven to 325°F (165°C). This slightly lower temperature helps the bread bake evenly without burning the top. Grease your 9×5-inch loaf pan lightly with oil or line it with parchment paper, leaving some overhang on the sides for easy removal later.
Step 2: Mash the Bananas. In your large mixing bowl, peel and add those very ripe bananas. Using a fork or a potato masher, mash them until they’re mostly smooth but with a few small lumps for texture. You should have about 1 ½ cups of mashed banana. The aroma at this stage is just a preview of the goodness to come.
Step 3: Combine the Wet Ingredients. To the mashed bananas, add the melted (and slightly cooled) coconut oil, maple syrup, eggs, and vanilla extract. Whisk everything together until it’s well combined and looks relatively smooth. You’ll notice the mixture is quite liquid, which is exactly what we want.
Step 4: Whisk the Dry Ingredients. In your medium bowl, add the whole wheat pastry flour, baking soda, salt, and cinnamon. Give this a good whisk for about 30 seconds. This not only combines them but also aerates the flour a little, contributing to a lighter crumb.
Step 5: The Big Combine. Now, pour the dry ingredients into the wet ingredients. Take your rubber spatula and gently fold them together. Use a sweeping motion, going around the bowl and through the center, just until you no longer see streaks of flour. It’s crucial to stop mixing here—a few lumps are your friend!
Step 6: Fold in the Walnuts. Add your toasted, chopped walnuts to the batter. Gently fold them in until they’re evenly distributed. This is the final mix, so be gentle.
Step 7: Pour and Top. Pour the batter into your prepared loaf pan. Use the spatula to spread it evenly into the corners. For a beautiful, bakery-style finish, sprinkle a handful of additional chopped walnuts over the top and press them down lightly.
Step 8: Bake to Perfection. Place the loaf pan in the preheated oven and bake for 50 to 60 minutes. The trick is to look for a golden-brown top that’s firm to the touch. The real test? A toothpick or skewer inserted into the very center of the loaf should come out clean, maybe with a few moist crumbs attached, but no wet batter.
Step 9: Cool Completely. This is the hardest part—waiting! Let the bread cool in the pan on a wire rack for at least 30 minutes. Then, using the parchment paper overhang or a knife around the edges, carefully lift it out of the pan and let it cool completely on the rack. This waiting period allows the structure to set, making it much easier to slice neatly.
Serving Suggestions
Complementary Dishes
- A dollop of Greek yogurt — The tangy creaminess cuts through the sweetness and adds a protein boost, making it a perfectly balanced breakfast.
- A sharp cheddar cheese slice — Don’t knock it ‘til you try it! The salty, savory cheese creates an incredible contrast with the sweet, spiced bread.
- A simple side of fresh berries — Their bright acidity and juiciness lighten up each bite, especially if you’re enjoying the bread for an afternoon snack.
Drinks
- A hot cup of black coffee — The bitterness of the coffee is a classic partner, highlighting the warm spices and nutty flavors in the bread.
- A glass of cold milk or almond milk — It’s a nostalgic combo that just works, especially when the bread is still slightly warm.
- A spicy chai latte — The cardamom, ginger, and cloves in chai harmonize beautifully with the cinnamon in the bread for a truly cozy experience.
Something Sweet
- A drizzle of almond butter — Warming the almond butter slightly makes it pourable, and its rich, roasted flavor takes the bread to dessert-level decadence.
- A scoop of vanilla bean frozen yogurt — For a real treat, serve a warm slice à la mode. The melting fro-yo seeping into the warm bread is pure bliss.
- A simple berry compote — Just simmer some frozen berries with a touch of maple syrup until they break down into a saucy consistency. It’s vibrant and fresh.
Top Mistakes to Avoid
- Mistake: Using under-ripe bananas. Yellow bananas simply don’t have the same concentration of sugar or flavor. Your bread will taste bland and be less sweet, tempting you to add more sweetener and throwing off the balance.
Mistake: Overmixing the batter. I’ve messed this up before too, and it’s the fastest way to a tough, dense loaf. Gluten develops when you overwork the flour, and we want a tender crumb, not a chewy one. Fold, don’t beat! - Mistake: Not letting it cool completely. I know, the wait is agony. But slicing into a warm loaf causes it to crumble and gush steam. The structure needs time to set as it cools, resulting in those perfect, neat slices.
- Mistake: Skipping the parchment paper. Even with a well-greased pan, this bread is moist and can stick. The parchment paper sling is your insurance policy for a flawless, stress-free release.
Expert Tips
- Tip: Freeze ripe bananas for later. If your bananas are ripening faster than you can use them, just peel them, break them into chunks, and freeze in a bag. Thaw them when you’re ready to bake—they’ll be extra soft and watery, which is perfect for mashing.
- Tip: Add a secret ingredient for moisture. For an even more incredibly moist crumb that stays that way for days, stir in ½ cup of unsweetened applesauce along with the wet ingredients. You won’t taste it, but you’ll feel the difference.
- Tip: Test for doneness in multiple spots. Sometimes the very center is the last place to cook. If your toothpick comes out with wet batter, but the edges look done, tent the loaf with foil and bake for another 5-10 minutes to prevent the top from burning.
- Tip: Toast your slices. If you have any left after a day or two, toasting a slice brings back that warm, fresh-from-the-oven feeling and revives the crunchy nut topping beautifully.
FAQs
Can I make this recipe vegan?
Absolutely! The easiest swap is for the eggs. Use a “flax egg”: mix 1 tablespoon of ground flaxseed with 2.5 tablespoons of water for each egg needed. Let it sit for 5 minutes until it becomes gelatinous. For this recipe, you’d need two. Just be aware the texture might be slightly denser, but still delicious. Also, ensure your maple syrup is used instead of honey to keep it fully plant-based.
Can I use a different type of nut?
Of course! Walnuts are classic, but pecans would be a wonderful, buttery substitute. Almonds (sliced or slivered) would add a nice crunch. If you have a nut allergy, sunflower seeds or pumpkin seeds are fantastic options. Just make sure to toast them first for the best flavor, no matter what you choose.
How should I store the banana bread, and how long will it last?
Once completely cool, wrap the loaf tightly in plastic wrap or store it in an airtight container at room temperature. It will be at its best for about 2-3 days. For longer storage, slice it and freeze the slices individually wrapped. Then you can pop a slice straight into the toaster whenever a craving strikes!
My bread is browning too quickly on top. What should I do?
This is a common issue! If the top is getting dark brown but the inside is still uncooked (you can tell if the loaf seems to be jiggly), simply tent a piece of aluminum foil loosely over the top for the remainder of the baking time. This will shield it from direct heat and allow the center to catch up without burning the top.
Can I add chocolate chips to this healthy version?
You sure can—it’s your kitchen! I’d recommend using dark chocolate chips (70% cacao or higher) for a less sugary addition. Fold in about ½ to ¾ cup along with the walnuts. The bitter notes of the dark chocolate pair wonderfully with the sweet bananas and create a more sophisticated flavor profile.
Banana Nut Healthy Bread
My wholesome banana nut bread recipe! Made with whole wheat flour, maple syrup & toasted walnuts. It's moist, satisfying & the perfect healthy twist on a classic. Easy to make!
Ingredients
Ingredients
-
3 large, very ripe bananas (the blacker, the better!)
-
⅓ cup melted coconut oil or avocado oil
-
½ cup pure maple syrup (or honey)
-
2 large eggs (at room temperature)
-
1 tsp pure vanilla extract
-
1 ¾ cups whole wheat pastry flour (or white whole wheat flour)
-
1 tsp baking soda
-
½ tsp fine sea salt
-
1 tsp ground cinnamon
-
¾ cup chopped walnuts (plus more for topping)
Instructions
-
Preheat and Prepare. Start by preheating your oven to 325°F (165°C). This slightly lower temperature helps the bread bake evenly without burning the top. Grease your 9x5-inch loaf pan lightly with oil or line it with parchment paper, leaving some overhang on the sides for easy removal later.01
-
Mash the Bananas. In your large mixing bowl, peel and add those very ripe bananas. Using a fork or a potato masher, mash them until they're mostly smooth but with a few small lumps for texture. You should have about 1 ½ cups of mashed banana. The aroma at this stage is just a preview of the goodness to come.02
-
Combine the Wet Ingredients. To the mashed bananas, add the melted (and slightly cooled) coconut oil, maple syrup, eggs, and vanilla extract. Whisk everything together until it's well combined and looks relatively smooth. You'll notice the mixture is quite liquid, which is exactly what we want.03
-
Whisk the Dry Ingredients. In your medium bowl, add the whole wheat pastry flour, baking soda, salt, and cinnamon. Give this a good whisk for about 30 seconds. This not only combines them but also aerates the flour a little, contributing to a lighter crumb.04
-
The Big Combine. Now, pour the dry ingredients into the wet ingredients. Take your rubber spatula and gently fold them together. Use a sweeping motion, going around the bowl and through the center, just until you no longer see streaks of flour. It's crucial to stop mixing here—a few lumps are your friend!05
-
Fold in the Walnuts. Add your toasted, chopped walnuts to the batter. Gently fold them in until they're evenly distributed. This is the final mix, so be gentle.06
-
Pour and Top. Pour the batter into your prepared loaf pan. Use the spatula to spread it evenly into the corners. For a beautiful, bakery-style finish, sprinkle a handful of additional chopped walnuts over the top and press them down lightly.07
-
Bake to Perfection. Place the loaf pan in the preheated oven and bake for 50 to 60 minutes. The trick is to look for a golden-brown top that's firm to the touch. The real test? A toothpick or skewer inserted into the very center of the loaf should come out clean, maybe with a few moist crumbs attached, but no wet batter.08
-
Cool Completely. This is the hardest part—waiting! Let the bread cool in the pan on a wire rack for at least 30 minutes. Then, using the parchment paper overhang or a knife around the edges, carefully lift it out of the pan and let it cool completely on the rack. This waiting period allows the structure to set, making it much easier to slice neatly.09


